Mission: to live in a world where you can learn university-level mathematics, physics, chemistry, biology and engineering from perfect free open source books that anyone can write to get famous.
Ultimate goal: destroy the currently grossly inefficient education system and replace it with a much more inspiring system where people learn what they want as fast as possible to reach their goals faster without so much useless pain.
How to get there: create a website (live at OurBigBook.com) that incentivizes learners (notably university students taking courses) to write freely licensed university-level natural science books in their own words for free. Their motivation for doing that are:
getting their knowledge globally recognized and thus better jobs
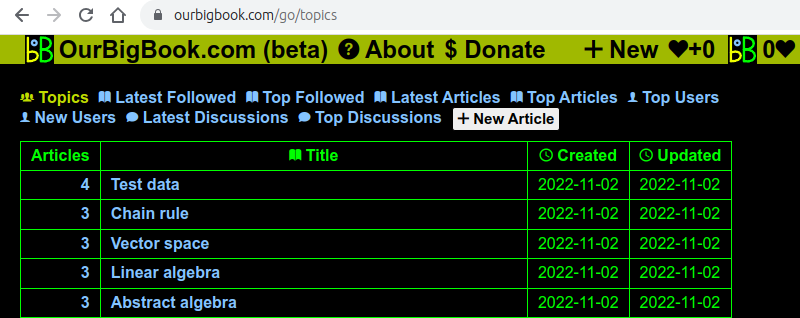
topics: groups the articles of different users about the same topic, sorted by upvote to achieve mind melding/collective intelligence. This makes your articles easier for others to find.
as HTML files to a static website: you can host yourself for free on many external providers like GitHub Pages, and remain in full control
This way you can be sure that even if OurBigBook.com were to go down one day (which we have no plans to as it is quite cheap to host!), your content will still be perfectly readable as a static site.
infinitely deep table of contents: never again be limited to only 6 levels of HTML h6 legacy limitations! With OurBigBook, the sky is the limit!
Furthermore, with our dynamic article tree of OurBigBook Web, every header can be the toplevel header for better SEO and user experience e.g. both the following pages show all their ancestors:
Every single section has a clear and sane discussion area, where you can easily ask the author for clarifications and corrections, and where other readers can find answers to their problems in older existing discussions.
. Source. You can create OurBigBook articles that talk about specific files such as images or source code. Such articles appear inside the global table of contents like other articles,. A preview of the file is automatically shown in the article when possible. Directory listings are also automatically generated to allow readers to navigate through all your files.
cirosantilli.com: showcase static demo document with interesting content, published with OurBigBook CLI. Primary inspiration for OurBigBook development.
All donated money currently just goes directly to Ciro Santilli's personal bank account, the project founder and current lead. If things ever take off we will set up a legal entity to make things cleaner. One may dream. But for now, it would just add unnecessary overhead. Related: Section "Project governance".
Ciro announces funding milestones and transparently accounts for all donations at: cirosantilli.com/sponsor. When milestones are reached, he quits his day job and works full time on the project for a given amount of time.
We are also happy to discuss paid contracts to implement specific features, to get in touch see: contact.
The following sections cover different ways to use tools from the OurBigBook:
OurBigBook Web user manual: manual for OurBigBook Web, the dynamic website. With this approach, you can write content on the browser without downloading anything, and save it on our database.
OurBigBook is a bit like a Wikipedia where each person can have their own version of every article.
This addresses the main shortcomings of Wikipedia:
contributors are not clearly recognized for their contributions. Clearly knowing who wrote what, and having upvotes and reputation is an essential motivation mechanism for free knowledge contributors.
what you write can be deleted at any time, for two major reasons:
excessive notability guidelines
the requirement for "encyclopedic tone", which precludes in theory tutorials
If you spend four hours writing a tutorial for a website and it gets deleted without comment, you are never ever going to write everything for that website again.
In OurBigBook, you can write about whatever you want, and no one can delete it.
inconsistent page granularity: it is somewhat random if an article deserves to be a toplevel page, or only a subheader. With OurBigBook, every header is a toplevel page with the dynamic article tree feature.
they give clear recognition to users' contributions
they make it much less likely that your content will be deleted by others (though it can still happen sometimes)
The limitation of Stack Exchange is that you cannot write a book on it, and anything judged to be "too general" will be closed or deleted. In other words, it can only contain the smallest units of knowledge, and lacks a table of content mechanism to group knowledge together more broadly.
Therefore, while it basically perfectly solves "shallower subjects" such as computer programming, it is insufficient for "deeper" subjects with longer dependency chains of knowledge such as mathematics and physics.
To a large extent, the goal of OurBigBook is to combine the strengths of Stack Exchange with those of Wikipedia.
OurBigBook is quite similar to the now defunct Knol, a Google project that basically made a Wiki where each person can have their own version of each article.
Knol ran from 2008 until its shutdown in 2012, and failed to attract enough attention that Google would keep it running.
It is our belief however that the website had great promise and potential value, and simply would generate profits too small to compare with other Google projects.
Knol also lacks a mechanism to store your notes locally, which we believe is essential if you want to get people to use as a system for people to dump large chunks into.
The main distinguishing feature of OurBigBook from other scientific publishing methods is mind-melding via topics.
It is perfectly possible to use OurBigBook without ever targeting mind meld, and we want to make that use case as awesome as we can.
There are many methods for people to publish their scientific knowledge online, each with their own strengths and weaknesses, but we believe that mind-melding is essential for a project to be able to truly take off.
OurBigBook seeks to pick the best of each of those methods, while also adding the mild-melding aspect on top, which we believe to be so transformative.
--embed-includes single file output from multiple input files. Includes are parsed smartly, not just source copy pasted, e.g. included headers are shifted from h1 to h2 correctly.
On the previous sample filesystem, it would produce a single output file index.html which would contain a header structure like:
= My website

== h2

=== Not index

==== Not index h2
supports both local serverless rendering to HTML files for local viewing, and server oriented rendering such as GitHub pages, e.g. internal links automatically get .html extension and or not. E.g.:
locally, a link \x[not-index] would render as <a href="not-index.html"> and not-index.bigb produces not-index.html
when publishing, \x[not-index] would render as <a href="not-index"> and not-index.bigb also produces not-index.html, which the server converts to just http://my-website.com/not-index
cross file configuration files to factor out common page parts like headers, footers and other metadata, e.g.:
the table of contents for index.html also contains the headers for not-index.bigb producing:
My website
h2
Not index
Not index h2
This means that you can split large splitDefault input files if rendering starts to slow you down, and things will still render exactly the same.
check that local files and images linked to actually exist: \aexternal argument. E.g.:
\a[i-don-exist.txt]
would lead to a build error.
associate headers to files or directories with the \Hfile argument e.g.:
Here's an example of a nice image: \x[path/to/my/image.png]{file}.

= path/to/my/image.png
{file}

This image was taken when I was on vacation!
would automatically add a preview of the image on the output. Display files and their metadata nicely directly on your static website rather than relying exclusively on GitHub as a file browser.
= Furry animal

I like \x[furry-animal]{p}, especially my cat, here is his photo: \x[image-my-cat].

== Cat

\Image[My_cat.jpg]
{title=My cat}
scopes either with directories or with within a single file:
See the important conclusion of my experiment: \x[report-of-my-experiment/conclusion]

= Report of my experiment
{scope}

== Introduction

== Middle

== Conclusion
My favorite fruits are \x[apple-fruit]{p}!

My favorite least favorite brand is is \x[apple-company]! \x[apple] computers are too expensive.

== Apple
{disambiguate=fruit}

== Apple
{c}
{disambiguate=company}

= Apple
{c}
{synonym}
OurBigBook tries to deal with media such as images and video intelligently for you, e.g.: Section "Where to store images". E.g. you can keep media in a separate media repository, my-media-repository, and then by configuring on ourbigbook.json:
OurBigBook is designed entirely to allow writing complex professional HTML and PDF scientific books, blogs, articles and encyclopedias.
OurBigBook aims to be the ultimate LaTeX "killer", allowing books to be finally published as either HTML or PDF painlessly (LaTeX being only a backend to PDF generation).
It aims to be more powerful and saner and than Markdown and Asciidoctor.
And so this "degraded" slightly into a language slightly saner than Asciidoctor but with an amazing Node.js implementation that makes it better for book writing and website publishing.
Notably, we hope that our escaping will be a bit saner backslash escapes everything instead of Asciidoctor's "different escapes for every case" approach: github.com/asciidoctor/asciidoctor/issues/901
But hopefully, having starting from a saner point will still produce a saner end result, e.g. there are explicit constructs for every shorthand one.
It is intended that this will be an acceptable downside as OurBigBook will be used primarily large complex content such as books rather than forum posts, and will therefore primarily written either:
in text editors locally, where users have more features than in random browser textareas
We would like to have only square brackets for both optional and mandatory to have even less magic characters, but that would make the language difficult to parse for computer and humans. LaTeX was right for once!
This produces a very regular syntax that is easy to learn, including doing:
arbitrary nesting of elements
adding arbitrary properties to elements
This sanity also makes the end tail learning curve of the endless edge cases found in Markdown and Asciidoctor disappear.
The language is designed to be philosophically isomorphic to HTML to:
further reduce the learning curve
ensure that most of HTML constructs can be reached, including arbitrary nesting
More precisely:
macro names map to tag names, e.g.: \\a to <a
one of the arguments of macros, maps to the content of the HTML element, and the others map to attributes.
E.g., in a link:
\a[http://example.com][Link text\]
the first macro argument:
http://example.com
maps to the href of <a, and the second macro argument:
The high sanity of OurBigBook, also makes creating new macro extensions extremely easy and intuitive.
All built-in language features use the exact same API as new extensions, which ensures that the extension API is sane forever.
Markdown is clearly missing many key features such as block attributes and internal links, and has no standardized extension mechanism.
The "more powerful than Asciidoctor" part is only partially true, since Asciidoctor is very featureful can do basically anything through extensions.
The difference is mostly that OurBigBook is completely and entirely focused on making amazing scientific books, and so will have key features for that application out-of-the box, notably:
amazing header/ToC/ID features including proper error reports: never have a internal broken link or duplicate ID again
and we feel that some of those features have required specialized code that could not be easily implemented as a standalone macro.
Another advantage over Asciidoctor is that the reference implementation of OurBigBook is in JavaScript, and can therefore be used on browser live preview out of the box. Asciidoctor does Transpile to JS with Opal, but who wants to deal with that layer of complexity?
Static wiki generators: this is perhaps the best way of classifying this project :-)
github.com/gollum/gollum: already has a local server editor! But no WYSIWYG nor live preview. Git integration by default, so when you save on the UI already generates a Git commit. We could achieve that with: github.com/isomorphic-git/isomorphic-git, would be really nice. Does not appear to have built-in static generation:
typst: github.com/typst/typst An attempt at a LaTeX killer. Has its own typesetting engine, does not simply transpile to LaTeX. Meant to be faster and simpler to write. No HTML output as of writing: github.com/typst/typst/issues/721
Less related but of interest, similar philosophy to what Ciro wants, but no explicitly reusable system:
Ciro Santilli developed OurBigBook to perfectly satisfy his writing style, which is basically "create one humongous document where you document everything you know about a subject so everyone can understand it, and just keep adding to it".
cirosantilli.com is the first major document that he has created in OurBigBook.
He decided to finally create this new system after having repeatedly facing limitations of Asciidoctor which were ignored/wontfixed upstream, because Ciro's writing style is not as common/targeted by Asciidoctor.
Following large documents Ciro worked extensively on:
the need for -S, --split-headers to avoid one too large HTML output that will never get indexed properly by search engines, and takes a few seconds to load on any browser, which is unacceptable user experience
As shown at <image Cute chicken chick>, chicks are cute.

\Image[https://upload.wikimedia.org/wikipedia/commons/thumb/c/c9/H%C3%BChnerk%C3%BCken_02.jpg/800px-H%C3%BChnerk%C3%BCken_02.jpg?20200716091201]
{title=Cute chicken chick}

\Video[https://www.youtube.com/watch?v=j_fl4xoGTKU]
{title=Top Down 2D Continuous Game by Ciro Santilli (2018)}
Images can take a bunch of options, about which you can read more about at image arguments. Most should be self explanatory, here is an image with a bunch of useful arguments:
\Image[https://upload.wikimedia.org/wikipedia/commons/thumb/c/c9/H%C3%BChnerk%C3%BCken_02.jpg/800px-H%C3%BChnerk%C3%BCken_02.jpg?20200716091201]
{title=Ultra cute chicken chick}
{description=
The chicken is yellow, and the hand is brown.

The background is green.
}
{border}
{height=400}
{source=https://commons.wikimedia.org/wiki/File:H%C3%BChnerk%C3%BCken_02.jpg}
Note that the prefixes http:// and https:// are automatically removed from the displayed link, since they are so common that they woudly simply add noise.
Equivalent sane version:
The website \a[http://example.com] is cool.

\Q[\a[http://example.com/2]]
Trump said this and that.https://en.wikipedia.org/wiki/Donald_Trump_Access_Hollywood_tape#Trump's_responses{ref}https://web.archive.org/web/20161007210105/https://www.donaldjtrump.com/press-releases/statement-from-donald-j.-trump{ref} Then he said that and this.https://en.wikipedia.org/wiki/Donald_Trump_Access_Hollywood_tape#Trump's_responses{ref}https://web.archive.org/web/20161007210105/https://www.donaldjtrump.com/press-releases/statement-from-donald-j.-trump{ref}
If it doesn't work, it should be easy to make it work, as we use relative links almost everywhere already. Likely there would only be some minor fixes to the --template arguments.
An external link is a link that points to a resource that is not present in the current OurBigBook project sources. A typical external link is something like:
Internal path links are links that point to files present inside the current project. For example, in computer programming tutorials we will often want to refer to source files in the current directory. So from our index.bigb, we could want to write something like:
Have a look at this amazing source file: \a[index.js].
which renders as:
Have a look at this amazing source file: index.js.
and here \a[ourbigbook] is a internal link. These should not to be confused with internal links, which may point not only to files, but to any ID, e.g. of headers inside a OurBigBook file.
OurBigBook considers a link external by default if it does not have a URL with protocol.
Therefore, the following links are external by default:
the correct relative path to the file is used when using nested scopes with -S, --split-headers. For example, if we have:
= h1

== h2
{scope}

=== h3

\a[index.js]
then in split header mode, h3 will be rendered to h2/h3.html.
Therefore, if we didn't do anything about it, the link to index.js would render as href="index.js" and thus point to h2/index.js instead of the correct index.js.
Instead, OurBigBook automatically converts it to the correct href="../index.js"
The _dir directory tree contains file listings of files in the _raw directory.
We originally wanted to place these listings under _raw itself, but this leads to unsolvable conflicts when there are files called index.html present vs the index.
If the file has a corresponding \Hfile argument section, and when using -S, --split-headers, then the content of the corresponding section are shown. Otherwise, only the file is shown.
The reason why a _raw prefix is needed it to avoid naming conflicts with OurBigBook outputs, e.g. suppose we had the files:
configure
configure.bigb
Then, in a server that omits the .html extension, if we didn't have _raw/ both configure.html and configure would be present under /configure. With _raw we instead get:
A URL with protocol is a URL that matches the regular expression ^[a-zA-Z]+://. The following are examples of URLs with protocol:
http://cirosantilli.com
https://cirosantilli.com
file:///etc/fstab
ftp://cirosantilli.com
The following aren't:
index.js
../index.js
path/to/index.js
/path/to/index.js
//example.com/path/to/index.js. This one is a bit tricky. Web browsers would consider this as a protocol-relative URL, which technically implies a protocol, although that protocol would be different depending how you are viewing the file, e.g. locally through file:// vs on a with website https://.
For simplicity's sake, we just consider it as a URL without protocol.
Note that the http://example.com inside \a[http://example.com] only works because we do some post-processing magic that prevents its expansion, otherwise the link would expand twice:
OurBigBook automatically encodes all link href for characters that are not recommended for URLs.
This way you can for example simply write arbitrary Unicode URLs and OurBigBook will escape them for you on the HTML output.
The only exception for this is the percent sign itself %, which it leaves untouched so that explicitly encoded URLs also work. So if you want a literal percent then you have to explicitly write it yourself as %25.
* acute a Á as raw Unicode: https://en.wikipedia.org/wiki/Á
* acute a Á explicitly escaped by user: https://en.wikipedia.org/wiki/%C3%81
There is basically just one application for line breaks: poetry, which would be too ugly with code blocks due to fixed width font:
Even as the sun with purple-coloured face
Had taken his last leave of the weeping morn,
Rose-cheeked Adonis tried him to the chase;
Hunting he loved, but love he laughed to scorn;
Sick-thoughted Venus makes amain unto him,
And like a bold-faced suitor begins to woo him.

"Thrice fairer than myself," thus she began,
The field's chief flower, sweet above compare,
Stain to all nymphs, more lovely than a man,
More white and red than doves or roses are;
Nature that made thee, with herself at strife,
Saith that the world hath ending with thy life.
which renders as:
Even as the sun with purple-coloured face Had taken his last leave of the weeping morn, Rose-cheeked Adonis tried him to the chase; Hunting he loved, but love he laughed to scorn; Sick-thoughted Venus makes amain unto him, And like a bold-faced suitor begins to woo him.
"Thrice fairer than myself," thus she began, The field's chief flower, sweet above compare, Stain to all nymphs, more lovely than a man, More white and red than doves or roses are; Nature that made thee, with herself at strife, Saith that the world hath ending with thy life.
Inline code (code that should appear in the middle of a paragraph rather than on its own line) is done with a single backtick (`) macro shorthand syntax:
My inline `x = 'hello\n'` is awesome.
which renders as:
My inline x = 'hello\n' is awesome.
and block code (code that should appear on their own line) is done with two or more backticks (``):
``
f() {
  return 'hello\n';
}
``
which renders as:
f() {
  return 'hello\n';
}
The sane version of inline code is a lower case c:
My inline \c[[x = 'hello\n']] is awesome.
which renders as:
My inline x = 'hello\n' is awesome.
and the sane version of block math is with an upper case C:
\C[[
f() {
  return 'hello\n';
}
]]
which renders as:
f() {
  return 'hello\n';
}
The capital vs lower case theme is also used in other elements, see: block vs inline macros.
If the content of the sane code block has many characters that you would need to escape, you will often want to use literal arguments, which work just like the do for any other argument. For example:
\C[[[
A paragraph.

\C[[
And now, some long, long code, with lots
of chars that you would need to escape:
\ [  ] {  }
]]

A paragraph.
]]]
which renders as:
A paragraph.

\C[[
And now, some long, long code, with lots
of chars that you would need to escape:
\ [  ] {  }
]]

A paragraph.
Note that the initial newline is skipped automatically in code blocks, just as for any other element, due to: argument leading newline removal, so you don't have to worry about it.
The distinction between inline \c and block \C code blocks is needed because in HTML, pre cannot go inside P.
We could have chosen to do some magic to differentiate between them, e.g. checking if the block is the only element in a paragraph, but we decided not to do that to keep the language saner.
See the: <code Python hello world>.

``
print("Hello wrold")
``
{title=Python hello world}
{description=Note thow this is super short unlike the C hello world!}
There is no limit to how many levels we can have, for either sane or shorthand headers!
HTML is randomly limited to h6, so OurBigBook just renders higher levels as an h6 with a data-level attribute to indicate the actual level for possible CSS styling:
<h6 data-level="7">My title</h6>
The recommended style is to use shorthand headers up to h6, and then move to sane one for higher levels though, otherwise it becomes very hard to count the = signs.
To avoid this, we considered making the shorthand syntax be instead:
= 1 My h1
= 2 My h2
= 3 My h3
but it just didn't feel as good, and is a bit harder to type than just smashing = n times for lower levels, which is the most common use case. So we just copied markdown.
The very first header of a document can be of any level, although we highly recommend your document to start with a \H[1], and to contain exactly just one \H[1], as this has implications such as:
When the OurBigBook input comes from a file (and not e.g. stdin), the default ID of the first header in the document is derived from the basename of the OurBigBook input source file rather than from its title.
The only exception to this is the home article, where the ID is empty.
For example, in file named my-file.bigb which contains:
= Awesome ourbigbook file
the ID of the header is my-file rather than awesome-ourbigbook-file. See also: automatic ID from title.
If the file is an index file other than the toplevel index file, then the basename of the parent directory is used instead, e.g. the toplevel ID of a file:
my-subdir/index.bigb
would be:
#my-subdir
rather than:
#index.bigb
For the toplevel index file however, the ID is just taken from the header itself as usual. This is done because you often can't general control the directory name of a project.
For example, a GitHub pages root directory must be named as <username>.github.io. And users may need to rename directories to avoid naming conflicts.
TODO: we kind of wanted this to be the ID of the toplevel header instead of the first header, but this would require an extra postprocessing pass (to determine if the first header is toplevel or not), which might affect performance, so we are not doing it right now.
This multiple argument marks given IDs as being children of the current page.
The effect is the same as adding the \xchild argument argument to an under the header. Notably, such marked target IDs will show up on the autogenerated tagged metadata section.
This argument is deprecated in favor of the \Htag argument.
Example:
= Animal

== Mammal

=== Bat

=== Cat

== Wasp

== Flying animal
{child=bat}
{child=wasp}

\x[bat]

\x[wasp]
renders exactly as:
= Animal

== Mammal

=== Bat

=== Cat

== Wasp

== Flying animal

\x[bat]{child}

\x[wasp]{child}
The header child syntax is generally preferred because at some point while editing the content of the header, you might accidentally remove mentions to e.g. \x[bat]{child}, and then the relationship would be lost.
If empty, the URL of the file is extracted directly from the header. Otherwise, the given URL is used.
for example:
= path/to/myfile.c
{file}

An explanation of what this file is about.
renders a bit like:
= path/to/myfile.c
{id=_file/path/to/myfile.c}

An explanation of what this file is about.

\a[path/to/myfile.c]

``
// Contents of path/to/myfile.c
int main() {
  return 1;
}
``
_file/path/to/myfile.c: the metadata about that file. Note that locally the .html extension is added as in file/path/to/myfile.c.html which avoids the collision. But on a server deployment, the .html is not present, and there would be a conflict if we didn't add that file/ prefix.
a link to the is added automatically, since users won't be able to click it from the header, as clicking on the header will just link to the header itself
a preview is added. The type of preview is chosen as follows:
if the URL has an image extension, do an image preview
otherwise if the URL has a video extension, or is a YouTube URL, do a video preview
otherwise, don't show a preview, as we don't know anything sensible to show
In some cases however, especially when dealing with external URLs, we might want to have a more human readable title with a non empty file argument:
The video \x[tank-man-by-cnn-1989] is very useful.

= Tank Man by CNN (1989)
{c}
{file=https://www.youtube.com/watch?v=YeFzeNAHEhU}

An explanation of what this video is about.
which renders something like:
The video \x[tank-man-by-cnn-1989] is very useful.

= Tank Man by CNN (1989)
{id=_file/https://www.youtube.com/watch?v=YeFzeNAHEhU}

\Video[https://www.youtube.com/watch?v=YeFzeNAHEhU]

An explanation of what this video is about.
= myfile.txt
{file}

Description of my amazing file.
and it would be associated to the file:
path/to/myfile.txt
The content of the header = myfile.txt is arbitrary, as it can be fully inferred from the file path _file/path/to/myfile.txt.bigb. TODO add linting for it. Perhaps we should make adding a header be optional and auto-generate that header instead. But having at least an optional header is good as a way of being able to set header properties like tags.
This is because a {file} header is already fully specified by its position in the tree or the given URL, so it doesn't make much sense to add more to it.
This is a central source file that basically contains all the functionality of the OurBigBook Library, so basically the OurBigBook Markup-to-whatever (e.g. HTML) conversion code, including parsing and rendering.
Things that are not there are things that only use markup conversion, e.g.:
However, for documents with a very large number of sections, or deeply nested headers those numbers start to be more noise than anything else, especially in the table of contents and you are better off just referring to IDs. E.g. imagine:
1.3.1.4.5.1345.3.2.1. Some deep level
When documents reach this type of scope, you can disable numbering with the numbered option.
This option can be set on any header, and it is inherited by all descendants.
The option only affects descendants.
E.g., if in the above example turn numbering off at h2:
= Huge toplevel wiki
{numbered=0}

== h2

=== A specific tutorial
{numbered}
{scope}

==== h4

===== h5
then it renders something like:
= Huge toplevel wiki

Table of contents
* h2
  * A specific tutorial
    * 1. h4
      * 1.1.  h5

== h2

=== A specific tutorial

==== 1. h4

===== 1.1. h5
Note how in this case the number for h4 is just 1. rather than 1.1.1.. We only show numberings relative to the first non-numbered header, because the 1.1. wouldn't be very meaningful otherwise.
In addition to the basic way of specifying header levels with an explicit level number as mentioned at Section "Header", OurBigBook also supports a more indirect ID-based mechanism with the parent argument of the \H element.
We hightly recommend using parent for all but the most trivial documents.
For example, the following fixed level syntax:
= My h1

== My h2 1

== My h2 2

=== My h3 2 1
is equivalent to the following ID-based version:
= My h1

= My h2 1
{parent=my-h1}

= My h2 2
{parent=my-h1}

= My h3 2 1
{parent=my-h2-h}
The main advantages of this syntax are felt when you have a huge document with very large header depths. In that case:
it becomes easy to get levels wrong with so many large level numbers to deal with. It is much harder to get an ID wrong.
when you want to move headers around to improve organization, things are quite painful without a refactoring tool (which we intend to provide in the browser editor with preview), as you need to fix up the levels of every single header.
If you are using the ID-based syntax however, you only have to move the chunk of headers, and change the parent argument of a single top-level header being moved.
Note that when the parent= argument is given, the header level must be 1, otherwise OurBigBook assumes that something is weird and gives an error. E.g. the following gives an error:
= My h1

== My h2
{parent=my-h1}
because the second header has level 2 instead of the required = My h2.
When scopes are involved, the rules are the same as those of internal reference resolution, including the leading / to break out of the scope in case of conflicts.
Like the \Hchild argument, parent also performs ID target from title on the argument, allowing you to use the original spaces and capitalization in the target as in:
When mixing both \Hparent argument and scopes, things get a bit complicated, because when writing or parsing, we have to first determine the parent header before resolving scopes.
As a result, the follow simple rules are used:
start from the last header of the highest level
check if the {parent=XXX} is a suffix of its ID
if not, proceed to the next smaller level, and so on, until a suffix is found
Following those rules for example, a file tmp.bigb:
Arguably, the language would be even saner if we did:
\H[My h1][

Paragraph.

\H[My h2][]
]
rather than having explicit levels as in \H[1][My h1] and so on.
But we chose not to do it like most markups available because it leads to too many nesting levels, and hard to determine where you are without tooling.
Ciro later "invented" (?) \Hparent argument, which he feels reaches the perfect balance between the advantages of those two options.
In some use cases, the sections under a section describe inseparable parts of something.
For example, when documenting an experiment you executed, you will generally want an "Introduction", then a "Materials" section, and then a "Results" section for every experiment.
On their own, those sections don't make much sense: they are always referred to in the context of the given experiment.
The problem is then how to get unique IDs for those sections.
One solution, would be to manually add the experiment ID as prefix to every subsection, as in:
= Experiments

See: \x[full-and-unique-experiment-name/materials]

== Introduction

== Full and unique experiment name

=== Introduction
{id=full-and-unique-experiment-name/introduction}

See our awesome results: \x[full-and-unique-experiment-name/results]

For a more general introduction to all experiments, see: \x[introduction].

=== Materials
{id=full-and-unique-experiment-name/materials}

=== Results
{id=full-and-unique-experiment-name/results}
but this would be very tedious.
To keep those IDs shorter, OurBigBook provides the scopeboolean argument property of headers, which works analogously to C++ namespaces with the header IDs.
Using scope, the previous example could be written more succinctly as:
= Experiments

See: \x[full-and-unique-experiment-name/materials]

== Introduction

== Full and unique experiment name
{scope}

=== Introduction

See our awesome results: \x[results]

For a more general introduction to all experiments, see: \x[/introduction].

=== Materials

=== Results
Note how:
full IDs are automatically prefixed by the parent scopes prefixed and joined with a slash /
we can refer to other IDs withing the current scope without duplicating the scope. E.g. \x[results] in the example already refers to the ID full-and-unique-experiment-name/materials
to refer to an ID outside of the scope and avoid name conflicts with IDs inside of the current scope, we start a reference with a slash /
So in the example above, \x[/introduction] refers to the ID introduction, and not full-and-unique-experiment-name/introduction.
When nested scopes are involved, internal links resolution peels off the scopes one by one trying to find the closes match, e.g. the following works as expected:
= h1
{scope}

== h2
{scope}

=== h3
{scope}

\x[h2]
Here OurBigBook:
first tries to loop for an h1/h2/h3/h2, since h1/h2/h3 is the current scope, but that ID does not exist
so it removes the h3 from the current scope, and looks for h1/h2/h2, which is still not found
then it removes the h2, leading to h1/h2, and that one is found, and therefore is taken
the split header becomes the default, e.g. index.html is now the split one, and nosplit.html is the non-split one
the header it is given for, and all of its descendant headers will use the split header as the default internal cross target, unless the header is already rendered in the current page. This does not propagate across includes however.
For example, consider index.bigb:
= Toplevel
{splitDefault}

\x[h2][toplevel to h2]

\x[notindex][toplevel to notindex]

\Include[notindex]

== h2
and notindex.bigb:
= Notindex

\x[h2][notindex to h2]

\x[notindex][notindex to notindex h2]

== Notindex h2
Then the following links would be generated:
index.html: split version of index.bigb, i.e. does not contain h2
toplevel to h2: h2.html. Links to the split version of h2, since h2 is also affected by the splitDefault of its parent, and therefore links to it use the split version by default
toplevel to notindex: notindex.html. Links to non-split version of notindex.html since that header is not splitDefault, because splitDefault does not propagate across includes
nosplit.html non-split version of index.bigb, i.e. contains h2
toplevel to h2: #h2, because even though h2 is splitDefault, that header is already present in the current page, so it would be pointless to reload the split one
toplevel to notindex: notindex.html
h2.html split version of h2 from index.bigb
notindex.html: non-split version of notindex.bigb
notindex to h2: h2.html, because h2 is splitDefault
notindex to notindex h2: #notindex-h2
notindex-split.html: split version of notindex.bigb
notindex to h2: h2.html, because h2 is splitDefault
notindex to notindex h2: notindex.html#notindex-h2, because notindex-h2 is not splitDefault
The major application of this if you like work with a huge index.bigb containing thousands of random small topics.
Splitting those into separate source files would be quite laborious, as it would require duplicating IDs on the filename, and setting up includes.
However, after this index reaches a certain size, page loads start becoming annoyingly slow, even despite already loading large assets like images video videos only on hover or click: the annoying slowness comes from the loading of the HTML itself before the browser can jump to the ID.
And even worse: this index corresponds to the main index page of the website, which will make what a large number of users will see be that slowness.
Therefore, once this index reaches a certain size, you can add the splitDefault attribute to it, to make things smoother for readers.
And if you have a smaller, more self-contained, and highly valuable tutorial such as cirosantilli.com/x86-paging, you can just split that into a separate .bigb source file.
This way, any links into the smaller tutorial will show the entire page as generally desired.
And any links from the tutorial, back to the main massive index will link back to split versions, leading to fast loads.
Note that this huge index style is not recommended however. Ciro Santilli used to do it, but moved away from it. The currently recommended approach is to manually create not too large subtrees in each page. This way, readers can easily view several nearby sections without having to load a new page every time.
Therefore, without a custom suffix, the split header version of that header would go to docs.ourbigbook.com, which would collide with this documentation, that is present in a separate repository: github.com/ourbigbook/ourbigbook.
Therefore a splitSuffix property is used, making the split header version fall under /ourbigbook-split, and leaving the nicer /ourbigbook for the more important project toplevel.
If given on the the toplevel headers, which normally gets a suffix by default to differentiate from the non-split version, it replaces the default -split suffix with a custom one.
The synonymNoScope argument works like the \Hsynonym argument, except that it ignores any scopes of the synonym target and instead places it at toplevel.
This can be useful if you initially placed a header under a scope, but then decide that some of its descendants would also make sense outside of the scope.
For example consider:
= My dog blog

I know a lot about the <history of dog food>.

== Dog food
{scope}

=== History

= History of dog food
{synonymNoScope}
In this example, the ID of History of dog food is just history-of-dog-food, not dog-food/history-of-dog-food and therefore we can link to it simply with:
If a non-toplevel macro has the title argument is present but no explicit id argument is given, an Element ID is created automatically from the title, by applying the following transformations:
do a id output format conversion on the title to remove for example any HTML tags that would be present in the conversion output
convert all characters to lowercase. This uses JavaScript case conversion. Note that this does convert non-ASCII characters to lowercase, e.g. É to é.
This conversion type is similar to Automatic ID from title, but it is used in certain cases where we are targeting IDs rather than setting them, notably:
So here we see that Bat and Humming bird have their unique position in the tree under Mammal ane Bird. But we also wanted them to be somehow classified under Flying animal. Tags allow us to do that.
Unlike \Htitle2 argument, the synonym does not show up by default next to the title. This is because we sometimes want that, and sometimes not. To make the title appear, you can simply add an empty title2 argument to the synonym header as in:
Note how we added the synonym to the title only when it is not just a simple flexion variant, since Quantum computing (Quantum computer) would be kind of useless would be kind of useless.
Or in other words: the toplevel header of each source file gets {toplevel} set implicitly for it by default.
This design choice might change some day. Arguably, the most awesome setup is on in which source files and outputs are completely decoupled. OurBigBook Web also essentially wants this, as ideally we want to store one source per header there in each DB entry. We shall see.
Also note that Wikipedia subsections are not completely stable, so generally you would rather want to link to a permalink with a full URL as in:
= Artificial general intelligence
{wiki=https://en.wikipedia.org/w/index.php?title=Artificial_general_intelligence&oldid=1192191193#Tests_for_human-level_AGI}
Note that in this case escaping the # is not necessary because it is part of the shorthandlink that starts at https://.
To the left of table of content entries you can click on an open/close icon to toggle the visibility of different levels of the table of contents.
The main use case covered by the expansion algorithm is as follows:
the page starts with all nodes open to facilitate Ctrl + F queries
if you click on a node in that sate, you close all its children, to get a summarized overview of the contents
if you click one of those children, it opens only its own children, so you can interactively continue exploring the tree
The exact behaviour is:
the clicked node is open:
state 1 all children are closed. Action: open all children recursively, which puts us in state 2
state 2: not all children are closed. Action close all children, which puts us in state 1. This gives a good overview of the children, without any children of children getting in the way.
state 3: the clicked node is closed (not showing any children). Action: open it to show all direct children, but not further descendants (i.e. close those children). This puts us in state 1.
Note that those rules make it impossible to close a node by clicking on it, the only way to close a node os to click on its parent, the state transitions are:
3 -> 1
1 -> 2
2 -> 1
but we feel that it is worth it to do things like this to cover the main use case described above without having to add two buttons per entry.
Clicking on the link from a header up to the table of contents also automatically opens up the node for you in case it had been previously closed manually.
OurBigBook adds some header metadata to the toplevel header at the bottom of each page. This section describes this metadata.
Although the table of contents has a macro to specify its placement, it is also automatically placed at the bottom of the page, and could be considered a header metadata section.
Used to represent a thematic break between paragraph-level elements:
She pressed the button. Just like that, everything was over.

\Hr

The next morning was a gloomy one. Nobody said a word.
which renders as:
She pressed the button. Just like that, everything was over.
The next morning was a gloomy one. Nobody said a word.
This macro corresponds to a misfeature of HTML/Markdown, and is not encouraged. We instead recommend creating smaller more specific headers instead to split sections, as this has all the usual advantages of allowing metadata to be associated to the header, such as -S, --split-headers, topic, liked and discussions.
Have a look at this amazing image: \x[image-my-test-image].

\Image[Tank_man_standing_in_front_of_some_tanks.jpg]
{title=The title of my image}
{id=image-my-test-image}
{width=600}
{height=200}
{source=https://en.wikipedia.org/wiki/File:Tianasquare.jpg}
{description=The description of my image.}
title: analogous to the \Htitle argument. Shows up preeminently, and sets a default ID if one is not given. It is recommended that you don't add a period . to it, as that would show in internal links
OurBigBook can optionally deduce the title from the basename of the src argument if the titleFromSrcboolean argument is given, or if title-from-src is set as the default media provider for the media type:
Have a look at this amazing image: \x[image-tank-man-standing-in-front-of-some-tanks].

\Image[Tank_man_standing_in_front_of_some_tanks.jpg]
{titleFromSrc}
If the image does not have an ID nor title, then it gets an automatically generated ID, just like every other OurBigBook output HTML element, and it is possible for readers to link to that ID on the rendered version, e.g. as:
#_123
Note that the 123 is not linked to the Figure <number>., but just a sequential ID that runs over all elements.
This type of ID is of course not stable across document revisions however, since if an image is added before that one, the link will break. So give an ID or title for anything that you expect users to link to.
Also, it is not possible to link to such images with an internal link, like any other OurBigBook element with autogenerated temporary IDs.
Another issue to consider is that in paged output formats like PDF, the image could float away from the text that refers to the image, so you basically always want to refer to image by ID, and not just by saying "the following image".
We can also see that such an image does not increment the Figure count:
If the image has any visible metadata such as source or description however, then the caption does show and the Figure count gets incremented:
\Image[Tank_man_standing_in_front_of_some_tanks.jpg]{source=https://en.wikipedia.org/wiki/File:Tianasquare.jpg}
\Image[Tank_man_standing_in_front_of_some_tanks.jpg]{description=This is the description of my image.}
If you are making a limited repository that will not have a ton of images, then you can get away with simply git tracking your images in the main repository.
With this setup, no further action is needed. For example, with a file structure of:
However, if you are making a huge tutorial, which can have a huge undefined number of images (i.e. any scientific book), then you likely don't want to git track your images in the git repository.
but OurBigBook allows you use configurations that allow you to enter just the image basename: Fundamental_theorem_of_calculus_topic_page_arrow_to_full_article.png which we will cover next.
In order to get this to work, the recommended repository setup is:
The directory and repository names are not mandatory, but if you place media in data/media and name its repository by adding the *-media suffix, then ourbigbook will handle everything for you without any further configuration in media-providers.
This particular documentation repository does have a different setup as can be seen from its ourbigbook.json. Then, when everything is setup correctly, we can refer to images simply as:
In this example, we also needed to set {provider=github} explicitly since it was not set as the default image provider in our ourbigbook.json. In most projects however, all of your images will be in the default repository, so this won't be needed.
provider must not be given when a full URL is given because we automatically detect providers from URLs, e.g.:
TODO implement: ourbigbook will even automatically add and push used images in the my-tutorial-media repository for you during publishing!
You should then use the following rules inside my-tutorial-media:
give every file a very descriptive and unique name as a full English sentence
never ever delete any files, nor change their content, unless it is an improvement in format that does change the information contained of the image TODO link to nice Wikimedia Commons guideline page
This way, even though the repositories are not fully in sync, anyone who clones the latest version of the *-media directory will be able to view any version of the main repository.
Then, if one day the media repository ever blows up GitHub's limit, you can just migrate the images to another image server that allows arbitrary basenames, e.g. AWS, and just configure your project to use that new media base URL with the media-providers option.
The reason why images should be kept in a separate repository is that images are hundreds or thousands of times larger than hand written text.
This is likely the sanest approach possible, as it clearly specifies which media version matches which repository version through the submodule link.
Furthermore, it is possible to make the submodule clone completely optional by setting things up as follows. For your OurBigBook project yourname/myproject create a yourname/myproject-media with the media, and track it as a submodule under yourname/myproject/media.
Now, as mentioned at media-providers, everything will work beautifully:
ourbigbook . local conversion will use images from media/ if it exists, e.g.:
\Image[myimage.jpg]
will render media/myimage.jpg. So after cloning the submodule, you will be able to see the images on the rendered pages without an internet connection.
But if the submodule is not cloned, not problem, renders will detect that and automatically use GitHub images.
Then, when you do:
ourbigbook --publish
the following happen:
\Image[myimage.jpg] uses the GitHub URL
automatically push media/ to GitHub in case there were any updates
also, that directory is automatically gitignore, so it won't be pushed as part of the main render and thus duplicate things
OurBigBook likes Wikimedia Commons so much that we automatically parse the image URL and if it is from Wikimedia Commons, automatically deduce the source for you. So the above image renders the same without the source argument:
And like for non-Wikimedia images, you can automatically generate a title from the src by setting the titleFromSrcboolean argument or if title-from-src is set as the default media provider for the media type:
but you don't want to do that for the most commonly Wikimedia Commons used license of CC BY+, do you? :-)
Upsides of using Wikimedia Commons for your images:
makes it easier for other writers to find and reuse your images
automatically generates resized versions of the uploaded images into several common dimensions so you can pick the smallest one that fits your desired image height to reduce bandwidth usage
if you have so many images that they would blow even the size of a separate media repository, this will still work
Downsides:
forces you to use the Creative Commons license
requires the content to be educational in nature
uploading a bunch of images to Wikimedia Commons does feel a bit more laborious than it should because you have to write down so much repeated metadata for them
And as a result, many many many SVG online images that you might want to reuse just rely on white pages and don't add that background rectangle.
Therefore for now we just force white background on our default CSS of block images, which is what most SVGs will work with. Otherwise, you can lose the entire image to our default black background.
For inline images however, a white background would also be very distracting compared to the nearby inline text, and it would prevent the use case of making rounded smileys, so for now we are just not forcing the background color in that case.
At some point we might just add a color argument to set the background color to an arbitrary value so that authors can decide what is better for each image.
TODO implement: mechanism where you enter a textual description of the image inside the code body, and it then converts to an image, adds to the -media repo and pushes all automatically. Start with dot.
Adds a border around the image. This can be useful to make it clearer where images start and end when the image background color is the same as the background color of the OurBigBook document.
\Image[logo.svg]
{border}
{height=150}
{title=Logo of the OurBigBook Project with a border around it}
The description argument similar to the image title argument argument, but allows allowing longer explanations without them appearing in internal links to the image.
For example, consider:
See this image: \x[image-description-argument-test-1].

\Image[Tank_man_standing_in_front_of_some_tanks.jpg]
{title=Tank man standing in front of some tanks}
{id=image-description-argument-test-1}
{description=Note how the tanks are green.}
{source=https://en.wikipedia.org/wiki/File:Tianasquare.jpg}
In this example, the reference \x[image-description-argument-test-1] expands just to
Tank man standing in front of some tanks
and does not include the description, which only shows on the image.
The description can be as large as you like. If it gets really large however, you might want to consider moving the image to its own header to keep things slightly saner. This will be especially true after we eventually do: github.com/ourbigbook/ourbigbook/issues/180.
If the description contains any element that would take its own separate line, like multiple paragraphs or a list, we automatically add a line grouping the description with the corresponding image to make that clearer, otherwise it can be hard to know which title corresponds to a far away image. Example with multiple paragraphs:
Stuff before the image.

\Image[Tank_man_standing_in_front_of_some_tanks.jpg]
{title=Tank man standing in front of some tanks}
{id=image-description-argument-test-2}
{source=https://en.wikipedia.org/wiki/File:Tianasquare.jpg}
{description=Note how the tanks are green.

But the shirt is white.}

Stuff after the image description.
By default, we fix image heights to height=315, and let the width be calculated proportionally once the image loads. We therefore ignore the actual image size. This is done to:
prevent reflows as the page loads images and can determine their actual sizes, especially is the user opens the page at a given ID in the middle of the page
create a more uniform media experience by default, unless a custom image size is actually needed e.g. if the image needs to be larger
When the viewport is narrow enough, mobile CSS takes over and forces block images to fill 100% of the page width instead, removing the scrollbar.
Inline images on the other hand never get a horizontal scrollbar, they are just always capped at viewport width.
When the height argument is given, it changes that default height. Width is still just calculated proportionally to this new custom height.
Usage of this argument is generally discouraged, as we always set the default image height by default, so that also passing a width is either unnecessary or may lead to changes in the image's correct aspect ratio.
The \Include macro allows including an external OurBigBook headers under the current header.
It exists to allow optional single page HTML output while still retaining the ability to:
split up large input files into multiple files to make renders faster during document development
suggest an optional custom output split with one HTML output per OurBigBook input, in order to avoid extremely large HTML pages which could be slow to load
\Include takes one mandatory argument: the ID of the section to be included, much like internal links.
Headers of the included document are automatically shifted to match the level of the child of the level where they are being included.
If --embed-includes is given, the external document is rendered embedded into the current document directly, essentially as if the source had been copy pasted (except for small corrections such as the header offsets).
Otherwise, the following effects happen:
The headers of the included tree appear in the table of contents of the document as links to the corresponding external files.
This is implemented simply by reading a previously generated database file much like cross file internal link internals, which avoids the slowdown of parsing all included files every time.
As a result, you have to do an initial parse of all files in the project to extract their headers however, just as you would need to do when linking to those headers.
the include itself renders as a link to the included document
The shorthand version is a bit shorter because the \Include magically discards the following newline node that follows it if it just a plaintext node containing exactly a newline. With a double newline, the newline would already have been previously taken out on the lexing stage as part of a paragraph.
This is the case because without the explicit container in an implicit ul list, the arguments would stick to the last list item instead of the list itself.
It is also required if you want ordered lists:
\Ol[
\L[first]
\L[second]
\L[third]
]
which renders as:
first
second
third
Shorthand nested list with two space indentation:
* a
  * a1
  * a2
  * a2
* b
* c
which renders as:
a
a1
a2
a2
b
c
The indentation must always be exactly equal to two spaces, anything else leads to errors or unintended output.
Equivalent saner nested lists with implicit containers:
\L[
a
\L[a1]
\L[a2]
\L[a2]
]
\L[b]
\L[c]
which renders as:
a
a1
a2
a2
b
c
Shorthand list item with a paragraph inside of it:
* a
* I have

  Multiple paragraphs.

  * And
  * also
  * a
  * list
* c
which renders as:
a
I have
Multiple paragraphs.
And
also
a
list
c
Equivalent sane version:
\L[a]
\L[
I have

Multiple paragraphs.

\L[And]
\L[also]
\L[a]
\L[list]
]
\L[c]
which renders as:
a
I have
Multiple paragraphs.
And
also
a
list
c
Shorthand lists may be escaped with a backslash as usual:
Equation IDs and titles and linking to equations works identically to images, see that section for full details. Here is one equation reference example that links to the following shorthand syntax equation: Equation 7. "My first shorthand equation":
$$
\sqrt{1 + 1}
$$
{title=My first shorthand equation}
See the: <equation Pytogoras theorem>.

$$
c = \sqrt{a^2 + b^2}
$$
{title=Pytogoras theorem}
{description=This important equation allows us to find the distance between two points.}
Our goal is to collect the most popular macros from the most popular pre-existing LaTeX packages and make them available with this mechanism.
These built-in macros are currently only available on OurBigBook CLI and OurBigBook Web, not when using the JavaScript API directly. We should likely make that possible as well at some point.
In addition to default.tex, the KaTeX mhchem extension is also enabled to facilitate typesetting of chemical formulae with the \ce and \pu macros.
If your project has multiple .bigb input files, you can share Mathematics definitions across all files by adding them to the ourbigbook.tex file on the toplevel directory.
For example, if ourbigbook.tex contains:
\newcommand{\foo}[0]{bar}
then from any .bigb file we in the project can use:
$$
\foo
$$
Note however that this is not portable to OurBigBook Web and will likely never be, as we want Web source to be reusable across authors. So the ony way to avoid macro definition conflicts would be to have a namespace system in place, which sounds hard/impossible.
Ideally, you should only use this as a temporary mechanism while you make a pull request to modify the built-in math macros :-)
Paragraphs are created automatically inside macro argument whenever a double newline appears.
Note that OurBigBook paragraphs render in HTML as div with class="p" and not as p. This means that you can add basically anything inside them, e.g. a list:
My favorite list is:
\Ul[
\li[aa]
\li[bb]
]
because it is simple.
which renders as a single paragraph.
One major advantage of this, is that when writing documentation, you often want to keep lists or code blocks inside a given paragraph, so that it is easy to reference the entire paragraph with an ID. Think for example of paragraphs in the C++ standard.
See the: <quote Hamlet what we are>.

\Q[We know what we are, but not what we may be.]
{title=Hamlet what we are}
{description=This quote refers to human's inability to know their own potential, despite understanding their current abilities.}
See the: <quote Hamlet what we are implicit>.

> We know what we are, but not what we may be.
{title=Hamlet what we are implicit}
{description=This quote refers to human's inability to know their own potential, despite understanding their current abilities.}
Any white space indentation inside an explicit \Tr can make the code more readable, and is automatically removed from final output due to remove_whitespace_children which is set for \Table.
To pass further arguments to an implicit table such as title or id, you need to use an explicit table macro as in: Table 3. "My table title".
Multiple source lines, including paragraphs, can be added to a single cell with shorthand syntax by indenting the cell with exactly two spaces just as for lists, e.g.:
Very analogous to images, only differences will be documented here.
In the case of videos, where to store images becomes even more critical since videos are even larger than images, such that the following storage approaches are impractical off the bat:
\Video[https://upload.wikimedia.org/wikipedia/commons/8/85/Vacuum_pump_filter_cut_and_place_in_eppendorf.webm]
{id=sample-video-in-wikimedia-commons}
{title=Nice sample video stored in Wikimedia Commons}
{start=5}
We also handle more complex transcoded video URLs just fine:
\Video[https://upload.wikimedia.org/wikipedia/commons/transcoded/1/19/Scientific_Industries_Inc_Vortex-Genie_2_running.ogv/Scientific_Industries_Inc_Vortex-Genie_2_running.ogv.480p.vp9.webm]
{id=sample-video-in-wikimedia-commons-transcoded}
{title=Nice sample video stored in Wikimedia Commons transcoded}
it makes it easier for other users to find and re-use your videos
If your video does not fit the above Wikimedia Commons requirements, YouTube could be a good bet. OurBigBook automatically detects YouTube URLs for you, so the following should just work:
\Video[https://youtube.com/watch?v=YeFzeNAHEhU&t=38]
{id=sample-video-from-youtube-implicit-youtube}
{title=Nice sample video embedded from YouTube implicit from `youtube.com` URL}
\Video[https://youtu.be/YeFzeNAHEhU?t=38]
{id=sample-video-from-youtube-implicit-youtu-be}
{title=Nice sample video embedded from YouTube implicit from `youtu.be` URL}
Alternatively, you can reach the same result in a more explicit and minimal way by setting {provider=youtube} and the start arguments:
\Video[YeFzeNAHEhU]{provider=youtube}
{id=sample-video-from-youtube-explicit}
{title=Nice sample video embedded from YouTube with explicit `youtube` argument}
{start=38}
\Video[Tank_man_side_hopping_in_front_of_some_tanks.mp4]
{id=sample-video-in-repository}
{title=Nice sample video stored in this repository}
{source=https://www.youtube.com/watch?v=YeFzeNAHEhU}
{start=3}
But this breaks page semantics however, we don't know how to work around that
youtube videos: same as above for the iframe, but this should be less problematic since YouTube videos are not viewable without JavaScript anyways, and who cares about iframe semantics?
so we see that the \xmagic argument gets added. It is that argument that for example adds the missing -, and removes the pluralization to find the correct ID internal-link. For more details, see the documentation of the \xmagic argument.
Like other shorthand constructs, shorthand internal links are exactly equivalent to the sane version, so you can just add other arguments after the construct, e.g.:
A common usage pattern is that we want to use header titles in non-fullinternal links as the definition of a concept without repeating the title, for example:
== Dog
Cute animal.
\x[cats][Cats] are its natural enemies.
== Cats
This is the natural enemy of a \x[dog][dog].
\x[dog][Dogs] are cute, but they are still the enemy.
One example of a cat is \x[felix-the-cat].
=== Felix the Cat
Felix is not really a \x[cats][cat], just a carton character.
However, word inflection makes it much harder to avoid retyping the definition again.
For example, in the previous example, without any further intelligent behaviour we would be forced to re-type \x[dog][dog] instead of the desired \x[dog].
OurBigBook can take care of some inflection cases for you.
For capitalization, both headers and internal link macros have the cboolean argument which stands for "capitalized":
for headers, c means that the header title has fixed capitalization as given in the title, i.e.
if the title has a capital first character, it will always show as a capital, as is the case for most proper noun
if it is lower case, it will also always remain lower case, as is the case for some rare proper nouns, notably the name of certain companies
This means that for such headers, c in the x has no effect. Maybe we should give an error in that case. But lazy now, send PR.
for internal link macros, c means that the first letter of the title should be capitalized.
Using this option is required when you are starting a sentence with a non-proper noun.
if given and true, this automatically pluralizes the last word of the target title by using the blakeembrey/pluralize library.
if given and false, automatically singularize
if not given, don't change the number of elements
If your desired pluralization is any more complex than modifying the last word of the title, you must do it manually however.
With those rules in mind, the previous OurBigBook example can be written with less repetition as:
== Dog
Cute animal.
\x[cats]{c} are its natural enemies.
== Cats
This is the natural enemy of a \x[dog].
\x[dog]{p} are cute, but they are still the enemy.
One example of a cat is \x[Felix the Cat].
=== Felix the Cat
{c}
Felix is not really a \x[cats][cat], just a carton character.
If plural and capitalization don't handle your common desired inflections, you can also just create custom ones with the \Hsynonym argument.
Now for a live example for quick and dirty interactive testing.
That library handles most cases well, but note that English language perfection is never possible with it as it would likely require having word databases which the authors do not wish to support, e.g. to deal with uncountable nouns such as "mathematics" correctly: github.com/plurals/pluralize/issues/60#issuecomment-310740594
\Hdisambiguate argument: disambiguate prevents the determination of plural inflection, e.g. in:
= Python
{disambiguate=animal}
I like <python animal>.
there is currently no way to make it output Pythons in the plural without resorting to either \xp argument or an explicit content, because if you wrote:
I like <pythons animal>.
it would just lead to Id not found, as we would try the plural vs singular on animal only.
Maybe one day we can implement an even more shorthand system that understands that parenthesis should skipped for the inflection as in:
If you use an internal link within a title argument, that can generate complex dependencies between IDs, which would either be harder to implement, or lead to infinite recursion.
if the internal link text is explicitly given, then it is used to calculate the ID of the title element and on render output
otherwise, the href argument is used for the ID and the render output. This generally works best when you use magic links.
for non-headers such as images, you you can link to headers, and the rendered target gets used for both ID and rendered content
Here are some example:
= Hello \x[h2-id][the content]
== H2 title
{id=h2-id}
h1 id: hello-the-content
h1 render content: Hello the content
= Hello \x[h2-id]
== H2 title
{id=h2-id}
h1 id: hello-h2-id
h1 render content: Hello h2-id. Note that this is not very nice due to the -, but it can be made nicer without repetition with a magic link as in the following example
= Hello <blue dog>
== Blue dog
h1 id: hello-blue-dog
h1 render content: Hello blue dog
non-header (e.g. an image) that links to the title of another non-header
For non-headers, things are a bit more relaxed, and we can link to headers, e.g.:
= h1
\Image[myimg.jpg]
{title=my \x[h1]}
This is allowed because OurBigBook calculates IDs in two stages: first for all headers, and only later non non-headers.
While it is technically possible relax the above limitations and give an error only in case of loops, it would require a bit of extra work which we don't want to put in right now: github.com/ourbigbook/ourbigbook/issues/95.
Furthermore, the above rules do not exclude infinite rendering loops, but OurBigBook detects such loops and gives a nice error message, this has been fixed at: github.com/ourbigbook/ourbigbook/issues/34
This infinite recursion is fundamentally not technically solved: the user has to manually break the loop by providing an x content explicitly, e.g. in either:
To make toplevel links cleaner, if the target header is the very first element of the other page, then the link does not get a fragment, e.g.: \x[not-index] rendered as:
<a href="not-index"
and not:
<a href="not-index#not-index"
while \x[h2-in-not-the-index] is rendered with the fragment:
<a href="not-index#h2-in-not-the-index"
Reference to the first header of another file that is a second inclusion:
When running in Node.js, OurBigBook dumps the IDs of all processed files to a _out/db.sqlite3 file in the _out directory, and then reads from that file when IDs are needed.
When converting under a directory that contains ourbigbook.json, _out/db.sqlite3 is placed inside the same directory as the ourbigbook.json file.
If there is no ourbigbook.json in parent directories, then _out/db.sqlite3 is placed in the current working directory.
For example, suppose "Superconductivity" is a descendant of "Condensed Matter Physics", and that the source for both is located at condensed-matter-physics.bigb, so that both appear on the same .html page condensed-matter-physics.html.
When linking to Superconductivity from an external page such as statistical-physics.bigb you write just <superconductivity> and NOT <condensed-matter-physics#superconductivity>. OurBigBook then automatically trakcs where superconductivity is located and produces href="condensed-matter-physics#superconductivity" for you.
This is important because on a static website, the location of headers might change. E.g. if you start writing a lot about superconductivity you would eventually want to split it to its own page, superconductivity.html otherwise page loads for condensed-matter-physics.html would become too slow as that file would become too large.
But if your links read <condensed-matter-physics#superconductivity>, and all links would break when you move things around.
So instead, you simply link to the ID <superconductivity>, and ourbigbook renders links correctly for you wherever the output lands.
When moving headers to separate pages, it is true that existing links to subheaders will break, but that simply cannot be helped. Large pages must be split into smaller ones. The issue can be mitigated in the following ways:
-S, --split-headers, which readers will eventually understand are better permalinks
JavaScript redirect to split on missing ID, which automatically redirect condensed-matter-physics#superconductivity to superconductivity, potentially hitting a split header if the current page does not contain the HTML ID superconductivity.
If you really want to to use scopes, e.g. enforce the ID of "superconductivity" to be "condensed-matter-physics/superconductivity", then you can use the scope feature. However, this particular case would likely be a bad use case for that feature. You want your IDs to be as short as possible, which causes less need for refactoring, and makes topics on OurBigBook Web more likely to have matches from other users.
If the target title argument contains a link from either another internal links or a regular external hyperlink, OurBigBook automatically prevents that link from rendering as a link when no explicit body is given.
This is a nice image: \x[image-aa-zxcv-lolol-bb].
\Image[Tank_man_standing_in_front_of_some_tanks.jpg]
{title=aa \x[internal-link-title-link-removal][zxcv] \a[http://example.com][lolol] bb}
so note how "Bat" has a list of tags including "Flying animal", but Cat does not, due to the child.
This property does not affect how the table of contents is rendered. We could insert elements sections there multiple times, but it has the downside that browser Ctrl + F searches would hit the same thing multiple times on the table of contents, which might make finding things harder.
== My title{id=my-id}
Read this \x[my-id][amazing section].
If the second argument, the content argument, is not present, it expand to the header title, e.g.:
== My title{id=my-id}
Read this \x[my-id].
is the same as:
== My title{id=my-id}
Read this \x[my-id][My title].
Secondary children are normally basically used as "tags": a header such as Bat can be a direct child of Mammal, and a secondary child of Flying animal, or vice versa. Both Mammal and Flying animal are then basically ancestors. But we have to chose one main ancestor as "the parent", and other secondary ancestors will be seen as tags.
This option first does ID target from title conversion on the argument, so you can e.g. keep any spaces or use capitalization in the title as in:
= Animal
== Flying animal
{child=Big bat}
== Big bat
TODO the fact that this transformation is done currently makes it impossible to use "non-standard IDs" that contain spaces or uppercase letters. If someone ever wants that, we could maybe add a separate argument that does not do the expansion e.g.:
= Animal
== Flying animal
{childId=Big bat}
== Big bat
{id=Big bat}
but definitely the most important use case is having easier to type and read source with the standard IDs.
To also show the section auto-generated number as in "Section X.Y My title" we add the optional {full}boolean argument to the internal link, for example:
{full} is not needed for internal links to most macros besides headers, which use full by default as seen by the default_x_style_full macro property in --help-macros. This is for example the case for images. You can force this to be disabled with {full=0}:
Compare \x[image-my-test-image]{full=0} vs \x[image-my-test-image]{full=1}.
This argument makes writing many internal links more convenient, and it was notably introduced because it serves as the sane version of shorthand internal links.
content capitalization and pluralization are detected from the string, and implicitly set the \xc argument and \xp argument. In the example:
{c} capitalization is set because Internal references starts with an upper case character I
{p} pluralization is set because Internal references ends in a plural word
In this simple example, the content therefore will be exactly Internal references as in the source. But note that this does not necessarily need to be the case, e.g. if we had done:
\x[Internal Reference]{magic}
then the content would be:
Internal reference
without capital R, i.e. everything except capitalization and pluralization is ignored. This forgiving way of doing things means that writers don't need to remember the exact ideal capitalization of everything, which is very hard to remember.
It also means that any more complex elements will be automatically rendered as usual, e.g. if we had:
then the output would still contain the <i> italic tag.
If we had a scope as in \x[my scope/Internal references], then each scope part is checked separately. E.g. in this case we would have upper case Internal references, even though my scope is lowercase, and so {c} would be set.
the ID is calculated as follows:
automatic ID from title conversion is performed, with you exception: forwards slashs / are kept, in order to make scopes work.
In our case, there aren't any slashes /, so it just gives internal-references. But if instead we had e.g.: \x[my scope/internal reference]{magic}, then we would reach my-scope/internal-reference and not my-scope-internal-reference.
if there is a match to an existing ID use it. internal-references in the plural does not match, so go to the next step
if the above failed, try singularizing the last word as in the \xp argument with p=0 before doing automatic ID from title conversion. This gives internal-reference, which does exist, and so we use that.
If true, then the target of a this link is called a "topic link" and gets treated specially, pointing to an external OurBigBook Web topic rather than a header defined in the current project.
For example, when rendering a static website, a link such as:
If an shorthand topic link is made up of a single word then it can be written in the following even succincter notation, without the need for angle brackets:
Unlike local links, it is not possible to automatically determine the exact pluralization of a topic link because:
it would require communicating with the OurBigBook Web API, which we could in principle do, but we would rather not have static builds depend on Web instances
topics can be written by multiple authors, and there could be both plural and singular versions of each topic ID, which makes it hard to determine which one is "correct"
Therefore, it is up to authors to specifically specify the desired pluralization of their topic links:
by default, topic IDs are automatically singularized, e.g.:
but that is very verbose and annoying to read and write. Therefore, in addition to the explicit\C syntax, most people will prefer the backtick shorthand syntax:
Every shorthand syntax does however have an equivalent sane syntax.
Our style recommendation is: use the shorthand version which is shorter, unless you have a specific reason to use the sane version.
Shorthand in our context does not mean worse. It just mean "harder for the computer to understand". But it is more important that humans can understand in the first place! It is find to make the computer work a bit more for us when we are able to.
and so we see that level and the content argument are positional arguments, and id and scope are named arguments.
Generally, positional arguments are few (otherwise it would be hard to know which is which is which), and are almost always used for a given element so that they save us from typing the name too many times.
The order of positional arguments must of course be fixed, but named arguments can go anywhere. We can even mix positional and named arguments however we want, although this is not advised for clarity.
Positive nonzero integer arguments accept only the characters [0-9] as their input, and 0 may not be the first character. If anything else is present, an error is raised.
In OurBigBook Markup, every single macro has an ID, which can be either:
explicit: extracted from some input given by the user, either the id argument or the title argument. Explicit IDs can be referenced in Internal links and must be unique
implicit: automatically generated numerical ID. Implicit IDs cannot be referenced in internal links and don't need to be unique. Their primary application is generating on hover links next to everything you hover, e.g. arbitrary paragraphs.
The disambiguatenamed argument helps you deal more neatly with such problems.
Have a look at this example:
My favorite snakes are \x[python-genus]{p}!
My favorite programming language is \x[python-programming-language]!
\x[python-genus]{full}
\x[python-programming-language]{full}
= Python
{disambiguate=genus}
{parent=disambiguate-argument}
= Python
{c}
{disambiguate=programming language}
{parent=disambiguate-argument}
{title2=.py}
{wiki}
shows up on the header between parenthesis, much like Wikipedia, as well as in full internal links
does not show up on non-full references. This makes it much more likely that you will be able to reuse the title automatically on an internal link without the content argument: we wouldn't want to say "My favorite programming language is Python (programming language)" all the time, would we?
gets added to the default \Hwiki argument inside parenthesis, following Wikipedia convention, therefore increasing the likelihood that you will be able to go with the default Wikipedia value
Besides disambiguating headers, the disambiguate argument has a second related application: disambiguating IDs of images. For example:
\x[image-the-title-of-my-disambiguate-image]{full=0}
\x[image-the-title-of-my-disambiguate-image-2]{full=0}
\x[image-the-title-of-my-disambiguate-image]{full}
\x[image-the-title-of-my-disambiguate-image-2]{full}
\Image[Tank_man_standing_in_front_of_some_tanks.jpg]
{title=The title of my disambiguate image}
\Image[Tank_man_standing_in_front_of_some_tanks.jpg]
{title=The title of my disambiguate image}
{disambiguate=2}
Note that unlike for headers, disambiguate does not appear on the title of images at all. It serves only to create an unique ID that can be later referred to. Headers are actually the only case where disambiguate shows up on the visible rendered output. We intend on making this application obsolete however with:
This use case is even more useful when title-from-src is enable by default for the media-providers entry, so you don't have to repeat titles several times over and over.
Arguments that are opened with more than one square brackets [ or curly braces { are literal arguments.
In literal arguments, OurBigBook is not parsed, and the entire argument is considered as text until a corresponding close with the same number of characters.
Therefore, you cannot have nested content, but it makes it extremely convenient to write code blocks or mathematics.
For example, a multiline code block with double open and double close square brackets inside can be enclosed in triple square brackets:
A literal argument looks like this in OurBigBook:
\C[[
\C[
A multiline
code block.
]
]]
And another paragraph.
which renders as:
A literal argument looks like this in OurBigBook:
\C[
A multiline
code block.
]
And another paragraph.
The same works for inline code:
The program \c[[puts("]");]] is very complex.
which renders as:
The program puts("]"); is very complex.
Within literal blocks, only one thing can be escaped with backslashes are:
leading open square bracket [
trailing close square bracket ]
The rule is that:
if the first character of a literal argument is a sequence of backslashes (\), and it is followed by another argument open character (e.g. [, remove the first \ and treat the other characters as regular text
if the last character of a literal argument is a \, ignore it and treat the following closing character (e.g. ]) as regular text
The exception is when the newline is placed between two inline macros, where it generates an explicit line break. This is particularly useful for poetry, for example:
The macro name and the first argument, and any two consecutive arguments, can be optionally separated by exactly one newline character, e.g.:
\H
[2]
{scope}
[Design goals]
is equivalent to:
\H[2]{scope}[Design goals]
which is also equivalent to:
\H[2]{scope}
[Design goals]
This allows to greatly improve the readability of long argument lists by having them one per line.
There is one exception to this however: inside an shorthand header, any newline is interpreted as the end of the shorthand header. This is why the following works as expected:
== My header 2 `some code`
{id=asdf}
and the id gets assigned to the header rather than the trailing code element.
Every character that cannot be a macro identifier can be escaped with a backslash \. If you try to escape a macro identifier it of course treats the thing as a macro instead and fails, e.g. in \a it would try to use a macro called \a, not escape the character a.
For some characters, escaping or not does not make any difference because they don't have any meaning to OurBigBook Markup, e.g. currently % is always the exact same as \%.
But in non-literal macro arguments, you have to use a backslash to escape the following if you want them to not have any magical meaning:
A macro argument property that is inlineOnly can only contain inline macros. If any block macros present in the argument or its descendants, will lead to a conversion error.
There are two main rationales for enforcing these rules:
the HTML h1 - h6 header HTML elements can only contain phrasing content (analogout to our inline macros) for the HTML to be valid. We could chose to use styled divs instead of h elements, but this could have a negative SEO impact. All other HTML elements could be replaced by divs without issue however, the problem really is only h.
on OurBigBook Web, where multiple users are working together and many titles from multiple users show on index pages, it is saner to be more restrictive on what is allowed on titles and to prevent visually very large things from being added in order to prevent bad actors or accidents from disrupting other users too much
However, arguments with the multiplemacro argument property set to true can be given multiple times, and each time the argument is given, the new value is appended to a list containing all the values.
Internally, multiple is implemented by creating a new level in the abstract syntax tree, and storing each argument separately under a newly generated dummy nodes as in:
AstNode: H
AstArgument: child
AstNode: Comment
AstArgument: content
AstNode: plaintext
AstNode: x
AstNode: Comment
AstArgument: content
AstNode: plaintext
AstNode: x
because the content argument of ul is marked with remove_whitespace_children and automatically removes any whitespace children (such as a newline) as a result.
This section documents ways to classify macro arguments that are analogous to macro argument properties, but which don't yet have clear and uniform programmatic effects and so are a bit more hand wavy for now.
The content argument of macros contains the "main content" of the macro, i.e. the textual content that will show the most proeminently once the macro is rendered. It is usually, but not always, the first positional argument of macros. We should probably make it into an official macro argument property at some point.
In most cases, it is quite obvious which argument is the content argument, e.g.:
\a macro: in \a[https://example.com][example website] then example website is the content argument
Some macros however don't have a content argument, especially when they don't show any textual acontent as their primary rendered output, e.g.:
\Image macro: this macro has title byt not content, e.g. as in: \Image[flower.jpg]{title=}, since the primary content is the Image rather than any specific text
Philosophically, the content argument of a macro is analogous to the innerHTML of an HTML tag, as opposed to attributes such as href= and so on. The difference is that in OurBigBook Markup, every macro argument can contain child elements, while in HTML only the innerHTML, but not the attributes, can.
If the project toplevel directory of an OurBigBook project is also a git repository, and if git is installed, then the OurBigBook project is said to be a "Git tracked project".
IDs that start with an underscore _ are reserved for OurBigBook usage, and will give an error if you try to use them, in order to prevent ID conflicts.
For example:
the table of contents uses an ID _toc the ID of the ToC is always fixed to toc. If you try to use that for another element, you will get the following error:
elements without an explicit ID may receive automatically generated IDs of type _1, _2 and so on
If you use a reserved ID, you will get an error mesasge of type:
error: tmp.bigb:3:1: IDs that start with "_" are reserved: "_toc"
OurBigBook CLI is the executable program called ourbigbook which comes when you install npm install ourbigbook. It is the main command line utility of the OurBigBook Project.
Its functionality will also be exposed on GUI editor support such as Visual Studio Code to make things nicer for non-technical users.
The main functionalities of the executable are to:
The HTML files can then be either viewd from your filesystem on a browser, or uploaded and hosted very cheaply or for free so that others can see it, e.g. on GitHub Pages.
OurBigBook Web takes as input the exact same format of OurBigBook Markup files used by OurBigBook CLI. TODO support/improve import/export to/from OurBigBook Web, see also: -W, --web.
The OurBigBook CLI calls the OurBigBook Library to convert each input file.
Convert a .bigb file to HTML and output the HTML to a file with the same basename without extension, e.g.:
Convert a .bigb file from stdin to HTML and output the contents of <body> to stdout:
printf 'ab\ncd\n' | ourbigbook --body-only
Stdin converion is a bit different from conversion from a file in that it ignores the ourbigbook.json and any other setting files present in the current directory or its ancestors. Also, it does not produce any changes to the ID database. In other words, a conversion from stdin is always treated as if it were outside of any project, and therefore should always produce the same results regardless of the current working directory.
it converts all files in the current directory separately, e.g.:
index.bigb to _out/html/index.html, since index is a magic name that we want to show on the root URL
not-index.bigb to _out/html/not-index.html, as this one is a regular name unlike index
main.scss to main.css
If one of the input files starts getting too large, usually the toplevel index.bigb in which you dump everything by default like Ciro does, you can speed up development and just compile files individually with either:
Note however that when those individual files have a cross file internal link to something defined in not-index.bigb, e.g. via \x[h2-in-not-the-index], then you must have first previously done pass once with:
npx ourbigbook .
to parse all files and extract all necessary IDs to the ID database. That would be optimized slightly with the --no-render command line option:
npx ourbigbook --no-render .
to only extract the IDs but not render, which speeds things up considerably
When dealing with large files, you might also be interested in the following amazing options:
You can now just give the generated _out/html/index.html to any reader and they should be able to view it offline without installing anything. The flags are:
--embed-includes: without this, \Include[not-index] shows as a link to the file _out/html/not-index.html which comes from not-index.bigb With the flag, not-index.bigb output gets embedded into the output _out/html/index.html directly
--embed-resources: by default, we link to CSS and JavaScript that lives inside node_modules. With this flag, that CSS and JavaScript is copied inline into the document instead. One day we will try to handle images that way as well
You almost never want to do this except when developing OurBigBook, as it won't be clear what version of ourbigbook the document should be compiled with. Just be a good infant and use OurBigBook with the template that contains a package.json via npx, OK?
Furthermore, the default install of Chromium on Ubuntu 21.04 uses Snap and blocks access to dotfiles. For example, in a sane NVM install, our global CSS would live under /home/ciro/.nvm/versions/node/v14.17.0/lib/node_modules/ourbigbook/_obb/ourbigbook.css, which gets blocked because of the .nvm part:
One workaround is to use --embed-resources, but this of course generates larger outputs.
To run master globally from source for development see: Section "Run OurBigBook master". This one actually works despite the dotfile thing since your development path is normally outside of dotfiles.
A fundamental design choice of the OurBigBook Project is that, except for bugs, a single OurBigBook Markup source tree can be published in both of those ways without any changes.
This means that you are likely to always have several free or cheap choices of where to upload your content to, making it essentially all but TEOTWAWKI-proof
Furthermore, it also has some non multi-user features which cannot be feasibly implemented in a static website because they would require too much storage, on the fly generation is the only feasible way to deal with them:
Its main downside is that it is more expensive to host.
The OurBigBook Project will do its best to keep OurBigBook.com uploading as free as possible, but upload limits necessarily have to be more strict than those of static websites, as the underlying operating cost is larger.
Those basenames have the following magic properties:
the default output file name for an index file in HTML output is either:
index.html when in the project toplevel directory. E.g. index.bigb renders to index.html. Note that GitHub and many other static website hosts then automatically hide the index.html part from the URL, so that your index.bigb hosted at http://example.com will be accessible simply under http://example.com and not http://example.com/index.html
the name of the subdirectory in which it is located when not in the project toplevel directory. E.g. mysubdir/index.bigb outputs to mysubdir.html
otherwise, if the input path is a directory, it is used
otherwise, the directory containing the input file is used
For example, consider the file following file structure relative to the current working directory:
path/to/notindex.bigb
In this case:
if there is no ourbigbook.json file:
if we run ourbigbook .: the toplevel directory is the current directory ., and so notindex.bigb has ID path/to/notindex
if we run ourbigbook path: same
if we run ourbigbook path/to: same
if we run ourbigbook path/to/notindex.bigb: same
if there is a path/ourbigbook.json file:
if we run ourbigbook .: the toplevel directory is the current directory . because the ourbigbook.json is below the entry point and is not seen, and so notindex.bigb has ID path/to/notindex
if we run ourbigbook path: the toplevel directory is the directory with the ourbigbook.json, path, and so notindex.bigb has ID to/notindex
When the file or directory being converted has an ancestor directory with a ourbigbook.json file, then your current working directory does not have any effect on OurBigBook output. For example if we have:
then all of the following conversions produce the same output:
directory conversion:
cd /project && ourbigbook .
cd / && ourbigbook project
cd project/subdir && ourbigbook ..
file conversion:
cd /project && ourbigbook index.bigb
cd / && ourbigbook project/index.bigb
cd project/subdir && ourbigbook ../index.bigb
When there isn't a ourbigbook.json, everything happens as though there were an empty ourbigbook.json file in the current working directory. So for example:
outputs that would be placed relative to inputs are still placed in that place, e.g. index.bigb -> index.html always stay together
outputs that would be placed next to the ourbigbook.json are put in the current working directory, e.g. the _out directory
Internally, the general philosophy is that the JavaScript API in index.js works exclusively with paths relative to the project toplevel directory. It is then up to callers such as ourbigbook to ensure that filesystem specifics handle the relative paths correctly.
The --dry-run option is a good way to debug the --publish option, as it builds the publish output files without doing any git commands that would be annoying to revert. So after doing:
ourbigbook --dry-run --publish .
you can just go and inspect the generated HTML to see what would get pushed at:
Similar to --dry-run, but it runs all git commands except for git push, which gives a clearer idea of what --publish would actually do including the git operations, but without publishing anything:
The problem those cause is that the IDs of included headers show as duplicate IDs of those in the ID database.
This should be OK to start with because the more common use case with --html-single-page is that of including all headers in a single document. TODO: this option is gone.
Otherwise, include only adds the headers of the other file to the table of contents of the current one, but not the body of the other file. The ToC entries then point to the headers of the included external files.
You may want to use this option together with --embed-resources to produce fully self-contained individual HTML files for your project.
Take input from stdin as a plaintext string and produce output escaping the input string so that OurBigBook conversion will result in a single output string. E.g.:
Note that newlines are also currently escaped even when that is not strictly needed, e.g. in the case of double newlines it would be needed but not for single newlines. But we are keeping it simple for now.
The advantage of this is that we don't have to duplicate this for every single file. But if you are giving this file to someone else, they would likely not have those files at those exact locations, which would break the HTML page.
With --embed-resources, the output contains instead something like:
<style>/*! normalize.css v8.0.1 | MIT License | github.com/necolas/normalize.css */html{ [[ ... A LOT MORE CSS ... ]]</style>
<script>/*! For license information please see ourbigbook_runtime.js.LICENSE.txt */ !function(t,e){"object"==typeof exports&&"object"==typeof module?module.exports=e() [[ ... A LOT MORE JAVASCRIPT ... ]]</script>
This way, all the required CSS and JavaScript will be present in the HTML file itself, and so readers will be able to view the file correctly without needing to install any missing dependencies.
The use case for this option is to produce a single HTML file for an entire build that is fully self contained, and can therefore be given to consumers and viewed offline, much like a PDF.
Examples of embeddings done:
CSS and JavaScript are copy pasted in place into the HTML.
The default built-in CSS and JavaScript files used by OurBigBook (e.g. the KaTeX CSS used for mathematics) are currently all automatically downloaded as NPM package dependencies to ourbigbook
Without --embed-resources, those CSS and JavaScript use their main cloud CDN URLs, and therefore require Internet connection to view the generated documents.
The embedded version of the document can be viewed offline however.
There is however a known bug: KaTeX fonts are not currently embedded, so math won't work properly. The situation is similar as for images, but a bit harder because we also need to fetch the blobs from the CSS, which is likely doable from Webpack:
Examples of embedding that could be implemented in the future:
images are downloaded if needed and embedded as data: URLs.
Doing this however has a downside: it would slow the page loading down. The root problem is that HTML was not designed to contain assets, and notably it doesn't have byte position indices that can tell it to skip blobs while parsing, and how to refer to them later on when they show up on the screen. This is kind of why EPUB exists: github.com/ourbigbook/ourbigbook/issues/158
Images that are managed by the project itself and already locally present, such as those inside the project itself or due to media-providers usually don't require download.
For images linked directly from the web, we maintain a local download cache, and skip downloads if the image is already in the cache.
To re-download due to image updates, use either:
--asset-cache-update: download all images such that the local disk timestamp is older than the HTTP modification date with If-Modified-Since
--asset-cache-update-force: forcefully redownload all assets
Keep in mind that certain things can never be embedded, e.g.:
YouTube videos, since YouTube does not offer any download API
Always render all selected files, irrespectively of if they are known to be outdated or not.
OurBigBook stores the timestamp of the last successful ID extraction step for each file.
For ID extraction, we always skip the extraction if the filesystem timestamp of a source file is older than the last successful extraction.
For render:
we mark output files as outdated when the corresponding source file is parsed
we also skip rendering non-outdated files by default when you invoke ourbigbook on a directory, e.g. ourbigbook ., as this greatly speeds up the interactive error fixing turnaround time
we always re-render fully when you specify a single file, e.g. ourbigbook path/to/index.bigb
However, note that skipping renders, unlike for ID extraction, can lead to some outdated pages.
This option disables the timestamp skip for rendering, so ensure that you will get a fully clean updated render.
E.g. consider if you had two files:
file1.bigb
= File 1
== File 1 1
file2.bigb
= File 2
== File 2 1
\x[file-1-1]
We then do the initial conversion:
ourbigbook .
we see output like:
extract_ids file1.bigb
extract_ids file1.bigb finished in 45.61287499964237 ms
extract_ids file2.bigb
extract_ids file2.bigb finished in 15.163879998028278 ms
render file1.bigb
render file1.bigb finished in 23.21016100049019 ms
render file2.bigb
render file2.bigb finished in 25.92908499762416 ms
indicating full conversion without skips.
But then if we just modify fil1.bigb as:
= File 1
== File 1 1 hacked
{id=file-1-1}
the following conversion with ourbigbook . would look like:
extract_ids file1.bigb
extract_ids file1.bigb finished in 45.61287499964237 ms
extract_ids file2.bigb
extract_ids file2.bigb skipped by timestamp
render file1.bigb
render file1.bigb finished in 41.026930000633 ms
render file2.bigb
render file2.bigb skipped by timestamp
and because we skipped file2.bigb render, it will still have the outdated "File 1 1" instead of "File 1 1 hacked".
In order to reach a final stable state, you might need to run the conversion twice. This is not ideal but we don't have the patience to fix it. The reason is that links in image titles may expand twice. This is the usual type of two level recursion that has caused much more serious problems, see e.g. \x within title restrictions. E.g. starting with:
<image my big dog>
\Image[image.png]{title=My <big dog>}
= Big dog
the first conversion leads to uppercasing inside the image title:
<image my big dog>
\Image[image.png]{title=My <big Dog>}
= Big Dog
and the second one to uppercasing the reference to the image title:
<image my big Dog>
\Image[image.png]{title=My <big Dog>}
= Big Dog
To use this options, you must run OurBigBook with the --expose-gc command line option, e.g. with:
node --expose-gc $(which ourbigbook) myfile.bigb
parse: parsing steps
split-headers: log which split header is currently being rendered. This can be extremelly helpful to identify which logs that we've added that come from the header of interest.
tokenize: tokenization steps
tokens: final parsed token stream
tokens-inside: like ast-inside but for tokens.
Also adds token index to the output, which makes debugging the parser way easier.
This nifty little option outputs to stderr what the header graph looks like!
It is a bit like a table of contents in your terminal, for when you need to have a look at the outline of the document to decide where to place a new header, but are not in the mood to open a browser or use the browser editor with preview.
which shows how long different parts of the conversion process took to help identify bottlenecks.
This option can also be useful to mark phases of the conversion to identify from which phase other logs are coming from, e.g. if we wanted to know which part of the conversion is making a ton of database requests we could run:
ourbigbook --log db perf -- index.bigb
and we would see the database requests made at each conversion phase.
Note that --log perf currently does not take sub-converts into account, e.g. include and \OurBigBookExample both call the toplevel conversion function convert, and therefore go through all the conversion intervals, but we do not take those it account, and just dump them all into the same toplevel interval that they happen in, currently between post_process_start and post_process_end.
Skip the database sanity check that is normally done after the ID extraction step.
This was originally added to speed up, originally added to speed up the web upload development loop, when we knew that there were no errors in the database after a local conversion, and wanted to get to the upload phase faster, but the DB check can take several seconds for a large input.
Don't use the ID database during this run. This implies that the on-disk database is not read, and also not written to. Instead, a temporary clean in-memory database is used.
Only extract IDs to fill the ID database, don't render. This saves time if you only want to render a single file which has references to other files without getting any errors.
Outputs as OurBigBook Markup, i.e. the same format as the input itself!
While using -O bigb is not a common use case, the existence of this format has the following applications:
automatic source code formatting e.g. with --format-source. The recommended format, including several edge cases, can be seen in the test file test_bigb_output.bigb, which should be left unchanged by a bigb conversion.
manipulating source code on OurBigBook Web to allow editing either individual sections separatelly, or multiple sections at once
this could be adapted to allows us to migrate updates with breaking changes to the source code more easily. Alternatively on OurBigBook Web, we might just start storing the AST instead of source, and just rendering the source whenever users want to edit it.
This output format is used an intermediate step in automatic ID from title, that unlike the regular HTML output does not have any tags.
It does not have serious applications to end users. We decided to expose it from the CLI mostly for fun, as it posed no extra work at all as it is treated internally exactly like any other conversion format.
This conversion type is useful in situations that users don't expect conversion to produce any HTML tags. For example, you could create a header:
= My \i[asdf]
and then following the automatic ID from title algorithm, that header would have the more commonly desired ID my-asdf, and not my-<i>asdf</i> or my-i-asdf-i.
Similarly, any macro argument that references an ID undergoes id output format conversion. E.g. the above header could be referenced by:
<My \i[asdf]>
which is equivalent to:
\x[my-asdf]
Besides being more intuitive, this conversion also guarantees greater format portability, in case we ever decide to support other output formats besides HTML!
Macros that don't have a content argument are just completely removed, i.e. typically non-textual macros such as images. We could put effort in outputting their title argument correctly, but meh, not worth the effort.
The id output format also serves as a good start generalizing OurBigBook to multiple outputs, as this is a simple format.
\x uses href if the content is not given explicitly.
Previously, if \x didn't have a content, we were actually rendering the \x to calculate the ID. But then we noticed that doing so would require another parse pass, so we just went for this simpler approach. This is closely linked to \x within title restrictions.
Attempt to publish without converting first. Implies the --publish option.
This can only work if there was previously a successful publish conversion done, which later failed to publish during the following steps, e.g. due to a network error.
This option was introduced for debugging purposes to help get the git commands right for large conversions that took a look time.
Publish as a local directory that can be zipped and sent to someone else, and then correctly viewed by a browser locally by the receiver. You can then zip it from the Linux command line for example with:
ourbigbook --publish --publish-target local
cd _out/publish/_out
zip -r local.zip local
If you want to publish your root user page, which appears at / (e.g. github.com/cirosantilli/cirosantilli.github.io for the user cirosantilli), GitHub annoyingly forces you to use the master branch for the HTML output:
This means that you must place your .bigb input files in a branch other than master to clear up master for the generated HTML.
ourbigbook automatically detects if your repository is a root repository or not by parsing git remote output, but you must setup the branches correctly yourself.
Split each header into its own separate HTML output file.
This option allows you to keep all headers in a single source file, which is much more convenient than working with a billion separate source files, and let them grow naturally as new information is added, but still be able to get a small output page on the rendered website that contains just the content of the given header. Such split pages:
Each header contains a on-hover link to the single-file split version of the header.
hello-split.html: contains only the contents directly under = h1, but not under any of the subheaders, e.g.:
h1 content. appears in this rendered output
h1-1-1 does not appear in this rendered output
The -split suffix can be customized with the \HsplitSuffix argument option. The -split suffix is appended in order to differentiate the output path from hello.html
h1-1.html, h1-1-1.html, h1-1-2.html: contain only the contents direcly under their headers, analogously to hello-split.html, but now we don't need to worry about the input filename and collisiont, and just directly use the ID of each header
--split-headers is implied by the --publish option: the published website will automatically get the split pages. There is no way to turn it off currently. A pull request would be accepted, especially if it offers a ourbigbook.json way to do it. Maybe it would be nice to have a more generalized way of setting any CLI option equivalent from the ourbigbook.json, and an option cli vs cli-publish so that cli-publish is publish only. Just lazy for now/not enough pressing use case met.
In order to make the split version be the default for some headers, you can use the \HsplitDefault argument.
This is something that we might consider changing with some option, e.g. keeping the split headers more self contained. But for now, the general feeling is that going to nosplit by default is the best default.
This will get out of sync sooner or later with the code, but this should still serve as a good base example for this documentation.
The the above example, you can see a few or our predefined template variables:
title: the title based on the toplevel header of the page
style: our default stylesheet
body: the main rendered body
We chose Liquid as our template language because it is server-side safe. This allows you to to download the OurBigBook repository of anyone and just compile it yourself without the fear that it will install malware in your computer, see also Section "--unsafe-ace".
Also, if we ever some day offer a compilation service, Liquid is designed to prevent arbitrary code execution and infinite loops in templates.
git_sha: SHA of the latest git commit of the source code if in a git repository
github_prefix: this variable is set only if if the "github" media provider. It points to the URL prefix of the provider, e.g. if you have in your ourbigbook.json:
May be an empty string in the case of autogenerated sources, notably automatic directory listings, so you should always check for that with something like:
{% if input_path != "" %}
<div>Source code for this page: <a href="{{ raw_relpath }}/{{ input_path }}">{{ input_path }}</a></div>
{% endif %}
is_index_article. Boolean. True if the toplevel being rendered on this output file is the the index article. E.g. in:
index.bigb
= John Smith's homepage
== Mathematics
with split header conversion, the value of is_index_article would be:
index.html: true
split.html: true
mathematics.html: false
json: exposes the entire ourbigbook.json to the template. This is useful for example to obtain publishRootUrl as in:
raw_relpath: relative path from the rendered output to the _raw directory. Should be used to prefix all non-OurBigBook Markup output resources, which is the directory where such files are placed during conversion, e.g.
= My homepage
== Mathematics
{scope}
=== Chain rule
we'd get;
/: empty string
/split: empty string
/mathematics: mathematics
/mathematics/chain-rule: mathematics/chain-rule
Template variable expansion automatically escape special HTML characters such as <. TODO: " however is not currently escaped: github.com/ourbigbook/ourbigbook/issues/375 but it would be better if it were.
true iff the --publish-target is a standard website, i.e. something that will be hosted publicly on a URL. This is currently true for the following publish targets:
--publish-target github-pages
and it is false for the following targets:
--publish-target local
This template variable is useful to remove JavaScript elements that only work on public websites and not on localhost or file:, e.g.:
The original application of this option was to allow external non Node.js processes to be able to accurately calculate IDs from human readable titles since the non-ASCII handling of the algorithm is complex, and hard to reimplement accurately.
From Python for example one may run something like:
from subprocess import Popen, PIPE, STDOUT
import time
p = Popen(['ourbigbook', '--title-to-id'], stdout=PIPE, stdin=PIPE)
p.stdin.write('Hello world\n'.encode())
p.stdin.flush()
print(p.stdout.readline().decode()[:-1])
time.sleep(1)
p.stdin.write('bonne journeé\n'.encode())
p.stdin.flush()
print(p.stdout.readline().decode()[:-1])
This option enables actions that would allow arbitrary code execution, so you should only pass it if you trust the repository author. Enabled functionality includes:
Now you can just edit any OurBigBook file such has index.bigb, save the file in your editor, and refresh the webpage and your change should be visible, no need to run a ourbigbook command explicitly every time.
Exit by entering Ctrl + C on the terminal.
Watch a single file:
ourbigbook --watch index.bigb
When a single file is watched, the reference database is not automatically updated. If it is not already up-to-date, you should first update it with:
ourbigbook .
otherwise you will just get a bunch of undefined ID errors every time the input file is saved.
Sync local directory to OurBigBook Web instead of doing anything else.
To upload the entire repository, run from toplevel:
ourbigbook --web
To update just all IDs in a single physics.bigb source file use:
ourbigbook --web physics.bigb
This requires that all external IDs that physics.bigb might depend on have already been previously uploaded, e.g. with a previous ourbigbook --web from toplevel.
The source code is uploaded, and conversion to HTML happens on the server, no conversion is done locally.
This option is not amazing right now. It was introduced mostly to allow uploading the reference demo content from cirosantilli.com to ourbigbook.com/cirosantilli, and it is not expected that it will be a major use case for end users for a long time, as most users are likely to just edit on OurBigBook Web directly.
file renaming does not work, it will think that you are creating a new file and blows up duplicates
if there's an error in a later file, the database is still modified by the previous files, i.e. there is no atomicity. A way to improve that would be to upload all files to the server in one go, and let the server convert everything in one transaction. However, this would lead to a very long server action, which would block any other incoming request (I tested, everything is single threaded)
However, all of those are fixable, and in an ideal world, will be fixed. Patches welcome.
If you delete a header locally and then do -W, --web upload, the article is currently not removed from web.
Instead, we simply make its content become empty, and mark it as unlisted.
The reason for this is that the article may have metadata created by other users such as OurBigBook Web discussions, which we don't want to delete remove.
In order to actually remove the header you should follow the procedure from Section "OurBigBook Web page renaming", which instead first moves all discussions over to a new article before deleting.
The only use case so far for this has been as a hack for incomplete database updates.
The correct approach is instead to actually re-extract server side as part of the migration. We should do this by implementing a Article.reextract analogous to Article.rerender, and a helper web/bin/rerender-articles.js.
--web-force-render does not skip the local pre-conversion to split bigb format that is done before upload, only the remote render. Conversely, when used together with -W, --web, -F, --force-render does wkip the local bigb conversion, and not the remove one.
Update the nested set after each article, rather than just once after all articles have been uploaded.
There is a complex time tradeoff between using this option or not, which depends on:
how many articles the user has
how many articles are being uploaded
This option was initially introduced for Wikipedia bot uploads. At 104k articles, the bulk update takes 1 minute, but each individual update of an empty article takes about 6 seconds (and is dominated by the nested set update time), making this option an indispensable time saver for the initial upload in that case
Therefore in that case, for less than 10 articles you are better off without this option. But with more thatn 10 articles you would want to use it.
This rule of thumb should scale for smaller deployments as well however. E.g. at 10k articles, both individual updates and bulk updates should be 10x faster, so the "use this option for 10 or more articles" rule of thumb should still be reasonable.
Set a custom URL for -W, --web from the command line. If not given, the canonical ourbigbook.com is used. This option is used e.g. for testing locally e.g. with:
OurBigBook configuration file that affects the behaviour of ourbigbook for all files in the directory.
ourbigbook.json not used for input from stdin, since we are mostly doing quick tests in that case.
While ourbigbook.json is optional, it is used to determine the toplevel directory of a OurBigBook project, which has some effects such as those mentioned at the toplevel index file.
Therefore, it is recommended that you always have a ourbigbook.json in your project's toplevel directory, even if it is going to be an empty JSON containing just:
{}
For example, if you convert a file in a subdirectory such as:
ourbigbook subdir/notindex.bigb
then ourbigbook walks up the filesystem tree looking for ourbigbook.json, e.g.:
is there a ./subdir/ourbigbook.json?
otherwise, is there a ./ourbigbook.json?
otherwise, is there a ../ourbigbook.json?
otherwise, is there a ../../ourbigbook.json?
and so on.
If we reach the root path / and no ourbigbook.json is found, then we understand that there is no ourbigbook.json file present.
List of JavaScript regular expression. If a file path matches any of them, then override ignore and don't ignore the path. E.g., if you have several .scss examples that you don't want to convert, but you do want to convert the main.scss for the website itself:
If a directory is ignored, all its contents are also automatically ignored.
Useful if your project has a large directory that does not contain OurBigBook sources, and you don't want OurBigBook to mess with it.
Only ignores recursive conversions, e.g. given:
"ignore": [
"web"
]
doing:
ourbigbook .
skips that directory, but
ourbigbook web/myfile.bigb
converts it because it was explicitly requested.
Examples:
ignore all files with a given extension;
"ignore": [
".*\\.tmp",
]
Yes, it is a bit obnoxious to have to escape . and the backslash. We should use some proper globbing library like: github.com/isaacs/node-glob. But on the other hand ignore from .gitignore makes this mostly useless, as .gitignore will be used most of the time.
Similar to ignore, but only ignore the files from rendering converesions such as bigb -> html, scss -> css.
Unlike ignore, matching files are still placed under the _raw directory and can be publicly viewed.
You almost always want this option over ignore, with files that should not be in the repository being just ignored with your .gitignore instead: Section "Ignore from .gitignore".
ASCII normalization is a custom OurBigBook defined normalization that converts many characters that look like Latin characters into Latin characters.
For now, we are using the deburr method of Lodash: lodash.com/docs/4.17.15#deburr, which only affects Latin-like characters.
In addition to deburr we also convert:
en-dash and em-dash to simple ASCII dash -. Wikipedia Loves en-dashes in their article titles!
greek letters are replaced with their standard latin names, e.g. α to alpha
One notable effect is that it converts variants of ASCII letters to ASCII letters. E.g. é to e removing the accent.
This operation is kind of a superset of Unicode normalization acting only on Latin-like characters, where Unicode basically only removes things like diacritics.
OurBigBook normalization on the other also does other natural transformations that Unicode does not do, e.g. æ to ae as encoded by deburr and further custom replacements.
Dictionary of lint options to enable. OurBigBook tries to be strict about forcing specific styles by default, e.g. forbids triple newline paragraph. But sometimes we just can't bear it :-)
parent: forces headers to use \Hparent argument to specify their level
number: forces headers to not use \Hparent argument to specify their level, i.e. to use a number or a number of =
You should basically always set either one of those on any serious project. Forgetting a parent= in a project that uses parent= everywhere else is a common cause of build bugs, and can be hard to debug without this type of linting enabled.
If given, the toplevel output of each input source is always non-split, and a split version is not generated at all.
This of course overrides the \HsplitDefault argument for toplevel headers, making any links go to the non split version, as we won't have a split version at all in this case.
Without splitDefaultNoToplevel we would instead have:
my-first-header: split
my-first-header-nosplit: not split
my-second-header: split
The initial use case for this was in OurBigBook Web. If we didn't do this, then there would be two versions of every article at the toplevel of a file: split and nosplit.
This would be confusing for users, who would e.g. see two new articles on the article index every time they create a new one.
It would also mean that metadata such as comments would be visible in two separate locations.
So instead of filtering the duplicate articles on every index, we just don't generate them in the first place.
The media-providers entry of ourbigbook.json specifies properties of how media such as images and videos are retrieved and rendered.
The general format of media-providers looks like:
"media-providers": {
"github": {
"default-for": ["image"], // "all" to default for both image, video and anything else
"path": "data/media/", // data is gitignored, but should not be nuked like _out/
"remote": "ourbigbook/ourbigbook-media"
},
"local": {
"default-for": ["video"],
"path": "media/",
},
"youtube": {}
}
Properties that are valid for every provider:
default-for: use this provider as the default for the given types of listed macros.
The first character of the macros are case insensitive and must be given as lower case. Therefore e.g.:
image applies to both image and Image
giving Image is an error because that starts with an upper case character
title-from-src (bool): extract the title argument from the src by default for media such as images and videos as if the titleFromSrc macro argument had been given, see also: Section "Image ID"
Direct children of media-providers and subproperties that are valid only for them specifically:
path: analogous to path for local: a local location for this GitHub provider, where the repository can optionally be cloned.
When not during a run with the --publish option, OurBigBook checks if the path exists locally, and if it does, then it uses that local directory as the source intead of the GitHub repository.
This allows you to develop locally without Internet and see the latest version of the images without pushing them.
During publishing, the GitHub version is used instead.
automatically git push this repository during deployment to ensure that any asset changes will be available.
ignore the path from OurBigBook conversion as if added to ignore, and is not added to the final output, because you are already going to have a copy of it.
produces a file in the output called ourbigbook.html that redirects to https://docs.ourbigbook.com.
When dealing with regular headers, you generally don't want to use this option and instead use the \Hsynonym argument, which already creates the redirection for you.
This JSON option can be useful however for dealing with things that are outside of your OurBigBook project.
Make every internal link point to the split header version of the pages of the website. Do this even if those pages don't exist, or if they are not the default target e.g. as per the \HsplitDefault argument.
If this option is set, then nosplit/split header metadata links are removed, since it was hard to come up with a sensible behaviour to them, and it won't matter on web redirection where every page is nonsplit anyways.
If true, adds a link under the metadata section of every header of a OurBigBook CLI static website pointing to the corresponding article on OurBigBook.com, or another OurBigBook Web instance specified by the host option.
It also sends you to Heaven for supporting the project.
This section describes how to make all links of one deployment of your static OurBigBook publication to another location. For example, if you have a:
The use case of this is if you are migrating from one domain to another, but you want to keep your old pages around to not break any links, and you also don't want to redirect users across domains.
For example, this happened Ciro felt that OurBigBook Web had reach enough maturity to be a reasonable reader alternative to the static website and so considered redirecting:
If the project is a Git tracked project, the standard git ignore rules are used for ignores. This includes .git/info/exclude, .gitignore and the user's global gitingnore file if any.
TODO: get this working. Maybe we should also bake it into the ourbigbook CLI tool as well for greater portability. Starting like this as a faster way to prototype:
This section lists versions at which the basic npm install followed by basic template repo conversion is known to work. Reports of other working systems are welcome and will be added here.
Note that while doing a simple conversion is easy, things get harder if you want to take multi-file features in consideration, notably cross file internal link internals.
This is because these features require interacting with the ID database, and we don't do that from the default ourbigbook.convert API because different deployments will have very different implementations, notably:
local Node.js run uses SQLite, an implementation can be seen in the ourbigbook file class SqlDbProvider
the in-browser version that runs in the browser editor of the OurBigBook Web makes API calls to the server
And it is also a bit like Obsidian (a personal knowledge base): you can optionally keep all your notes in plaintext markup files in your computer and publish either on OurBigBook.com or as a static HTML website on your own domain.
The goal of the OurBigBook Project is to make university students write perfect natural sciences books for free as they are trying to learn for their lectures.
Suppose that Mr. Barack Obama is your calculus teacher this semester.
Being an enlightened teacher, Mr. Obama writes everything that he knows on his OurBigBook.com account. His home page look something like the following tree:
On your first day of class, Mr. Obama tells his students to read the "Calculus" section, ask him any questions that come up online, and just walks away. No time wasted!
While you are working through the sections under "Calculus", you happen to notice that the "Fundamental theorem of calculus" article is a bit hard to understand. Mr. Obama is a good teacher, but no one can write perfect tutorials of every little thing, right?
This is where OurBigBook comes to your rescue. There are two ways that it can help you solve the problem:
Topics group articles that have the same title by different users. This feature allows you to find the best article for a given topic, and it is one of the key innovations of OurBigBook Web.
Topics are a bit like Twitter hashtags or Quora questions: their goal is to centralize knowledge about a specific subject by different people at a single location.
But we can see that there are 3 articles in total about "Fundamental theorem of calculus", 2 of them by other authors, so maybe one of the others will help!
Here we see that there are 3 articles in total. The one by Mr. Trump has 1 vote, while the others have zero, so Trump's appears on top. So maybe that is the best one!
After a quick read, it does look like it might be interesting. Let's click on "Read the full article" to also see the descendant articles by Mr. Trump.
If even existing topics and discussions have failed you, and you have finally understood a subject after a few hours of Googling, why not share your knowledge by creating a new article yourself?
Figure 55. If you click do any of the above links, you will be redirected to the editor page, and the title will be preset. By simply using that exact same title to create your new article, your article will then appear in the correct "Fundamental theorem of calculus" topic where others might see it. ourbigbook.com/go/new?title=Proof%20of%20the%20fundamental%20theorem%20of%20calculus.
OurBigBook Web can automatically create links to topics from regular plaintext. For example, if the following topics exist:
/go/topic/quantum-mechanics
/go/topic/mathematicsl-physics
then writing:
I like mathematical physics and quantum mechanics.
will automatically be converted to something like:
I like <a href="/go/topic/mathematical-physics">mathematical physics</a> <a href="/go/topic/quantum-mechanics">quantum mechanics</a>.
This reduces the burden on writers of having to manually create topic links themselves.
This conversion currently has the following limitations:
because it would lead to too many false postives and be too distracting, auto-generated links currently just have the exact same color as regular text, and users only notice them when mouse hovering
for performance reasons, only topics with a given maximum number of words are considered. The maximum length is configurable by the OurBigBook Web admin under site settings via the automaticTopicLinksMaxWords, and currently defaults to 3. Setting it to 0 turns off the automatic link generation
Topic autolinking becomes especially interesting with auto-generated data to populate a large number of topics, as was done with the wikibot on OurBigBook.com.
This feature is available only on OurBigBook Web. While it would be possible to implement it for static website generation, it would require downloading information from the server which we don't currently want to implement.
OurBigBook Web implements what we call "dynamic article tree".
What this means is that, unlike the static website generated by OurBigBook CLI where you know exactly which headers will show as children of a given header, we just dynamically fetch a certain number of descendant pages at a time.
As an example of dynamic artic tree, note how the article "Special relativity" can be seen in all of the following pages:
The only efficient way to do this is to pick which articles will be rendered as soon as the user makes the request, rather than having fully pre-rendered pages, thus the name "dynamic".
The design goals of the dynamic article tree are to produce articles such that:
each article can appear as the toplevel article of a page to get better SEO opportunities
and that page that contains the article can also contain as many descedants as we want to load, not jus the article itself, so as to not force readers to click a bunch of links to read more
For example, with a static website, a user could have a page structure such as:
In the static output, we would have two output files with multiple pages:
natural-science.html
special-relativity.html
plus one split output file for each header if -S, --split-headers were enabled:
natural-science-split.html
physics.html
special-relativity-split.html
lorentz-transformation.html
In this setup the header "Physics" for example is present in one of two possible pages:
natural-science.html: as a subheader, but Special Relativity is not shown even though it is a child
physics.html: as the top header, and Special Relativity is still not shown as we are in split mode
In the case of the dynamic article tree however, we achieve our design goals:
"Physics" is the toplevel header, and therefore can get much better SEO
"Special Relativity", "Lorentz transformation" and any other descendants will still show up below it, so it is much more readable than a page
We then just cut off at 100 articles to not overload the server and browsers on very large pages. Sometimes those pages can still be accessed through the ToC, which has a larger limit of 1000 entries. We also want to implement: load more articles to allow users to click to load more articles.
And all of that is achieved:
without requiring authors to manually determine which headers are toplevel or not to customize page splits with reasonable load sizes.
without keeping multiple copies of the render output of each page and corresponding pre-rendered ToCs. On the static website, we already had two rendering for each page: one split and one non-split, and the ToCs were huge and copied everywhere. Perhaps the ToC side could be resolve with some runtime fetching of static JSON, but then that is bad for SEO.
The downside of the feature is slightly slower page loads and a bit more server workload. We have kept it quite efficient server-side by implementing the page fetching with a nested sets implementation.
We believe that dynamic article treee offers a very good tradeoff between server load, load speeds, SEO, readability and author friendliness.
Each article has their own discussion section. This way you can easily see if other students have had the same problem as you and asked about it already.
Figure 59. Every section has a "Discussions" button where you can see if other people hit the same problem as you and created a discussion thread for it. We see that there are 2 total discussions about the section "Fundamental theorem of calculus", so let's check them out. URL: ourbigbook.com/barack-obama/integral#fundamental-theorem-of-calculus
Marking a page as the child of another page is easy in OurBigBook Web: you can simply set the parent of the page directly on the editor UI.
If you don't want the article to be the first child of a parent, you can also set the "previous sibling" field. This specifies after which article the new article will be inserted.
Once you've created a particularly notable article, you can announce it to your followers by clicking the "Announce to followers" button under the article page.
Once clicked, this will send an email with a link to the article to all your followers. You can also optionally add a short message to the announcement to help your followers know why it was announced.
In order to reduce the risk of spam and going over email quotas, the following restrictions are in place:
you can only announce each article once
each user can only announce up to 5 articles in the last 30 days. Each user can check their quotas under the user settings page.
actually update all references on other files to the new value. This could be done e.g. by creating a worker thread, and mark all references as outdated.
Ctrl + Enter: submit the current form, e.g. save/create articles or comments, login, register
TODO N: create a new article. This requires making sure that all input fields and textareas don't propagate N key events. We did that as a one off for E in comment textareas.
Page specific:
Article page (and for Index page on user page):
E: edit the page
L: like or unlike the page. This would require moving like state out of the Like button, which is a bit annoying.
There are currently a few constructs that are legal in OurBigBook CLI but forbidden in Web and will lead to upload errors. TODO we should just make those forbidden on CLI by default with a flag to re-enable if users really want to make their source incompatible with web:
By default, when you publish on OurBigBook Web, either via the web editor or via Web upload from the command line, the server will store and display the date at which articles were created and updated.
To prevent that, you can set the "Hide article dates" user option, which prevents storage of such information on the database entirely.
Each user has an admin property which when set to true allows the user to basically view and change anything for themselves and other users. E.g. admins can see private data of any user such as emails, or modify users usernames.
Some actions are not possible currently because they were originally hardcoded for "do action for the current user" rather than "do action for target user", but all of those are intended to be converted. E.g. that is currently the case for like/unlike, follow/unfollow from the API.
In order to mark a user as admin, direct DB acceess is required.
For example, to make user barack-obama admin on a development run the web/bin/make-admin script:
web/bin/make-admin barack-obama
Admin priviledges can be revoked with the -f (--false) flag:
When an account is locked, the locked user can login into it and view the account, but they cannot take any action sthat would lead to changes to the database, including:
creating or editing articles and discussions
liking, unliking articles or following or unfollowing users
OurBigBook Web supports the following types of analytics:
Google Analytics. TODO: the Google Analytics ID is currently hardcoded under web/front/config.jsgoogleAnalyticsId: 'G-R721ZZTW7L', we should instead take it from an environment variable
our simple built-in analytics to better view referrers. At some point Google Analytics stopped showing clear referrer paths, and so we started storing out own real quick. There is currently no UI for it, you just have to query the database e.g. with:
printf '\\a\nSELECT referrer,path,ip,"createdAt" FROM "Request" ORDER BY "createdAt" DESC LIMIT 1000' | ./heroku psql DATABASE_URL
These policies only applies to the official reference OurBigBook.com instance. If you host your own OurBigBook Web, there are no constraints imposed on your content, only on the source code as per LICENSE.txt.
All content that you upload that you own copyright for is automatically dual licensed as under the Creative Commons CC BY-SA 4.0. This is for example the same license family used by Wikipedia.
Starting from August 22 2024, users also automatically grant to the OurBigBook Project a non-exclusive license to relicense their content. This could be used for example to:
sell the content to companies that do not wish to comply with the CC BB-SA license, e.g. for LLM training. We will try to avoid ever doing this as much as possible since it goes against the vision of the project for open knowledge. But it could one day be the difference between life and death of the project, so we'd like to keep that door open just in case. Any such relicensing deals will be transparently announced.
add a new license to content on the website which we feel might better serve all users
Any such relicensing does not affect the original CC BY-SA 4.0 license nor your ownership of the content. It only adds new licenses on top of it. This way the content remains free no matter what.
If you don't own the copyright for a work, you may still upload it if its license allows for "perpetual (non-expiring) and non-revocable" usage. This allows for example for:
all Creative Commons licenses
GNU General Public License
and so on.
Note however that the "non-commercial" (NC) and "no derivatives" (ND) CC license are basically legal minefields as it can be very subjective to decide what counts as commercial or a derivative, and so we will immediately take down material upon copyright owner request as we are not ready to test this in court!
The project makes the following commitment however: if ever a way if found to make money from the project, all NC content will be excluded from any directly monetizable money-making activities, e.g. ads or otherwise.
which of the following consist of a derivative or not:
a table of contents that mirrors a ND work, but without the actual contents, which would automatically be filled with "the most upvoted article in a given topic"
a section of ND content without the rest of the work?
ND content but with extra article interlinking added?
ND content with IDs (such as HTML id= elements) but where IDs have been
a public modification request to an ND content?
Unfortunately, NC is extremely popular amongst academics, presumably due to professors hopes that one day their notes may become a book which will sell for money, or maybe simply for idealist reasons, and it would be too hard to fight against such licenses at this point in time.
Ultimately the project will have to decide if such licenses is worth the trouble or not, and if one day it seems apparent that it is not, a mass take down may happen. But for now we are willing to try. Wikimedia Commons for example has decided not to allow NC and ND.
Content that is not freely licensed might be allowed for upload under a fair use rationale. Fair use are murky waters. Wikipedia for example takes a very strict approach of very limited fair use: en.wikipedia.org/wiki/Wikipedia:Non-free_content, but we are more relaxed to it, and only take gray cases down upon copyright owner request.
Some examples of what should generally be OK:
quote up to a paragraph from a copyrighted book, clearly attributing it
explain what you've learned from a book or course in your own words.
You also have to take some care to not copy the exact structure of the original, as that itself could be subject to copyright.
One good approach is to just use several sources. If multiple sources use the same structure, then it is more arguable that this structure is not a novel copyrighted thing.
use a copyrighted image when there is no free alternative to illustrate what you are talking about
If the copyright owner complains in such cases, we might have to take something down, but as long as you are not just uploading a bunch of obviously copyrighted content, it's not the end of the world, we'll just find another freer way to explain things without them.
More egregious cases such as the upload of:
entire copyrighted books
copyrighted pieces of music
and so on will obviously be taken down preemptively as soon as noticed even without a take down request.
Anything you want, as long as it is legal. This notably includes not violating copyright, see also: OurBigBook.com content license.
It doesn't have to be about STEM in any way.
And it doesn't even have to be useful.
Just beward of the following:
if you automatically mass upload a bunch of useless automatically generated content, you might get blocked
if you create a bunch of accounts and upvote one another, i.e. voting fraud, you might get blocked. Ideally one day we want to have a robust ranking system that is immune to manual vote fraud, much like PageRank. However we still don't have anywhere enough users and data to make that worth it or feasible at this time, so we are starting simple and doing it manually
SPAM: if you are clearly trying to promote goods or services with a large number of posts of accounts because you were paid to do so. There is a fine line between SPAM and non spam, which our admins will do their best to judge. E.g. talking at length about your projects is not SPAM, and it is greatly encouraged. But e.g. using a large number of unrelated topics to promote your stuff is Here's a nice example: github.com/ourbigbook/ourbigbook/issues/346
At some distant point in the future we could start letting people self tag content that is illegal in certain countries or for certain age groups, and we could then block this content to satisfy the laws of each country.
Websites such as Wikipedia or Stack Exchange have a political system where users can gain priviledges, and once they have gained those priviledges, they can edit or delete your content.
In OurBigBook Web, unless you explicitly give other users permission to do so, only admins of the website can ever delete any content, and that will only ever be done if:
Admins will always be a small number of people, either employed by, or highly trusted by OurBigBook Project leaders. They are not community elected. Their actions may be reversed at anytime by the OurBigBook Project leadership.
We haven't implemented it yet, but it is an important feature that we will implement: you will be able to download all your content as a .zip file containing OurBigBook Markup files, and then you will be able to generate the HTML for your content on your own computer with the open source OurB implementation. There are then several alternative ways to host the generated HTML files, including free ones such as GitHub Pages.
OurBigBook Web is a regular databased backed dynamic website. This is unlike the static websites generated by OurBigBook CLI:
static websites are simpler and cheaper to run, but they are harder to setup for non-programmers
static websites cannot have multiuser features such as likes, comments, and "view versions of this article by other users", which is are core functionality of the OurBigBook Project
OurBigBook Web was originally forked from the following starter boilerplate: github.com/cirosantilli/node-express-sequelize-realworld-example-app. We are trying to keep tech synced as much as possible between both projects, since the boilerplate is useful as a tech demo to quickly try out new technologies in a more minimal setup, but it has started to lag a bit behind. The web stack of OurBigBook Web is described at: OurBigBook Web tech stack.
cd ourbigbook &&
npm run link &&
npm run build-assets &&
cd web/ &&
npm install &&
./bin/generate-demo-data.js --users 2 --articles-per-user 10
# Or short version:
#./bin/generate-demo-data.js -u 2 -a 10
where:
npm run build-assets needs to be re-run if any assets (e.g. CSS or Js file mentioned at overview of files in this repository) on the ./ourbigbook/ toplevel are modified. No need to re-run it for changes under web/.
To develop files from outside web/, also consider:
npm run web-setup
./bin/generate-demo-data.js --users 2 --articles-per-user 10
After this initial setup, run the development server:
npm run dev
And the website is now running at localhost:3000. If you created the demo data, you can login with:
email: user0@mail.com, user1@mail.com, etc.
password: asdf
Custom demo user passwords can be set by exporting the OURBIGBOOK_DEMO_USER_PASSWORD variable, e.g.:
OURBIGBOOK_DEMO_USER_PASSWORD=qwer ./bin/generate-demo-data.js -u 2 -a 10
this is useful for production.
To run on a different port use:
PORT=3001 npm run dev
We also offer shortcuts on toplevel for the npm install and npm run dev commands so you can skip the cd web for those:
npm install
npm run dev
Whenever you save any changes to the backend server, we listen to this and automatically restart the server, so after a few seconds or less, you can refresh the web page to obtain the backend update.
For frontend, changes are automatically recompiled by the webpack development server, so you can basically just refresh pages and they will be updated straightaway.
The current limiting factor on the number of articles per user is memory of the nested set generation. We've managed to review this and reduce it with attribute selection, but we have not yet been able to indefinitely scale it, e.g. we would not be able to handle 1M articles per user. The root problems are:
leads seems to reach all ~9M articles + categories , or most of them. We gave up around 8.6M, when things got really really slow, possibly due to heavy duplicate removal. We didn't log it properly, but depths of 3k+ were seen... so not setting depth is just pointless unless you want the entire Wiki.
Mostly for fun we've populated the body of wikibot-generated sections on OurBigBook.com with some LLM-generated content.
At first we considered using Ollama with something like llama3.2, but because each prompt took 5 seconds on a laptop it would take about 5 days to do all 100k articles and so we decided to try existing API providers.
We finally ended up going with the cheapest model that seemed easy to use and chose OpenAI gpt-4o-mini. We managed to complete the generation for 100 output tokens per section with only 3 dollars. To help reduce costs we also:
used batch jobs, which can take up to 24 hours to complete and sometimes just fail after 24 hours
enabled data collection to get some extra credits.
We just took the Wikipedia titles and prompted directly:
What is TITLE?
It is a bit of shame that many of the replies end in crap like "Let me know if you need more help on this subject"-type output. We could have prevented those with a role=system prompt, but there seems to be no way to factor out a single system prompt for multiple queries, so the input token could would have increased.
Our pipeline is as follows. First clone the wikibot repo:
cd ..
git clone https://github.com/ourbigbook/wikibot
cd -
cd web
./bin/generate-demo-data --users 2 --articles-per-user 10
Every time this is run, it tries to update existing entities such as users and articles first, and only creates them if they don't exist. This allows us to update all demo data on a live website that also has users without deleting any user data.
Note however that if you ever increase the ammount of demo users, you might overwrite real user data. E.g. if you first do:
it is possible that some real user will have taken up the username that we use for the third user, which did not exist previously, and then hacks their articles away. So never ever do that! Just stick to the default values in production.
As a safeguard, to be able to run this in production you have to also pass the --force-production flag;
By default, when you run web/bin/generate-demo-data.js, besides inserting the data into the database directly, the command also generates a in-file-system tree that contains equivalent content under:
Because each user has its own ourbigbook.json file added to the directory, you can for example build each user directory in isolation with:
cd web/tmp/demo/barack-obama
ourbigbook .
This setup can be useful for quickly testing things locally, and in particular to test -W, --web upload to a local test server.
These files have nothing to do with OurBigBook Web specifically, and would be used from OurBigBook CLI itself. It would be nice to bring them up to OurBigBook CLI at some point, and only expose the Web-specific database functions from Web.
One option is to use the standard Express.js logging mechanism:
DEBUG='sequelize:sql:*' npm run dev
Shortcut:
npm run devs
These logs also include some kind of timing information. However, we are not entirely sure that the timings mean, as they show for both Executing (query is about to start) and Executed (query finished) lines with possibly different values e.g.:
sequelize:sql:pg Executing (default): SELECT 1+1 AS result +0ms
sequelize:sql:pg Executed (default): SELECT 1+1 AS result +1ms
The meaning of +0ms and +1ms appears to be the timing since last the last message with the same ID, i.e. sequelize:sql:pg in this case. Therefore, so long as there wasn't any sequelize:sql:pg between and the corresponding Executing, the Executing timing should give us the query time.
This is a bit messy however, as we often want to find the largest numbers for profiling, and there could be a large time delta during inactivity.
This tends to be a better good way for benchmarking than DEBUG sql:
OURBIGBOOK_LOG_DB=1 npm run dev
which sets in the Sequelize constructor:
rew Sequelize({ logging: console.log })
and produces many outputs of type:
Executed (default): SELECT 1+1 AS result Elapsed time: 0ms
so we get explicit elapsed time measurements rather than deltas, and without the corresponding Executing marker.
Furthermore, because we try to code the server correctly by making multiple async requests simultaneously wherever possible, the slowest of those requests finishes, last, and is the last "Elapsed time" to get logged! So you generally just have to look at the last logged line if there's one slow bottleneck query, rather than going over all the previous "Elapsed time" entries.
One major advantage of this method is that Sequelize's error logging is a bit crap, and sometimes the error appears much much more clearly in the PostgreSQL logs.
Then, when running for the first time, or whenever frontend changes are made, you need to create optimized frontend assets with:
npm run build-dev
before you finally start the server each time with:
npm start
This setup runs the Next.js server in production mode locally. Running this setup locally might help debug some front-end deployment issues.
Building like this notably runs full typescript type checking, which is a good way to find bugs early.
But otherwise you will just normally use the local run as identical to deployment as possible setup instead for development, as that makes iterations quicker are you don't have to re-run the slow npm run build-dev command after every frontend change.
build-dev is needed instead of build because it uses NODE_ENV_OVERRIDE which is needed because Next.js forces NODE_ENV=production and wontfixed changing it: github.com/vercel/next.js/issues/4022#issuecomment-374010365, and that would lead to the PostgreSQL database being used, instead of the SQLite one we want.
build runs npm run build-assets on toplevel which repacks ourbigbook itself and is a bit slow. To speed things up during the development loop, you can also use:
If you have determined that a bug is PostgreSQL specific, and it is easier to debug it interactively, first create the database as mentioned at local run as identical to deployment as possible and then:
OURBIGBOOK_POSTGRES=1 ./bin/generate-demo-data.js
OURBIGBOOK_POSTGRES=1 npm run dev
or shortcut for the run:
npm run dev-pg
Note that doing sync-db also requires NODE_ENV=production as in:
List all queries that are a currently running on PostgreSQL database.
Useful in the sad cases that our recursive queries go infinite due to bugs.
web/bin/pg-ls-queries
#!/usr/bin/env bash
script_dir="$( cd -- "$( dirname -- "${BASH_SOURCE[0]}" )" &> /dev/null && pwd )"
# https://stackoverflow.com/questions/12641676/how-to-get-a-status-of-a-running-query-in-postgresql-database/44211767#44211767
"$script_dir/psql" -c "SELECT datname, pid, state, query, age(clock_timestamp(), query_start) AS age
FROM pg_stat_activity
WHERE state <> 'idle' AND state <> 'idle in transaction'
AND query NOT LIKE '% FROM pg_stat_activity %'
ORDER BY age" "$@"
By default, we don't make any requests to Next.js, because starting up Next.js is extremelly slow for regular test usage and would drive us crazy.
In regular OurBigBook Web usage through a browser, Next.js handles all GET requests for us, and the API only handles the other modifying methods like POST.
However, we are trying to keep the API working equally well for GET, and as factored out with Next.js as possible, so just testing the API GET already gives reasonable coverage.
But testing Next.js requests before deployment is a must, and is already done by default by npm run deploy-prod from Heroku deployment, and can be done manually with:
npm run test-next
or e.g. to run just a single test:
npm run test-next -- -g 'api: create an article and see it on global feed'
for for Postgres:
npm run test-pg-next
These tests are currently very basic, and only check page status. In the future, we can
add some HTML parsing to check for page contents as a reponse to GET, just as we already do in the test system of the OurBigBook Library
go all in an use a JavaScript enabled test system like Selenium to also test login and data modification from the browser
TODO: npm run test-nextgithub.com/ourbigbook/ourbigbook/issues/354 is currently broken and always blows up on the second test that uses Next.js. So it works if you run one by one with -g, but not if you try to run all of them in one go.
If you are not making any changes to the website itself, e.g. only to the test system, then you can skip the slow rebuild with:
test-next-nobuild
test-pg-next-nobuild
Note that annoyingly, Next.js reuses the same forlder for dev and build runs, so you have to quit your dev server for this to work, otherwise the dev server just keeps writing into the folder and messing up the production build test.
Note that Next.js tests are just present inside other tests, e.g. api: create an article and see it on global feed also tests some stuff when not testing Next.js. Running npm run test-next simply enables the Next.js tests on top of the non Next.js ones that get run by default.
These tests can only be run in production mode, and so our scripts automatically rebuild every time before running the tests, which makes things quite slow. This required because in development mode, Next.js is extremelly soft, and e.g. does not raise 500 instead returning a 200 page with error messages. Bad default.
This technique is also called "closure table" by some authors.
This index is, as the name indicates, an index, i.e. it duplicates information otherwise present in the OurBigBook Web Ref database table, which contains an adjacency list format instead, in the hope that it would be faster to pre-order depth first traverse.
This feature adds considerable complexity to the codebase. Also, updates can be considerably slow, as updating this index for a single article requires updating the index value for most or all other articles as well. We should bechmark it better vs recursive queries.
Any pending migrations are done automatically during deployment as part of npm run build, more precisely they are run from web/bin/sync-db.js.
We also have a custom setup where, if the database is not initialized, we first:
just creates the database from the latest model descriptions
manually fill in the SequelizeMeta migration tracking table with all available migrations to tell Sequelize that all migrations have been done up to this point
This is something that should be merged into Sequelize itself, or at least asked on Stack Overflow, but lazy now.
In order to test migrations locally interactively, you can:
The arguments of test-migration are fowarded to web/bin/generate-demo-data.js from demo data, -u1 -a5 would produce a small ammount of data, suitable for quick iteration tests.
Towards the end of that script, we can see lines of type:
Those are important diffs you might want to look at every time:
tmp.old.sqlite3.sort.sql: old schema before migration, but with lines sorted alphabetically
tmp.new-clean.sqlite3.sort.sql: new schema achieved by dropping the database and re creating at once
tmp.new-migration.sqlite3.sort.sql: new schema achieved migrating from the old state
Therefore, you really want the diff tmp.old.sqlite3.schema tmp.new-clean.sqlite3.schema to be empty. For sqlite3 we actually check that and give an error if they differ, but for PostgreSQL it is a bit harder due to the multiline statements, so just inspect the diffs manually.
When quickly developing before we had any users, a reasonable way is to nuke the database everytime instead of spending time writing migrations. To do this, you can without creating a migration:
npm run deploy-prod
This breaks the website, because the DB is out of sync. So then you go and manually fix it up:
# heroku run -a ourbigbook web/bin/generate-demo-data.js --force-production --clear
This utilit serves as a quick test to check if email sending is working, without you having to click a bunch of buttons on the web UI such as creating a new user:
cd web
OURBIGBOOK_SEND_EMAIL=ses \
OURBIGBOOK_SEND_EMAIL_SES_REGION=us-east-1 \
OURBIGBOOK_SEND_EMAIL_SES_USERNAME=access-key \
OURBIGBOOK_SEND_EMAIL_SES_API_KEY=secret-access-key \
bin/send-email user@mail.com 'My subject' 'My body'
This is the current method used on OurBigBook.com. They currenly offer pay as you go mailing at 1$ / 10,000 emails sent, which feels reasonable.
OURBIGBOOK_SEND_EMAIL=ses \
OURBIGBOOK_SEND_EMAIL_SES_REGION=us-east-1 \
OURBIGBOOK_SEND_EMAIL_SES_USERNAME=access-key \
OURBIGBOOK_SEND_EMAIL_SES_API_KEY=secret-access-key \
npm run dev
The initial setup is slightly annoying as you have to write to support for them to enable your account, much like other AWS products, but once that is done we managed to get it working fine.
ensure that you have a working email address in the hosted domain such as notification@ourbigbook.com. E.g. on our custom domain name setup with Porkbun. We achieved this by redirecting notification@ourbigbook.com to your personal email initially.
create a Sendgrid account
it would also be a good idea to setup two factor authentication
verify your domain, e.g. ourbigbook.com. This means setting up three CNAME records given by Sendgrid on your DNS provider, e.g. Porkbun.
create a single sender. We used:
From Name: OurBigBook.com
From Email Address: notification@ourbigbook.com
Reply to: notification@ourbigbook.com
we disabled their "link tracking" feature, which was turned on by default. While it is fun to track clicks, it is basically useless for transactional email, and it parse HTML and replaces the links with their tracking links, making things less clear for end users. It is also harder to debug.
integrate using web API
create an API key, and then save it on Heroku:
heroku config:set -a ourbigbook OURBIGBOOK_SEND_EMAIL_SENDGRID_API_KEY=thekey
Also set it locally to be able to test email sending integration locally:
OurBigBook Web supports blocking VPN users from signing up in order to reduce SPAM.
This is currently done by making API calls to ipapi.is/ after the reCAPTCHA check.
To enable this, you must set the OURBIGBOOK_IPAPI_IS_API_KEY environment variable to contain your API key, which can be obtained by signing up to the freemium service:
Got it running perfectly at as of April 2021 ourbigbook.com with the following steps.
Initial setup for a Heroku project called ourbigbook:
sudo snap install --classic heroku
heroku login
./heroku git:remote
git remote rename heroku prod
# Automatically sets DATABASE_URL.
./heroku addons:create heroku-postgresql:hobby-dev
# We need this to be able to require("ourbigbook")
./heroku config:set SECRET="$(tr -dc A-Za-z0-9 </dev/urandom | head -c 256)"
# Password of users generated with ./web/bin/generate-demo-data
./heroku config:set OURBIGBOOK_DEMO_USER_PASSWORD="$(tr -dc A-Za-z0-9 </dev/urandom | head -c 20)"
# You can get it later to login with the demo users from the Heroku web interface
Additionally, you also need to setup the PostgreSQL test database for both OurBigBook CLI and OurBigBook Web as documented at Section "OurBigBook Web PostgreSQL setup":
web/bin/pg-setup ourbigbook-cli
Then deploy with:
cd web
npm run deploy-prod
Get an interactive shell on the production server:
./heroku run bash
From there you could then for example update the demo data with:
cd web
bin/generate-demo-data.js --force-production
This should in theory not affect any real user data, only the demo articles and users, so it might be safe. In theory!
Alternatively, we could do this at once with;
./heroku run web/bin/generate-demo-data.js --force-production
Drop into a PostgreSQL shell on production:
./heroku psql
Of course, any writes could mean loss of user data!
Run a query directly from your terminal:
./heroku psql -c 'SELECT username,email FROM "User" ORDER BY "createdAt" DESC LIMIT 50'
If some spurious bugs crashes the server, you might want to restart it with:
On the Porkbun web UI, we added a DNS record of type :
ALIAS ourbigbook.com <heroku-id>.herokudns.com
where heroku-id was obtained from:
heroku domains:add ourbigbook.com
heroku domains
and we removed all other ALIAS/CNAME records from Porkbun.
Next, we setup forwarding from ciro@ourbigbook.com to Ciro Santilli's personal gmail account. This is done in part because it appears that we are required to provide a from address for OurBigBook Web email sending with Sendgrid, and that email has to be verified. Having Porkbun host it costs 2$/month, and we are trying to use as much free stuff as possible until there are actual users on the website.
Note that if you try to test from your own personal account, the redirect automatically skips sending as it notices that it would redirect to the sender. To test it you have to use some secondary email account instead.
To set it up, we just follow the exact same steps as for Heroku deployment but with a different app ID. E.g. using the ourbigbook-staging heroku project ID:
git remote add staging https://git.heroku.com/ourbigbook-staging.git
heroku addons:create -a ourbigbook-staging --confirm ourbigbook-staging heroku-postgresql:hobby-dev
heroku config:set -a ourbigbook-staging SECRET="$(tr -dc A-Za-z0-9 </dev/urandom | head -c 256)"
npm run deploy-staging
We also add some extra flags to reduce the ammount of warnings and errors due to database differences. The command does not exit with status 0. devcenter.heroku.com/articles/heroku-postgres-import-export says some of those warnings are normal and can be ignored.
web/: OurBigBook Web package that depends on the local OurBigBook package through relative path ..
Every require outside of web/ must be relative, except for executables such as ourbigbook or demos such as lib_hello.js, or else the deployment will break.
This is because we don't know of a super clean way of adding the toplevel ourbigbook package to the search path as npm run link does not work well on Heroku.
A known workaround to allow npm run build-assets is done at: web/build.sh.
Currently, Heroku deployment does the following:
install both dependencies and devDependencies
npm run build
remove devDependencies from the final output to save space and speed some things up
The devDependencies should therefore only contain things which are needed for the build, typically asset compressors like Webpack, but not components that are required at runtime.
This setup creates some conflict between what we want for OurBigBook command line users, and Heroku deployment.
Notably, OurBigBook command line users will want SQLite, and Heroku never, and SQLite installation is quite slow.
Since we were unable to find any way to make things more flexible on the package.json with some kind of optional depenency, for now we are just hacking out any dependencies that we don't want Heroku to install at all from package.json and web/package.json with sed rom heroku-prebuild.
Local tests are always on optimized PostgresQL. Remote tests always on powerful home wifi, never 4G. Measuremnts are taken on browser Network tab in developer tools with cache enabled. Each URL is ran randomly a few times, which gives an idea of cache warmup effects. Logged-in is logged-in as cirosantilli.
Visit article:
ae4d0e3a0964f3c00a7e1ec0d561ebd6f2d2f44f (show tagged headers under non-toplevel headers) TTFB logged off local:
/barack-obama: 60 - 75
/cirosantilli: 200 - 300
/wikibot: 100 - 120
3c61db4b778f0cc6c0fcfbc5519ef82927d365b3 (one before "show tagged headers under non-toplevel headers") TTFB logged off local:
/cirosantilli: 200 - 300
/wikibot: 110 - 120
075872a0a5ca7faf171d45834bc2b47995a15634 web: speed up article page DB queries further by moving topicId into topic
At this commit we had highly optimized article page queries. The slowest query was getting the new upvotes of the logged in user at 20 - 30 ms.
unsafe methods such as POST are all authenticated by JWT. This authentication comes from headers that can only be sent via JavaScript, so it is not possible to make users click links that will take those actions
safe methods such as GET are authenticated by a cookie. The cookie has the same value as the JWT. It is possible for third party websites to make such authenticated requests, but it doesn't matter as they will not alter the server state, and contents cannot be read back due to the single origin policy.
There is currently one exception to this: the verification page, which has side effects based on GET. But it shouldn't matter in that specific case.
The JWT token is only given to users after account verification. Having the JWT token is the definition of being logged in.
are icon-separated, e.g.: "(home icon) Home (article icon) Top Articles (article icon) Latest articles'
every title-like (e.g. pages, table headers) thing and links to title-like things are "Sentence cased", i.e.:
the first letter uppercase
others are lowercase or uppercase if proper nouns
things that users can click to "take actions" (usually modify the database) show as buttons. Things that users can click to view things show as links. Exmaples of actions:
like, subscribe
create article/issue/comment
go to a separate new/edit article/issue page. This is strictly technically speaking just a link, but it is closely related to creating something new, so it feels more intuitive for it to be a button
when logged off:
stateful actions like "create article" or "like article" show as if logged in, but redirected to signup page. Unless it is possible for user to create significant content and then lose it, e.g. type in a new comment body and only notice later that he cannot submit.
It is intended that OurBigBook Web be readable with JavaScript disabled. This has the following advantages:
reduces flickering on page load for users that JavaScript enabled
may help with SEO
helps with Web archiving. The Wayback Machine for example is notably bad with JavaScrip
helps privacy freaks who have their JavaScript turned off
Pages should look exactly the same with JavaScript turned on or off.
Page interactive behaviour may differ slighly. Notably, due to OurBigBook Web dynamic article tree, clicking links with JavaScript off always opens a new page /username/myid rather than going to #myid if the target Element ID is already visible in the current page.
User input and even login is not intended to be necessarily possible however, and will likely be always broken.
This section describes rules for normally browser-visible URLs of the website. These rules do not apply to the Web API, see OurBigBook Web API standards for Web API URL standards.
It should be impossible to have upper case characters on any URL of the website. Words should be separated by hyphens - instead.
Use the usual gramatical ordering for action object pairs, e.g.:
new-discussion
edit-discussion
instead of:
discussion-new
discussion-edit
The latter is tempting to group all "Discussion" actions under a prefix, but let's use the nice grammar instead.
GET parameters should always be alphabetically ordered by key, e.g.:
Next.js imposes one constraint: ISR only works with URL parameters like /articles/<page>, not GET parameters like /articles?page=1.
As of writing however, we don't use any ISR as it adds a lot of complication. But still, we are trying to stick to the general principle that if something might ever be ISR'ed in the future, then we would like to keep it as parameter rather then GET. It feels sane.
The only things that we are ever consider ISR'ing are the pre-rendered version of articles and issues, excluding any metadata of those that changes often or depends on logged in users.
All lists of things will never be ISR'ed, as those can change constantly. One conclusion of this is that:
page number
ordering
other search-like parameters
which appear only in lists of things, will always be part of the GET query, and not params.
It is a bit annoying that due to scopes being separated with /, we always have to put article names last in any URL (outside GET parameters) to avoid ambiguities. E.g. it would be arguably nicer to have:
/go/donald-trump/linear-algebra/issues
rather than the current:
/go/issues/donald-trump/linear-algebra
but this produces ambiguity, what if user issues has an article with title Linear algebra under scope donald-trump?
web_api.js: helpers to access the OurBigBook HTTP REST API. These have to be outside of web/ because OurBigBook CLI uses them e.g. for syncing local files to the server, and OurBigBook CLI cannot depend on OurBigBook Web components, only the other way around, otherwise we could create circular dependencies. That exact same JavaScript code is also used from the front-end! The infinite joys of homomorphic JS.
#!/usr/bin/env node
// https://docs.ourbigbook.com/file/web/bin/normalize
const path = require('path')
const commander = require('commander')
const models = require('../models')
// main
const program = commander.program
program.description('View, check or update (i.e. normalize redundant database data: https://docs.ourbigbook.com/ourbigbook-web-dynamic-article-tree https://docs.ourbigbook.com/_file/web/bin/normalize')
program.option('-c, --check', 'check if something is up-to-date', false);
program.option('-f, --fix', 'fix before printing', false);
program.option('-p, --print', 'print the final state after any update if any', false);
program.option(
'-u, --username <username>',
'which user to check or fix for. If not given do it for all users. Can be given multiple times.',
(value, previous) => previous.concat([value]),
[],
);
program.argument('[whats...]', 'list of things to normalize, e.g. "nested-set" or "article-issue-count"')
program.parse(process.argv);
const opts = program.opts()
let [whats] = program.processedArgs
const sequelize = models.getSequelize(path.dirname(__dirname))
;(async () => {
await models.normalize({
check: opts.check,
fix: opts.fix,
log: true,
print: opts.print,
sequelize,
usernames: opts.username,
whats,
})
})().finally(() => { return sequelize.close() });
web/bin/rerender-articles.js -a johnsmith -a maryjane
Rerender articles by all authors except johnsmith and maryjane:
web/bin/rerender-articles.js -A johnsmith -A maryjane
Rerendering has to be done to see updates on OurBigBook changes that change the render output.
Notably, this would be mandatory in case of CSS changes that require corresponding HTML changes.
As the website grows, we will likely need to do a lazy version of this that marks pages as outdated, and then renders on the fly, plus a background thread that always updates outdated pages.
The functionality of this script should be called from a migration whenever such HTML changes are required. TODO link to an example. We had one at web/migrations/20220321000000-output-update-ancestor.js that seemed to work, but lost it. It was simple though. Just you have to instantiate your own Sequelize instance after making the model change to move any data.
web/bin/rerender-articles.js
#!/usr/bin/env node
const path = require('path')
const commander = require('commander')
const models = require('../models')
const back_js = require('../back/js')
const { cliInt } = require('ourbigbook/nodejs_webpack_safe')
const program = commander.program
program.description('Re-render articles https://docs.ourbigbook.com/_file/web/bin/rerender-articles.js')
program.option('-a, --author <username>', 'only convert articles by this author', (v, p) => p.concat([v]), [])
program.option('--automatic-topic-links-max-words <val>', 'maximum number of words to put on automatic topic links', cliInt)
program.option('-A, --skip-author <username>', "don't convert articles by this author", (v, p) => p.concat([v]), [])
program.option('-d, --descendants', 'rerender all descendants of input slugs in addition to the articles themselves. Has no effect if no slugs are given as input (everything gets converted regardless in that case).')
program.option('-i, --ignore-errors', 'ignore errors', false)
program.option('-s, --start-from <start-from>', 'start from this article and continue alphabetically to the end', false)
program.argument('[slugs...]', 'list of slugs to convert, e.g. "barack-obama/quantum-mechanics". If not given, convert all articles matching the criteria of other options.')
program.parse(process.argv);
const opts = program.opts()
let [slugs] = program.processedArgs
const sequelize = models.getSequelize(path.dirname(__dirname));
(async () => {
await sequelize.models.Article.rerender({
log: true,
convertOptionsExtra: {
automaticTopicLinksMaxWords: opts.automaticTopicLinksMaxWords,
katex_macros: back_js.preloadKatex(),
},
authors: opts.author,
descendants: opts.descendants,
ignoreErrors: opts.ignoreErrors,
slugs,
skipAuthors: opts.skipAuthor,
startFrom: opts.startFrom,
})
})().finally(() => { return sequelize.close() });
That file contains JavaScript functionality to be included in the final documents to enable interactive document features such as the table of contents.
You should use the packaged _obb/ourbigbook_runtime.js instead of this file directly however.
However, if at some point you decide that the section dog has become too large and want to split it as:
= Animal
\Include[dog]
and:
dog.bigb
= Dog
== Poodle
When you do this, it would break liks that users might have shared to animal.html#poodle, which is not located at dog.html#poodle.
To make that less worse, if -S, --split-headers are enabled, we check at runtime if the ID poodle is present in the output, and if it is not, we redirect to the split page #poodle to poodle.html.
It would be even more awesome if we were able to redirect to the non-split version as well, dog.html#poodle, but that would be harder to implement, so not doing it for now.
Unlike all languages which rely on ad-hoc tooling, we will support every single tool that is required and feasible to be in this repository in this repository, in a centralized manner.
We would like to remove the need for this step and allow users doing everyting without the command line, but that will require some extra work: github.com/ourbigbook/ourbigbook/issues/318
Once that is working, you can now install the extension either:
via the VS Code UI: Ctrl + Shift + X and search for "ourbigbook", the ID is: ourbigbook.ourbigbook-vscode
from the command line with:
ext install ourbigbook.ourbigbook-vscode
We also recommend installing the "Code Spell checker" extension:
ext install streetsidesoftware.code-spell-checker
and adding the following settings to your User JSON settings file:
"cSpell.enableFiletypes": [
"ourbigbook"
],
Next, open the downloaded folder in Visual Studio Code with:
Ctrl + Shift + P
File: Open Folder
then open a .bigb file such as index.bigb on vscode.
Now you are ready to:
Ctrl + Shift + B: build all files in the folder
F5: build all files in the folder, and view the HTML output for the current source file in your browser
Ctrl + Shift + Alt + B: publish your project to OurBigBook Web
although separate words do find good matches in this case unlike in Ctrl + T, if you auto-complete after the first word, pre existing words are duplicated, e.g.:
type the first word
space
start the second word
finish autocomplete on second word
then the stuff before the last space remains rather than being replaced, leaving you with something like:
<United United States>
The bult-in markdown extension does not support this either as it uses only slash separated "IDs" in its searches.
then followed by IDs that contain the search anywhere inside them
Unfortunately, due to VS Code limitations, you cannot use spaces in the search as we would like, e.g.:
fundamental theorem
will not find the ID fundamental-theorem-of-calculus. This is because VS Code does not pass the search after the first space to the extension at all in the provideWorkspaceSymbols callback. It does work if you instead use the hyphen - ID separator as in:
fundamental-theorem
Using % SQL wildcards such as in:
fund%ntal
also does not work. Looking at debug logs, we see that the correct SQL queries are generated and the correct rows returned, but VS Code must be doing a hardcoded post-processing step that removes the matches afterwards, so it also seems to be out of our control.
TODO: the built-in markdown extension handles spaces on Ctrl+T. Understand how it works.
ID extraction is performed on .bigb files automatically with ourbigbook --no-render file.bigb whenever new changes are saved to disk e.g. with Ctrl + S. This ensures that the ID database is kept up to date so that Ctrl + T and autocompletion will work.
Ctrl + Shift + O: ID search in the current file. Somewhat of a subset of Ctrl + T, but works faster, is more scoped if you know your ID is in the current file, and allows you to type spaces.
Ctrl + Click: jump to definition. If you hover over internal cross file internal link-like elements such anywhere over the following:
<New York>
{tag=New York}
{parent=New York}
then the editor jumps to their definition point.
outline, sticky scroll, breadcrumb. These features allow you to quickly navigate between headers of the current file in a tree structure. Consider adding the following shortcut to reveal the outline sidebar on Ctrl + 3:
{
"key": "ctrl+3",
"command": "outline.focus"
},
As you add or remove lines to the document, the outline becomes immediately outdated. To update it, make sure to save the document (Ctrl + S) and wait a few seconds.
Drag and drop editing gets requested from time to time but just dies to the bot:
though in our case it wouldn't be so simple as \Hparent arguments would also have to be adjusted.
commands: all our command shortcuts are defined to only work on OurBigBook files (.bigb extension) to avoid cluttering non-OurBigBook projects. This is done as vscode does not seem to have the concept of "project type" built into it. If you want the build and launch shorcuts to work on your project for any file, also define build and launch commands under .vscode
Build all: save the current file is unsaved, and then build the project toplevel directory with ourbigbook .
Build all and view current output file: do ourbigbook . and then open the HTML output for the current file in your browser
Historically, Vim support came first and was better developed. But that was just an ad-hoc path of least resistance, VS Code is the one we are going to actually support moving forward.
Our syntax highlighting attempts mostly to follow the official HTML style, which is perhaps the best maintained data-language. We have also had a look at the LaTeX, Markdown and Asciidoctor ones for refernce.
This opens a new window titled "Extension Development Host". You will likely then want to open any .bigb file from that window to test out the extension
from there on:
make changes on the "vscode" workspace
test them on the "Extension Development Host" window. To reload changes either:
from the Extension Host run the "Developer: Reload Window" command to make extension changes take effect. We recommend adding a shortcut "Alt + Shift + R" for that
from the "vscode" workspace, restart the debug proces with the "Debug: Restart" command (default shortcut "Ctrl + Shift + F5")
Sometimes you need to change ourbigbook files like index.js when working on a new extension feature.
TODO: we don't have a neat way to handle this now. Currently; vscode/package.json uses fixed ourbigbook versions such as:
"dependencies": {
"ourbigbook": "0.9.11"
and therefore does not pick up changes made to index.js.
To work around that, you can hack that line to:
"dependencies": {
"ourbigbook": ".."
and:
cd vscode
npm install
The reason we don't use the .. by default is that we are unable to release the extension with the .. for an unknown reason because then:
npx vsce package
is failing with:
Executing prepublish script 'npm run vscode:prepublish'...
> ourbigbook-vscode@0.0.26 vscode:prepublish
> npm run compile
> ourbigbook-vscode@0.0.26 compile
> tsc -p ./
ERROR Command failed: npm list --production --parseable --depth=99999 --loglevel=error
npm ERR! code ELSPROBLEMS
npm ERR! invalid: katex@v0.11.1 /home/ciro/bak/git/ourbigbook/node_modules/katex
npm ERR! A complete log of this run can be found in:
npm ERR! /home/ciro/.npm/_logs/2024-08-05T15_51_22_124Z-debug-0.log
One thing we could do is to play it really nasty and hack .. to a fixed version for relese, then hack it back to .. immediately, always requiring a ourbigbook release for each vscode release.
If you use the .. hack, besides undoing the .. change, before releasing you have to:
Syntax highlighting can likely never be perfect without a full parser (which is slow), but even the imperfect approximate setup (as provided for most other languages) is already a huge usability improvement.
We will attempt to err on the side of "misses some stuff but does not destroy the entire page below" whenever possible.
mappings:
<leader>f, which usually means ,f (comma then F): start searching for a header in the current file. Does a regular / search without opening any windows, to is it very ligthweight. Mnemonic: "Find".
<leader>h (requires Fugitive to be installed): sets up the ObbGitGrep command, which searches for header across all git tracked files in the current Git repository. After ,g you are left in the prompt with:
ObbGitGrep
so if you complete that by:
ObbGitGrep animal kingdom
it will match headers that start with animal kingdoom case insentively, e.g.:
= Animal kingdom tree
= Animal kingdom book
Vim regular expressions are accepted, e.g. if you don't want it to start with the search pattern:
ObbGitGrep .*animal kingdom
The command opens a new tab (technically a "Vim error window") containing all matches, where you can click Enter to open one of them.
Mnemonic: "Header search".
A simple way to develop is to edit the Vundle repository directly under ~/.vim/bundle/ourbigbook.
The static editor is a browser-only toy/demo with no persistent storage. We call it "static" because it is able to run on a static website, as opposed to the more advanced editor present in OurBigBook Web, which interacts fully with a dynamic database. Both static and dynamic editor codebases are highly factored however, which is why they look identical.
That editor can be viewed directly locally with:
git clone https://github.com/ourbigbook/ourbigbook
cd ourbigbook
npm install
npm run build-assets
firefox dist/editor.html
You can also speed up the interactive development loop of editor.html with:
A lot of effort has been put into making error reporting as good as possible in OurBigBook, to allow authors to quickly find what is wrong with their source code.
Error reporting is for example tested with assert_error tests in test.js.
Please report any error reporting bug you find, as it will be seriously tracked under the: error-reporting label.
Notably, OurBigBook should never throw an exception due to a syntax error, as that prevents error messages from being output at all.
One important philosophy of the error reporting is that the very first message should be the root cause of the problem whenever possible: users should not be forced to search a hundred messages to find the root cause. In this way, the procedure:
solve the first error
reconvert
solving the new first error
reconvert
etc.
should always deterministically lead to a resolution of all problems.
Error messages are normally sorted by file, line and column, regardless of which conversion stage they happened (e.g. a tokeniser error first gets reported before a parser error).
There is however one important exception to that: broken internal links are always reported last.
For example, consider the following syntactically wrong document:
= a
\x[b]
``
== b
Here we have an unterminated code block at line 5.
However, this unterminated code block leads the header b not to be seen, and therefore the reference \x[b] on line 3 to fail.
Therefore, if we sorted naively by line, the broken reference would shoe up first:
error: tmp.bigb:3:3: internal link to unknown id: "b"
error: tmp.bigb:5:1: unterminated literal argument
But in a big document, this case could lead to hundreds of undefined references to show up before the actual root unterminated literal problem.:
error: tmp.bigb:3:3: internal link \x to unknown id: "b"
error: tmp.bigb:4:3: internal link \x to unknown id: "b"
error: tmp.bigb:5:3: internal link \x to unknown id: "b"
...
error: tmp.bigb:1000:1: unterminated literal argument
Therefore, we force undefined references to show up last to prevent this common problem:
error: tmp.bigb:1000:1: unterminated literal argument
error: tmp.bigb:3:3: intenal link \x to unknown id: "b"
error: tmp.bigb:4:3: intenal link \x to unknown id: "b"
error: tmp.bigb:5:3: intenal link \x to unknown id: "b"
...
OurBigBook is designed to not allow arbitrary code execution by default on any OurBigBook CLI command.
This means that it it should be safe to just download any untrusted OurBigBook repository, and convert it with OurBigBook CLI, even if you don't trust its author.
In order to allow code execution for pre/post processing tasks e.g. from prepublish, use the --unsafe-ace option.
Note however that you have to be careful in general, since e.g. a malicious author could create a package with their own malicious version of the ourbigbook executable, that you could unknowingly run with with the standard npx ourbigbook execution.
OurBigBook HTML output is designed to be XSS safe by default, any non-XSS safe constructs must be enabled with a non-default flag or setting, see: unsafeXss.
All our software is licensed by under the GNU Affero General Public License (AGPL): LICENSE.txt unless otherwise noted. This license basically means that if you use this software then you must publish any changes you make to it, even if you use it only in your own servers that serve external requests without publishing the software.
We require all contributions to give the OurBigBook Project non-exclusive rights to their contributions.
This means that contributors retain their copyright, and may reuse their part of the code as they see fit under additional licenses beyond AGPL, but so can the OurBigBook Project.
The AGPL can of course cannot never be revoked once it has been applied. This only means that copyright owners may at any point also release their IP under another license.
The main rationale for this right now is to allow the OurBigBook Project the flexibility to one day allow someone to pay for a license that doesn't require releasing their source code under the AGPL without having to get all contributors ever to agree. This scenario is very unlikely to ever happen.
The OurBigBook Projects's commitment is and always will be to provide free education for all, and we have no plans to ever make anything closed source. But if it ever happens that we absolutely run out of the only way to achieve the goals of free education is to make concessions and allow enterprise users to pay for using the site for their purposes, which is not the case at this point, we would like to keep that door open.
Such CLA would also make it easier for the OurBigBook Project to be able to fight in court to enforce the AGPL's term's should that need ever arise.
As mentioned at useless knowledge, most users don't want global installations of OurBigBook. But this can be handy during development, as you can immediately see how your changes to OurBigBook source code affect your complex example of interest. For example, Ciro developed a lot of OurBigBook by hacking github.com/cirosantilli/cirosantilli.github.io directly with OurBigBook master.
Just remember that if you add a new dependency, you must redo the symlinking business:
createdb ourbigbook_cli
psql -c "CREATE ROLE ourbigbook_user with login password 'a'"
psql -c 'GRANT ALL PRIVILEGES ON DATABASE ourbigbook_cli TO ourbigbook_user'
psql -c 'GRANT ALL ON SCHEMA public TO ourbigbook_user'
psql -c 'GRANT USAGE ON SCHEMA public TO ourbigbook_user'
psql -c 'ALTER DATABASE ourbigbook_cli OWNER TO ourbigbook_user'
to where you want to break in the code, and then run:
npm run testi -- -g 'p with id before'
where i in testi stands for inspect from node inspect. Also consider the alias:
npmtgi() ( npm run testi -- -g "$*" )
Note however that this does not work for tests that run the ourbigbook executable itself, since those spawn a separate process. TODO how to do it? Tried along:
tests that call the ourbigbook.convertJavaScript API directly. These tests are prefixed with lib:
These tests don't actually create files in the filesystem, and just mock the filesystem instead with a dictionary.
Database access is not mocked however, we just use Sqlite's fantastic in-memory mode.
Whenever possible, these tests check their results just from the abstract syntax tree tree returned by the API, which is cleaner than parsing the HTML. But sometimes HTML parsing is inevitable.
can test functionality that is done outside of the ourbigbook.convert JavaScript API, notably stuff prevent in ourbigbook, so they are more end to end
don't do any mocking, and could therefore be more representative.
However, as of 2022, we have basically eliminated all the hard database access mocking and are using the main database methods directly.
So all that has to be mocked is basically stuff done in the ourbigbook executable itself.
This means that except for more specific options, the key functionality of ourbigbook, which is to convert multiple paths, can be done very well in a non executable test.
The only major difference is that instead of passing command line arguments like in ourbigbook . to convert multiple files in a directory, you have to use convert_before and convert_before_norender and specify conversion order one by one.
This test robustness is new as of 2022, and many tests were previously written with executable that would now also work as unit tests, and we generally want that to be the case to make the tests go faster.
work by creating an actual physical filesystem under _out/test/<normalized-test-title> with the OurBigBook files and other files like ourbigbook.json, and then running the executable on that directory.
npm test first deletes the _out/test directory before running the tests. After running, the generated files are kept so you can inspect them to help debug any issues.
all these tests check their results by parsing the HTML and searching for elements, since here we don't have access to the abstract syntax tree. It wouldn't be impossible to obtain it however, as it is likely already JSON serializable.
dist/ contains fully embedded packaged versions that work on browsers as per common JavaScript package naming convention. All the following files are generated with Webpack with:
dist/ourbigbook.js: OurBigBook JavaScript API converter for browser usage. The source entry point for it is located at index.js. Contains the code of every single dependency used from node_modules used by index.js. This is notably used for the live-preview of a browser editor with preview.
dist/ourbigbook_runtime.js: similar dist/ourbigbook.js, but contains the converted output of ourbigbook_runtime.js. You should include this in every OurBigBook HTML output.
dist/ourbigbook.css: minimized CSS needed to view OurBigBook output as intended. Embeds all OurBigBook CSS dependencies, notably the KaTeX CSS without which mathematics displays as garbage. The Sass entry point for it is: ourbigbook.scss.
dist/editor_css.css: the CSS of the editor, rendered from editor.scss.
To develop these files, you absolutely want to use:
npm run webpack-dev
This runs Webpack in development mode, which has two huge advantages:
almost instantaneous compilation, as opposed to the unbearable 5 seconds+ of an optimized build
A conversion follows the following steps done for each file to be converted:
tokenizer. Reads the input and converts it to a linear list of tokens.
parser. Reads the list of tokens and converts it into an abstract syntax tree. Parse can be called multiple times recursively when doing things like.
ast post process pass 1.
An ast post process pass takes abstract syntax tree that comes out of a previous step, e.g. the original parser output, and modifies the it tree to achieve various different functionalities.
We may need iterate the tree multiple times to achieve all desired effects, at the time of writing it was done twice. Each iteration is called pass.
You can view snapshots of the tree after each pass with the --log option:
ourbigbook --log=ast-pp-simple input.bigb
This first pass basically does few but very wide reacing operations that will determine what data we will have to fetch from the database during the followng DB queries step.
It might also do some operations that are required for pass 2 but that don't necessarily fetch data, not sure anymore.
E.g. this is where the following functionality are implemented:
ast post process pass 3: this does some minimal tree hierarchy linking between parents and children. TODO could it be merged into 2? Feels likely
render, which converts our AST tree into a output string. This is run once for the toplevel, and once for every header of the document if -S, --split-headers are enabled. We need to do this because header renders are different from their toplevel counterparts, e.g. their first paragraph has id p-1 and not p-283. All of those renders are done from the same parsed tree however, parsing happens only once.
TODO it is intended that it should not be possible for there to be rendering errors once the previous steps have concluded successfully. This is currently not the case for at least one known scenario however: internal links that are not defined.
Sub-steps include:
DB queries: this is the first thing we do during the rendering step.
Every single database query must be done at this point, in one go.
Database queries are only done while rendering, never when parsing. The database is nothing but a cache for source file state, and this separation means that we can always cache input source state into the database during parsing without relying on the database itself, and thus preventing any circular dependencies from parsing to parsing.[ref]
Keeping all queries together is fundamental for performance reasons, especially of browser editor with preview in the OurBigBook Web: imagine doing 100 scattered server queries:
SELECT * from Ids WHERE id = '0'
SELECT * from Ids WHERE id = '1'
...
SELECT * from Ids WHERE id = '100'
vs grouping them together:
SELECT * from Ids WHERE id IN ('0', '1', ..., '100')
It also has the benefit of allowing us to remove async/await from almost every single function in the code, which considerably slows down the CPU-bound execution path.
As an added bonus, it also allows us to clearly see the impact of database queries when using --log perf.
We call this joining up of small queries into big ones "query bundling".
at the every end of the conversion, we then save the database changes calculated during parsing and post processing back to the DB so that the conversion of other files will pick them up.
Just like for the SELECT, we do a single large INSERT/UPDATE query per database to reduce the round trips.
Conversion of a directory with multiple input files works as follows:
Ideally, failure of any of the above checks should lead to the database not being updated with new values, but that is not the case as of writing.
do one conversion pass with render. To speed up conversion, we might at some point start storing a parsed JSON after the first conversion pass, and then just deserialize it and convert the deserialized output directly without re-parsing.
The two pass approach is required to resolve internal links
The implementation of much of the functionality of OurBigBook involves manipulating the abstract syntax tree.
The structure of the AST is as follows:
AstNode: contains a map from argument names to the values of each argument, which are of type AstArgument
AstArgument: contains a list of AstNode. These are generally just joined up on the output, one after the other.
One important exception to this are plaintext nodes. These nodes contain just raw strings instead of a list of arguments. They are usually the leaf nodes.
We can easily observe the AST of an input document by using the --log following log options:
CREATE TABLE IF NOT EXISTS 'ids' (
id TEXT PRIMARY KEY,
path TEXT,
ast_json TEXT
);
CREATE TABLE IF NOT EXISTS 'includes' (
from_id TEXT,
from_path TEXT,
to_id TEXT,
type TINYINT
);
CREATE INDEX includes_from_path
ON includes(from_path);
CREATE INDEX includes_from_id_type
ON includes(from_id, type);
CREATE TABLE IF NOT EXISTS 'files' (
path TEXT PRIMARY KEY,
toplevel_id TEXT UNIQUE
);
CREATE TABLE `Files` (`id` INTEGER PRIMARY KEY AUTOINCREMENT, `path` TEXT NOT NULL UNIQUE, `toplevel_id` TEXT UNIQUE);
CREATE TABLE sqlite_sequence(name,seq);
CREATE INDEX `files_path` ON `Files` (`path`);
CREATE INDEX `files_toplevel_id` ON `Files` (`toplevel_id`);
CREATE TABLE `Ids` (`id` INTEGER PRIMARY KEY AUTOINCREMENT, `idid` TEXT NOT NULL UNIQUE, `path` TEXT NOT NULL, `ast_json` TEXT NOT NULL);
CREATE INDEX `ids_path` ON `Ids` (`path`);
CREATE TABLE `Refs` (`id` INTEGER PRIMARY KEY AUTOINCREMENT, `from_id` TEXT NOT NULL, `from_path` TEXT NOT NULL, `to_id` TEXT NOT NULL, `type` TINYINT NOT NULL);
CREATE INDEX `refs_from_path` ON `Refs` (`from_path`);
CREATE INDEX `refs_from_id_type` ON `Refs` (`from_id`, `type`);
CREATE INDEX `refs_to_id_type` ON `Refs` (`to_id`, `type`);
The question is: is it because we added async Everywhere, or is it because of changes in the database queries?
Before the first time you release, make sure that you can login to NPM with:
npm login
This prompts you to login via the browser with 2FA. Currently you can also tick a box to not ask again for the next 5 minutes, which should be enough for the following release command. If you don't select this option, you will be prompted midway through the release command for login.
After publishing, a good minimal sanity check is to ensure that you can render the template as mentioned in play with the template:
cd ~
# Get rid of the global npm link development version just to make sure it is not being used.
npm uninstall -g ourbigbook
git clone https://github.com/ourbigbook/template
cd template
npm install
npx ourbigbook .
firefox _out/html/index.html
This is done so that the extension always includes the latest version of the ourbigbook package.
This is not ideal as we would like for the extension to use the ourbigbook package version specified on each project's package.json.
However that is not easy to achieve, because in some cases we need to refactor ourbigbook to allow for a new extension feature, creating incompatibilities.
So for now, we ignore the problem and take the "easy to get started" approach of "always ship ourbigbook with the extension".
If changes are made only to the extension, it is also possible to release a new version of the extension alone with release-vscode:
It was created to keep blobs out of this repository.
Some blobs were unfortunately added to this repository earlier on, but when we saw that we would need more and more, we made the sane call and forked that out.
OurBigBook Admins can select one article from any user to be pinned to the website's "front index pages" such as the global article, topics or user indexes.
The typical use case of this feature is to facilitate user onboarding, and it could also be used for general server announcemnets.
It is a shame that you can't easily drag and drop move/resize images on the web UI, which has led us to do that manually on the in the source images.
But still, relatively easy to use, and easy to setup a marketplace in.
Another downside is that it does not seem possible to edit existing designs, so it is a bit hard to know exactly what you had done when it is time to update things.
Very slightly too straight on shoulders, but not bad. The front color is a bit off/too white-ish, but not terrible.
This is a picture from version one, which did not have the project slogan. Version one is no longer available for sale, only the new one with the slogan.
Good quality, but the material is slightly warmer than I'd like, I tend to prefer slightly fluffier ones.
This is a picture from version one, which did not have the project slogan. Version one is no longer available for sale, only the new one with the slogan.
It was slighty concerning if the hoodie would cover the URL or not, but it does not do often in practice.
. This SVG is our original sticker design for laptops.
www.redbubble.com/people/OurBigBook/shop (case insensitive) has a marketplace mechanism 6.64 pound/unit for the 21cm size, which is quite expensive. It is unclear how much they pay the creator.
TODO: the following links are currently restricted because it is a new account:
They said would be unrestricted in five business days, but it was still not true after one month.
It appears that you have to upload five designs for anything to be publicly available... Contacted them and they confirmed that there is no workaround for that. That service is a bit crap. Have to find a new one later on.
Their delivery is a bit slow, 7 business days in theory, but took at least 21 in reality. They must be streched thin.
The product quality was good when it finally arrived though.
stickerapp.co.uk/ does not seem to have a marketplace, 2 pounds/unit on an 11 unit order, so much cheaper. But why would we need 11 is the question. Just going with the marketplace for now.
Two sticker widths: 5 inch (12.7 cm) or 7.5 inch (19 cm). Also does t-shirts and hoodies. Design not showing on newly created shop page after several refreshes.
This is a version of logo.svg with a transparent background instead of the hardcoded black background.
It was useful e.g. for t-shirt merch, where the t-shirt background choices were not perfectly black, and the black square would be visible (and possibly glossy) otherwise, which would not be nice.
. This version of the logo was useful when designing project T-shirts on tshirtstudio.com. On that website, you can't easily resize images with drag and drop, so:
leaving some extra margin at the top would make the text more likely visible considering the hoodie
leaving some extra margin around allows us to make the image a bit less huge and imposing
This is the same as logo-transparent-with-text-and-slogan-2000.png but with a 150 px border added to the top to ensure that the tshirtstudio.com hoodie hood won't hide the URL.
It was created with:
convert logo-transparent-with-text-and-slogan-2000.png -gravity north -background transparent -splice 0x150 logo-transparent-with-text-and-slogan-2000-2150.png
Some rationale:
the lowercase b followed by uppercase B gives the idea of big and small
the small o looks a bit like a degree symbol, which feels sciency. It also contributes to the idea of small to big: o is smallest, b a bit larger, and B actually big
keep the same clear on black feeling as the default CSS output
yellow, green and blue are the colors of Brazil, where Ciro Santilli was born!
It might be cool if we were able to come up with something that looks more like an actual book though instead of just using a boring lettermark.
A good point of the current design is that it suggests a certain simplicity. We want the explanations of our website to be simple and accessible to all.
In addition to the pictorial logo, we have also created a few textual logos which might be useful.
We first designed them as a way to take up upper left chest square space nicely on tshirtstudio.com T-shirts, as a long one line version of ourbigbook.com would be too small and unreadable.
The main idea of the text logo is to make a letter square with uppercase monospace font letters:
OUR
BIG
BOOK
.COM
Could make the OBB red and other letters white. But that does come a bit closer to our dreaded ÖBB name competitor.
. This was made by scaling down a version of the 3x4.svg logo. We had to add some extra space between lines before however, otherwise it would feel too cramped after scaling.
Initial project banner showing the OurBigBook Web topics feature. Not very subtle, but will do as a placeholder.
The downside of this is that much of its bottom left is hidden by the profile picture on websites such as Twitter and LinkedIn.
The banner is also a bit narrow for certain websites, and either looks rescaled, or is outright not allowd with editing, e.g. YouTube requires a minium width of 1024, with 2048 recommended.
YouTube is also extremelly picky and hard to make the banner look right as it reserves mandatory huge height for TV displays! The best approach we can find is to make the image huge and fill in black with:
convert banner-topics-signed-in-800.png -background black -gravity center -extent 2000x1000 tmp.png
and then drag the image selection so that the desktop view covers the area we care about.
desktop recording area size: 720x720. This could perhaps be optimized, but this is a reasonable size that works both as an YouTube Short and Twitter post.
Previously we had been using 700x700, but at some point YouTube appears to have stopped generating 720p resolution for those, and 480p is just too bad.
We've been happily using vokoscreenNG.
A good technique is to move the recording window to the lower left bottom of the screen, which stops things from floating around too much.
use Chromium/Chrome to record
resize window to fit recording area horizontally by using the Ctrl + Shift + C debugger view. Make sure to also resize the browser window vertically (cannot be done on debugger, needs resizing actual window) otherwise you won't be able to scroll if the page is not taller than the viewport.
be careful about single pixel black border lines straying in the recording area, they are mega visible against the clear chrome browser bar on the finished output!
music style guidelines: cool, beats, techno, mysterious, upbeat
Some of the videos contain non-fully free YouTube music added via the YouTube UI. Reupload together with the video files appears however allowed. Ideally we should use fully CC BY-SA music, but it is quite hard to find good ones. NC is not acceptable.
hardcode subtitles in the video. No voice. Previously we were using Aegisub to create the subtitles in .ass format and ffmpeg to hardcode:
22pt white font with black background to improve readability
aim to have 3/4 lines of subtitle maximum per frame
When recording, make sure that all key mouse action happens on the top half of the viewport, otherwise it will get covered by the subtitles in downstream editing.
on YouTube, add the video as the first video of the "Videos" playlist: www.youtube.com/playlist?list=PLshTOzrBHLkZlpvTuBdphKLWwU7xBV6VF This list is needed because otherwise YouTube's stupid "Shorts" features produces two separate timelines by default, one for shorts and one for non-shorts. With this list, all videos can be seen easily as non-shorts.
The OurBigBook Project has sporadically offered a fellowship called the "OurBigBook.com Fellowship". Its recipients are called the "OurBigBook.com Fellows".
The goal of the fellowship is to pay brilliant students to focus exclusively on pursuing ambitious goals in STEM research and education for a pre-determined length of time, without having to worry about earning money in the short term.
The fellowship is both excellency and need based, focusing on brilliant students from developing countries whose families were not financially able to support them.
Being brilliant, such students would be tempted and able to go for less ambitious jobs that pay them the short term. The goal of the fellowship is to free such students to instead pursue more ambitious, longer term goals.
The fellowship is paid as a single monetary transfer to the recipient.
There are no legally binding terms to the fellowship: we pick good people and trust them to do what they think is best.
The fellowship is more accurately simply a donation. There is no contract. Whatever happens, the OurBigBook Project will never able to take legal action against a recipient for not "using well" their donation.
The following ethical guidelines are however highly encouraged:
to acknowledge the funding where appropriate, e.g.:
at "funding slide" (usually the last one) of a presentation for work done during, or that you feel is a direct consequence of the fellowship
by marking yourself as a "OurBigBook.com Fellow" on LinkedIn, under the organization: www.linkedin.com/company/ourbigbook for the period of award
keep in touch. Let us know about any large successes (or failures!) you've have as the consequence of the funding, e.g. publications, starting a cool new job, or deciding to quit academia.
give back culture: if one day, in a potentially far and undefined future, recipients achieve a stable financial situation with some money to spare, they are encouraged to give back to the OurBigBook.com Fellowship fund an amount at least equal to their funding.
This enables us to keep sustainably investing in new brilliant talent who needs the money.
We are more than happy to take the consider the fellow's suggestion for a recipient of their choice.
Remember that an investment in the American stock market doubles every 10 years. So if you do go into a money making area, can you as a "person investment", match, or even beat the market? :-) Or conversely, the sooner you give back, the less you are morally required to give back.
Fellows who go on to work on charitable causes, which includes the incredibly underpaid academics jobs, absolutely don't have to give back.
If you are able to give back by doing a corresponding amount of good to the world all the better.
It is you that have to look into your heart and decide: how much free or underpaid work have I done? And then if there is some money left after this consideration, you give that amount back.
pivoting is OK. If you decide half way that your initial project plan is crap, change! We can only notice that something won't work once we try to do it for real. At least now you know!
If you do pivot to something that makes money immediately however, the correct thing to do is to return any unused funds of the fellowship. The sooner you pay, the lesser your moral dividend obligation, right?
be bold. Don't ever think "I'll take this safer option because it will allow me to pay back earlier".
The entire goal of the scholarship is to allow smart people to take greater risks. If you took the risk, e.g. made a startup instead of going to a safer job, failed, and that made you make less money than you would have otherwise, no problem, deduce that cost from the value you can return in the future, and move on.
But if you take a bet and it pays big time, do remember us ;-)
We also encourage fellows to take good care of their health, and strive for a good work/life balance. Exercise. Eat well. Rest. Don't work when you're tired. Take time off if when you are stressed. Keep in touch with good friends and family. Talk to someone if you feel down. Taking good care of yourself pays back with great dividends in the long run. Invest in it.
This section lists current and past OurBigBook.com Fellows. It is a requirement of the fellowship that fellows should be publicly listed here.
Publicly known updates on related to their fellowship projects may also be added here where appropriate, notably successes! But we also embrace failure. All must know that failure is a possibility, and does happen. If you can't fail, you're not dreaming big enough. Failing is not bad, it is inevitable.
2022-12: Letícia Maria Paz De Lima is awarded 10,000 Brazilian Real (~1,929 USD) to help her:
Focus on her quantum computing studies and research until 2023-06-30 (end of her third year), with the future intention of pursuing a PhD abroad in that area.
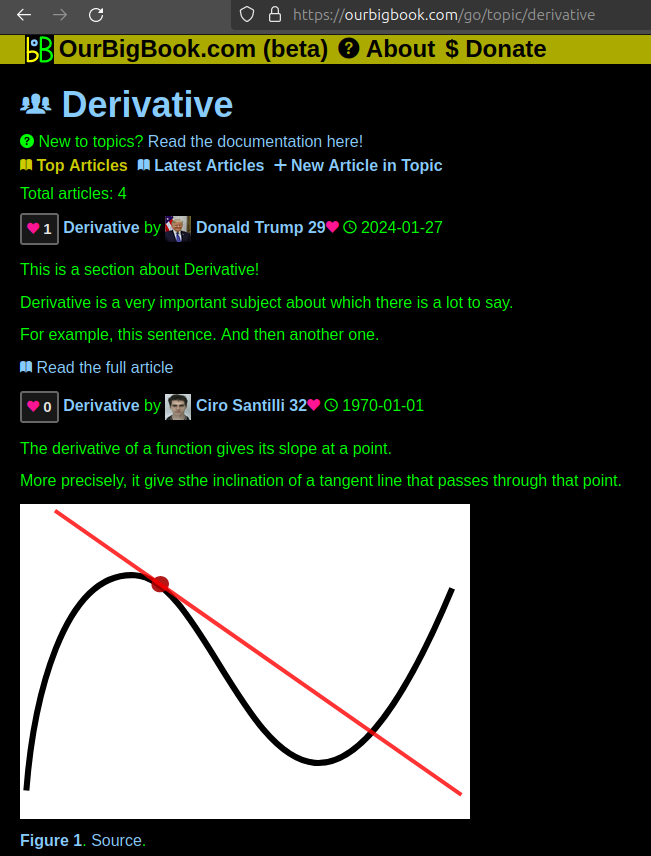

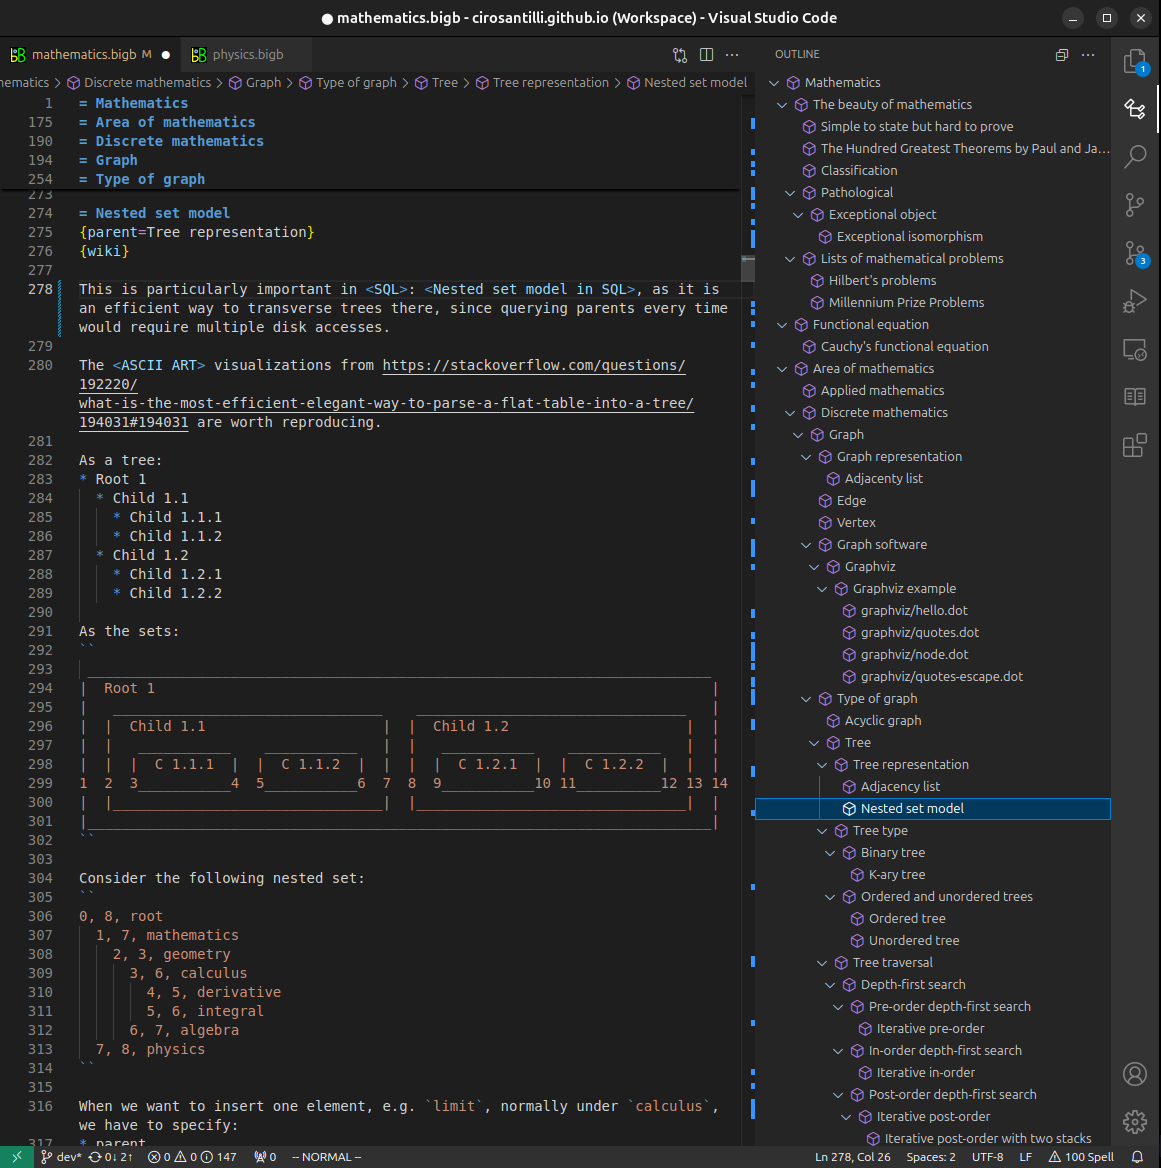
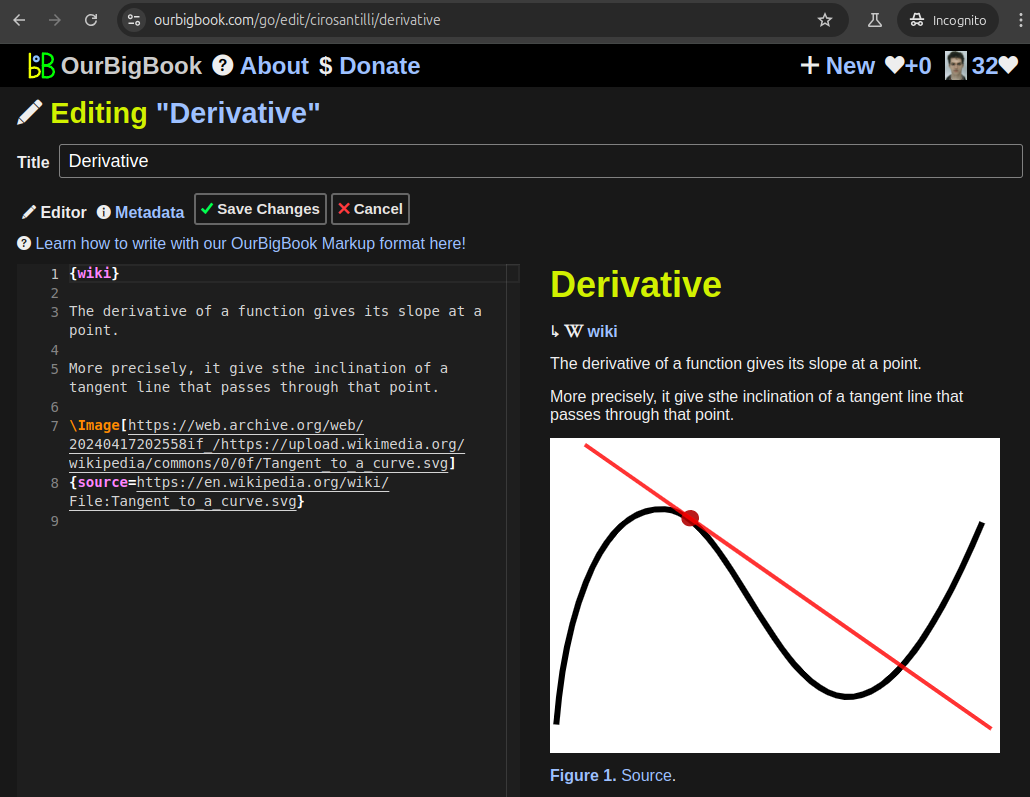

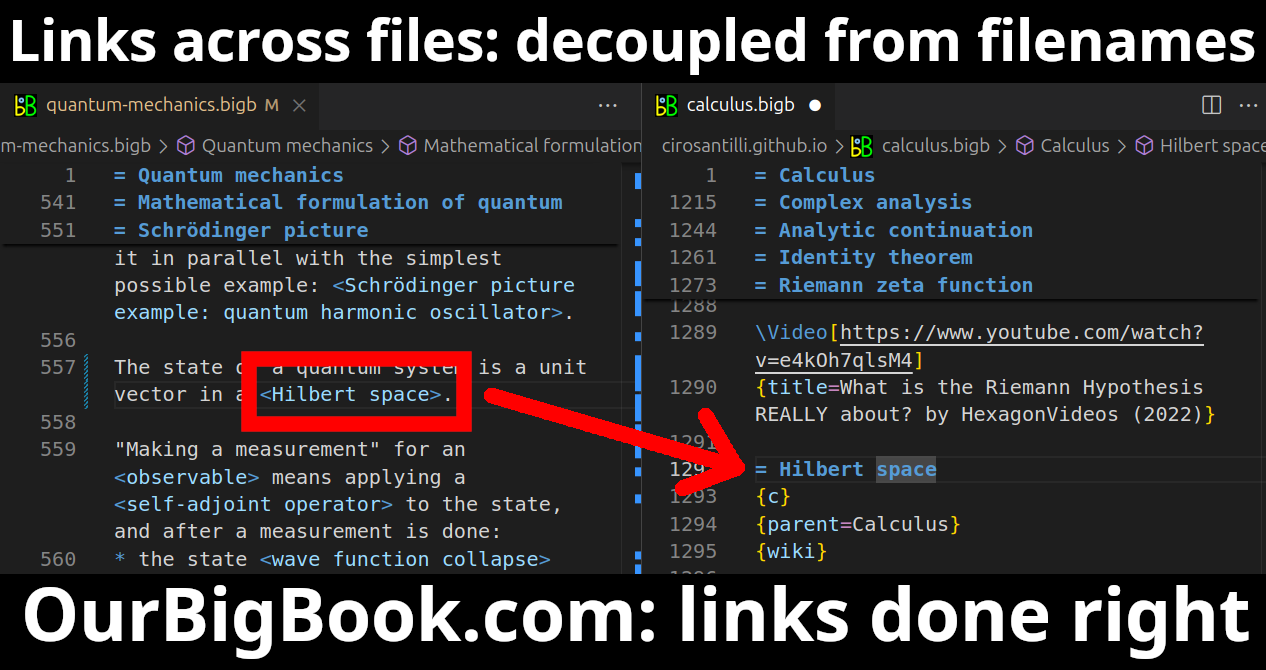
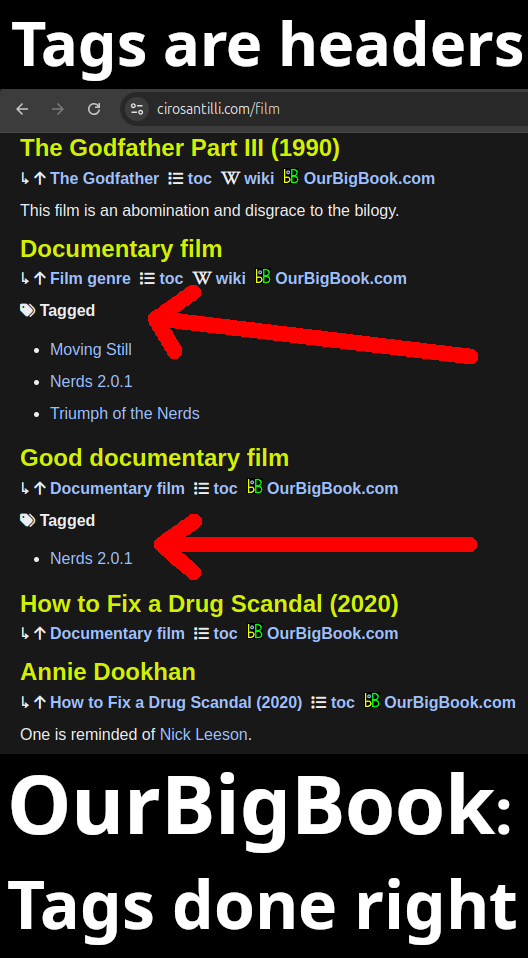
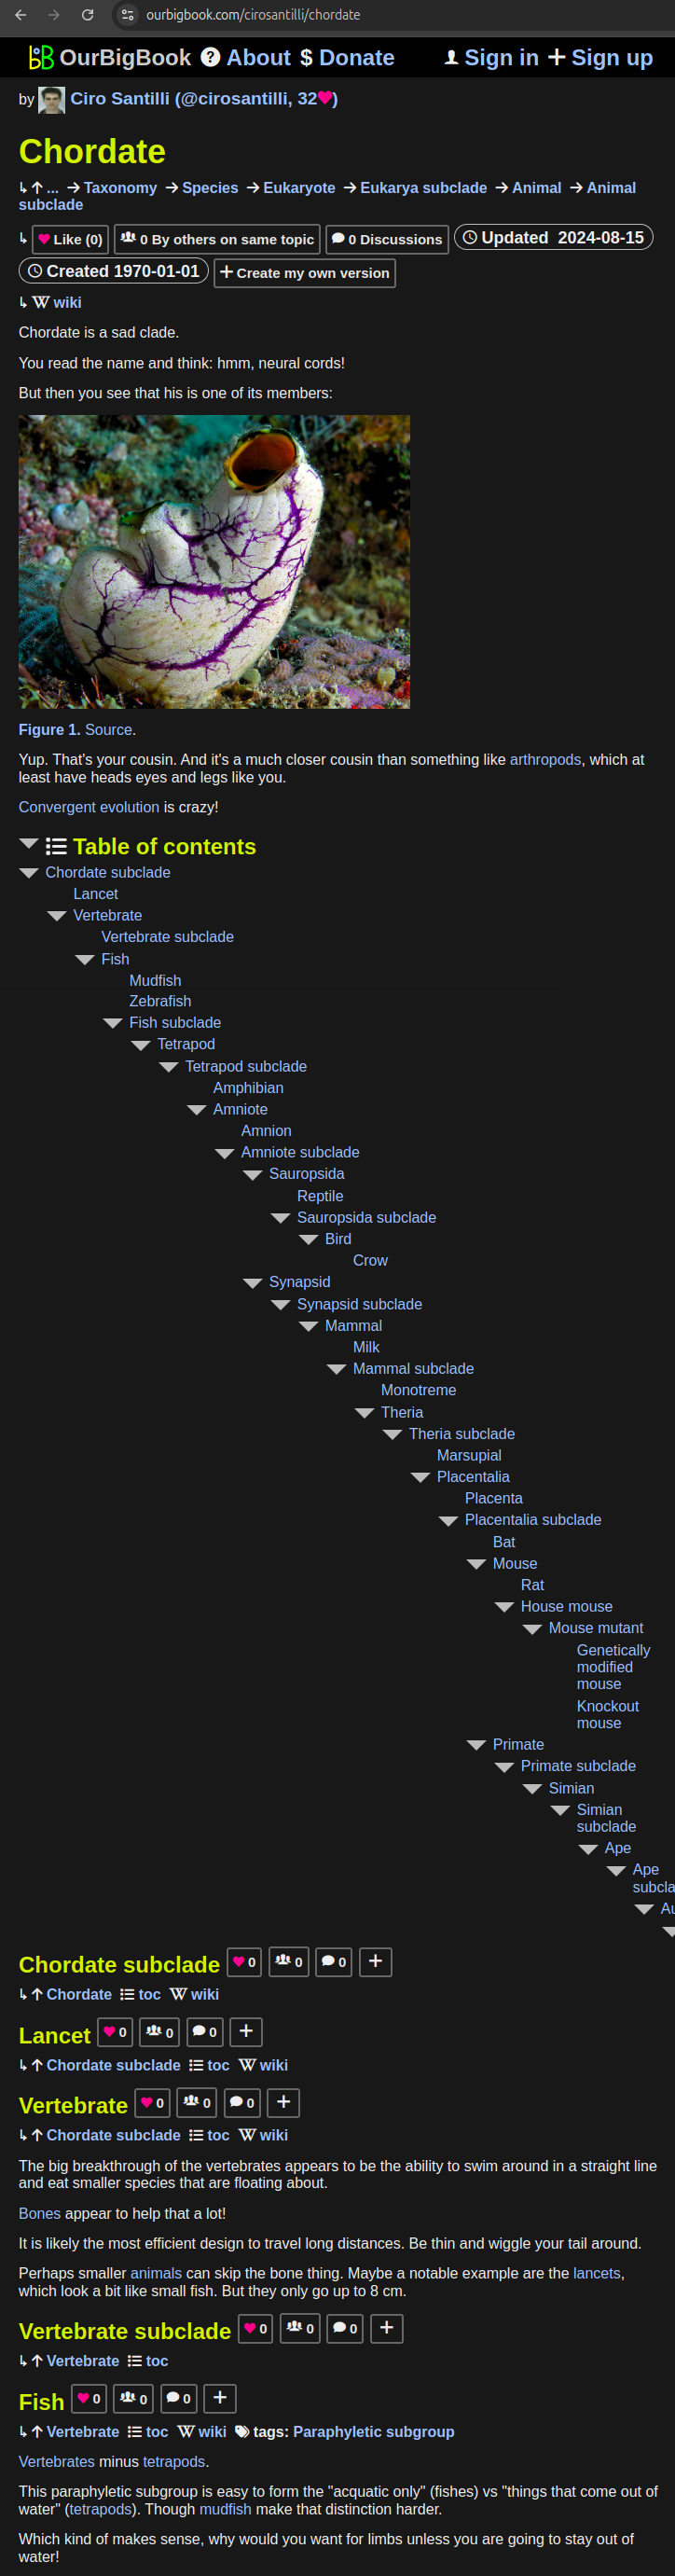
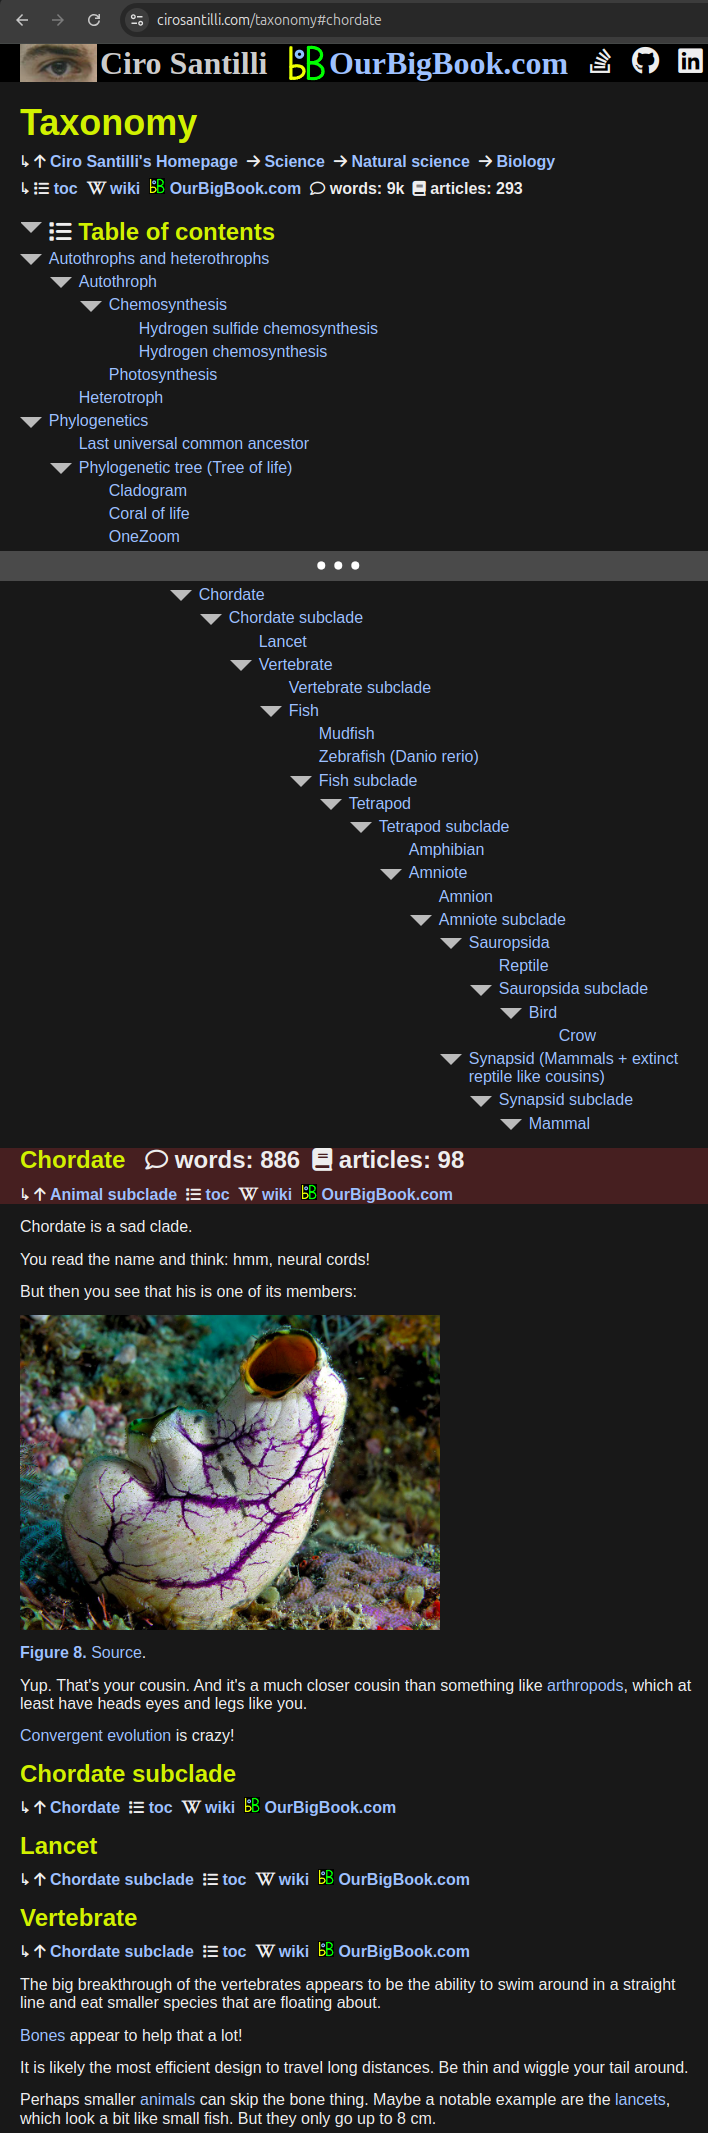
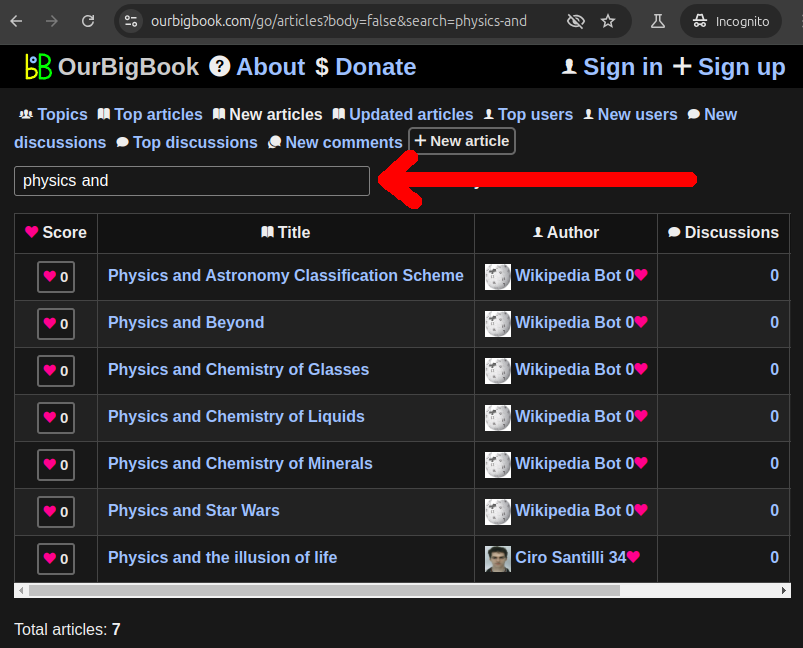
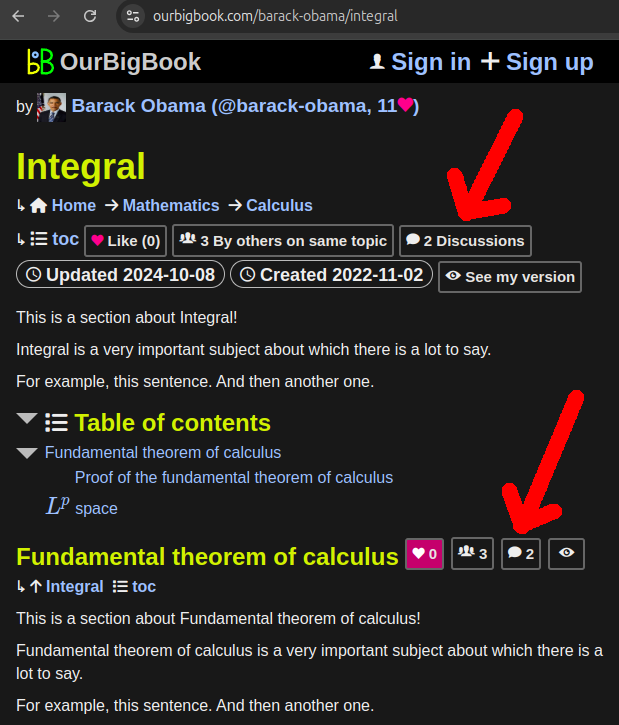

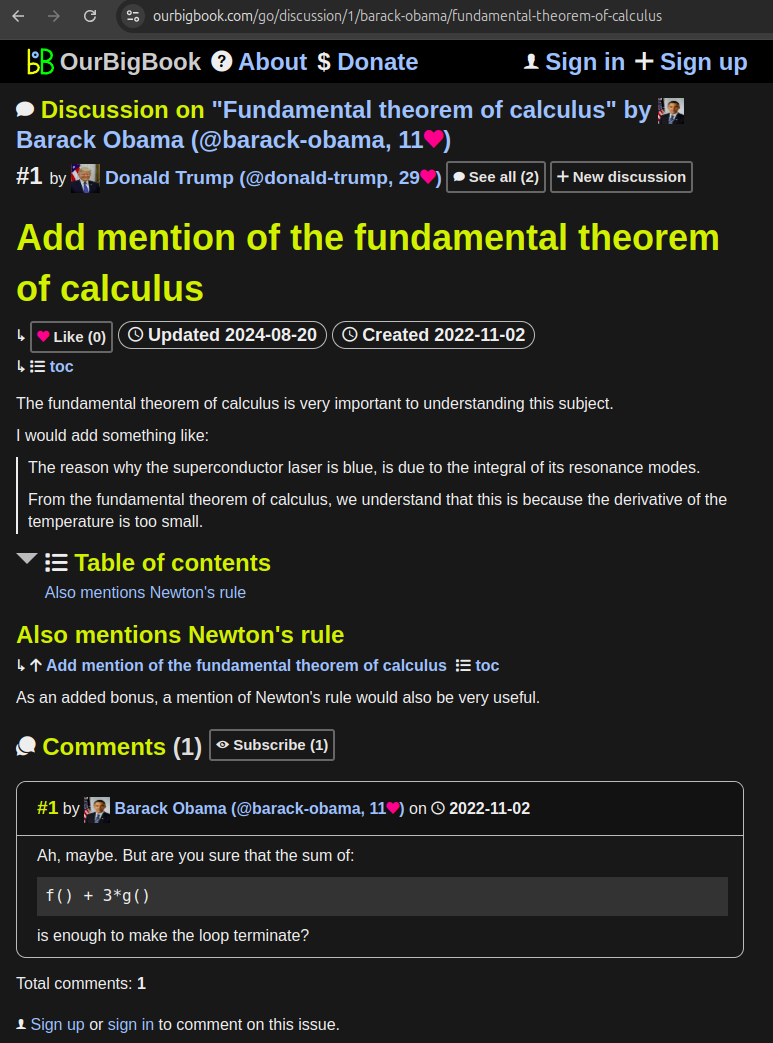

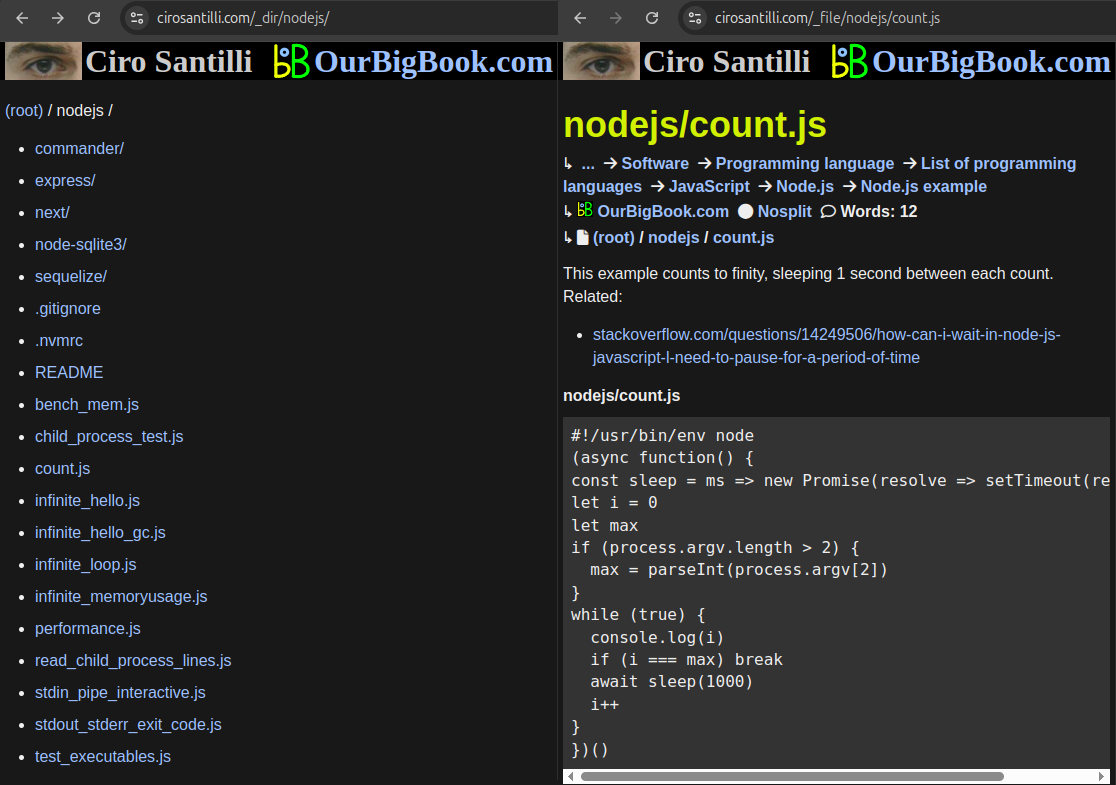
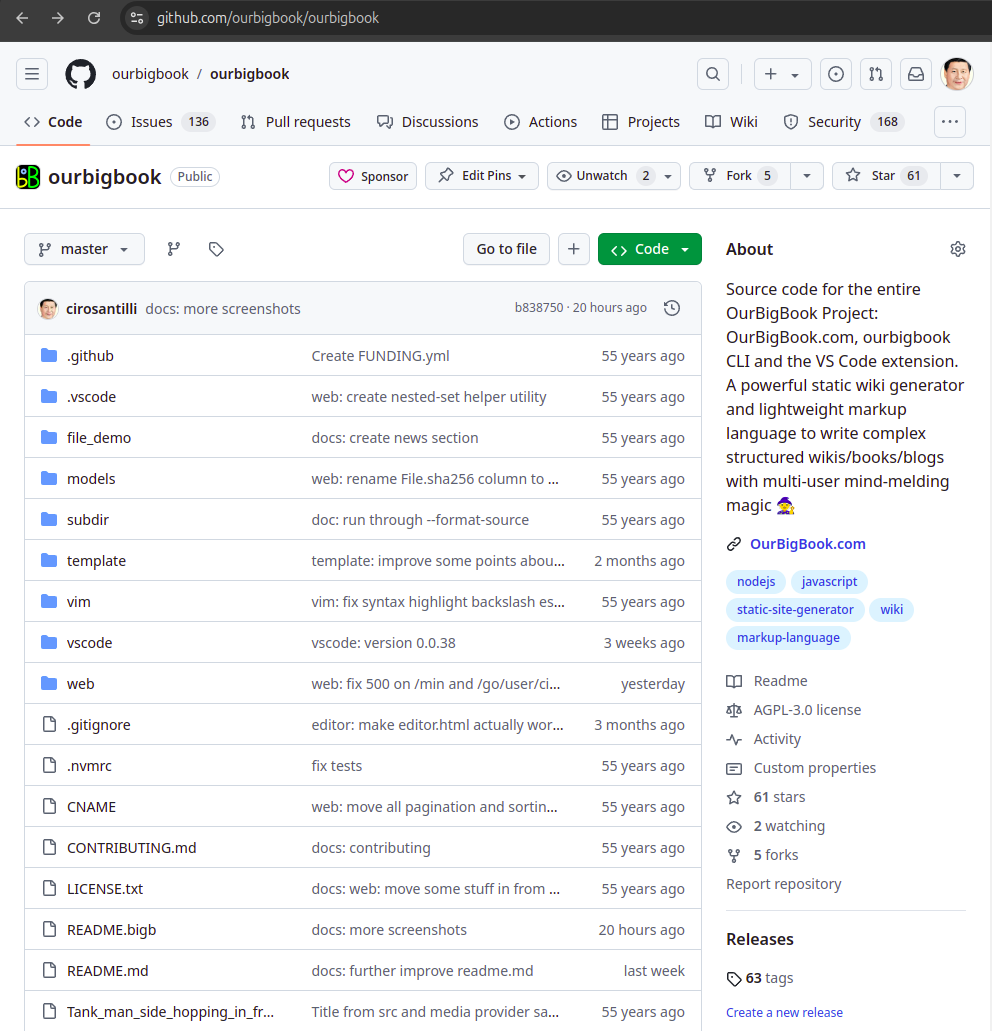


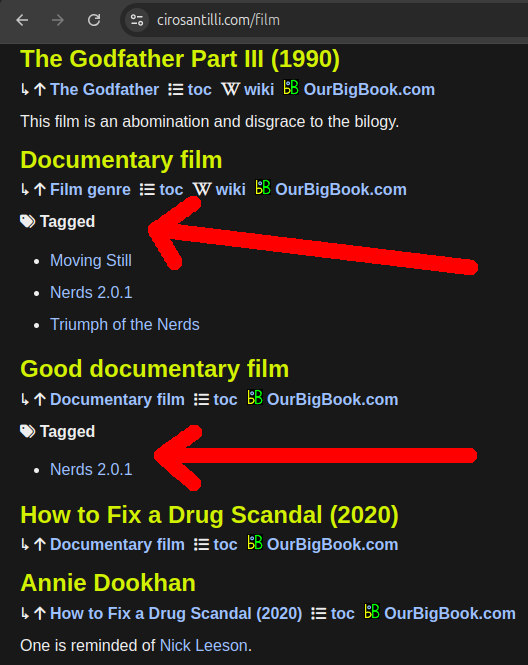


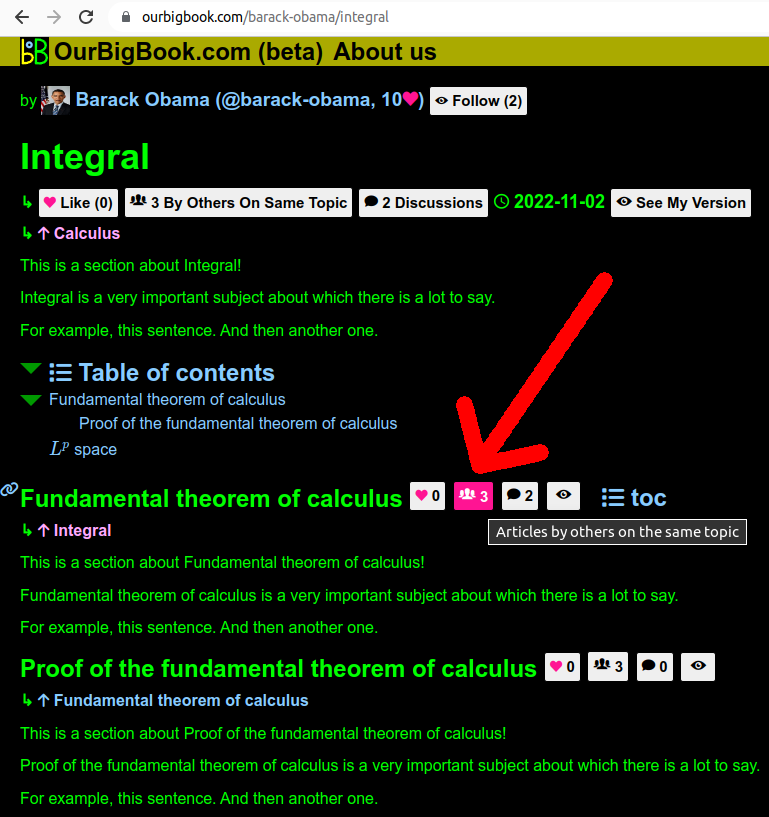

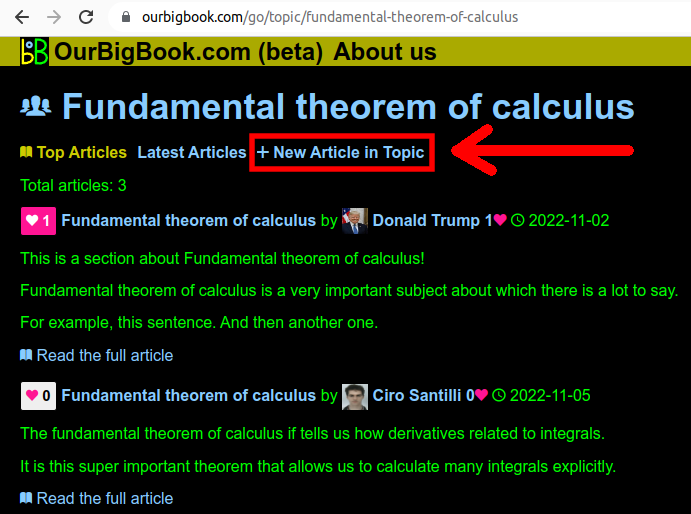

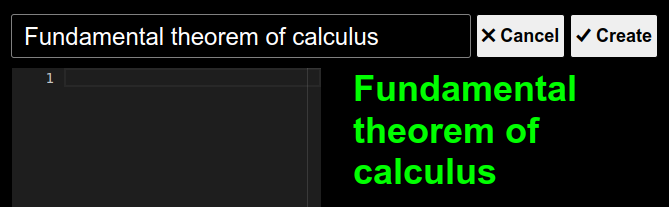
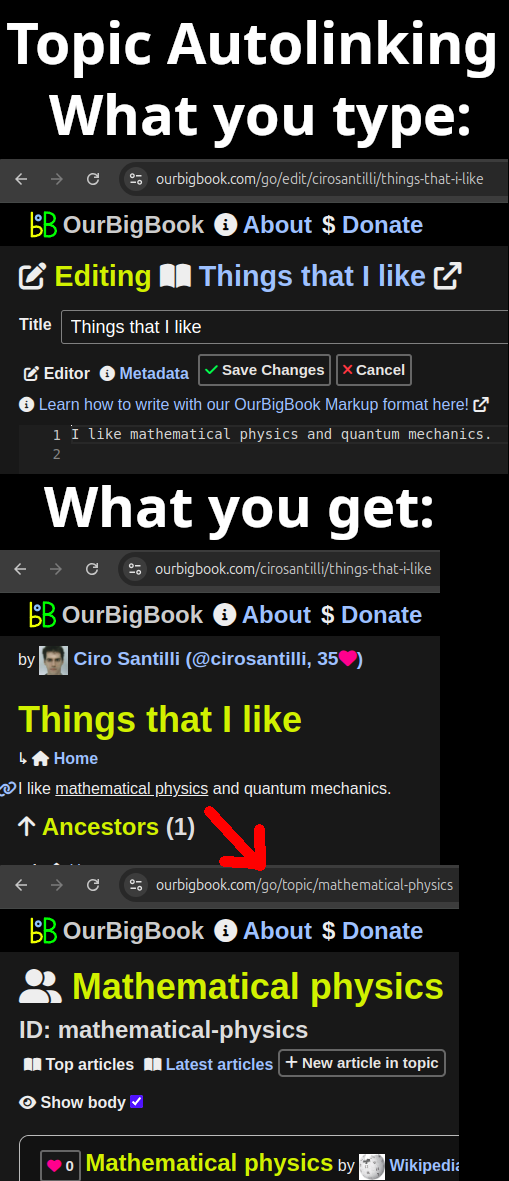